Getting Started
InfluMedia is a comprehensive platform designed to connect service providers and users seamlessly, facilitating a range of digital marketing services, social media advertisements, and more. This user-friendly app empowers service providers to offer a diverse array of services while managing their business operations efficiently. Users can explore, book, and pay for these services with ease, and benefit from transparent communication and support throughout their journey.
With InfluMedia, service providers can create detailed service listings, including descriptions, categories, and pricing. They can also track orders, update statuses, and manage customer interactions through an integrated chat feature. The app ensures secure transactions with online payment options and offers a support system for issue resolution via ticketing.
Users benefit from the ability to review service providers upon job completion, helping to maintain high-quality standards. They can also view provider profiles, including social media accounts, to gauge the provider’s popularity and reputation before making a decision
InfluMedia - Admin Panel
- Uploaded Date: 23-August-2024
- Project: InfluMedia
- Author: Acnoo
- Email: acnooteam@gmail.com
Thank you for purchasing our product. If you have any questions that are beyond the scope of this documentation file, please feel free to email us via our user page contact form or directly to email at acnooteam@gmail.com
Requirements
- PHP >= 8.2
- Ctype PHP Extension
- cURL PHP Extension
- DOM PHP Extension
- Fileinfo PHP Extension
- Filter PHP Extension
- Hash PHP Extension
- Mbstring PHP Extension
- OpenSSL PHP Extension
- PCRE PHP Extension
- PDO PHP Extension
- Session PHP Extension
- Tokenizer PHP Extension
- XML PHP Extension
For more information about deployment see the Laravel documentation here https://laravel.com/docs/10.x/deployment
Download Project from Envato
After successfully purchase InfluMedia download the project from Envato download page
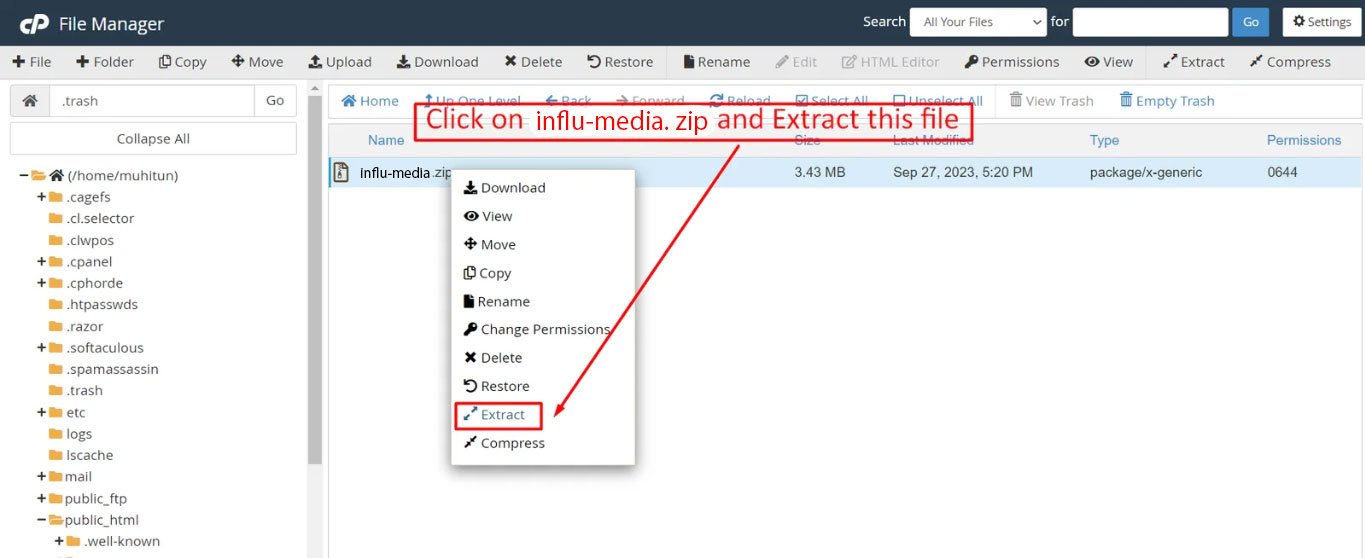
Extract the downloaded file. You will have another zip file named influ-media.zip containing the main project's files and a documentation folder. You are reading this documentation, that means you already have theme both.
Creating Database
Before installing, you will need to create a new database. If you already know how to do this or have already created one, skip to the next step.
Note: Please use empty database. In most cases you should be able to create a database from your cpanel.
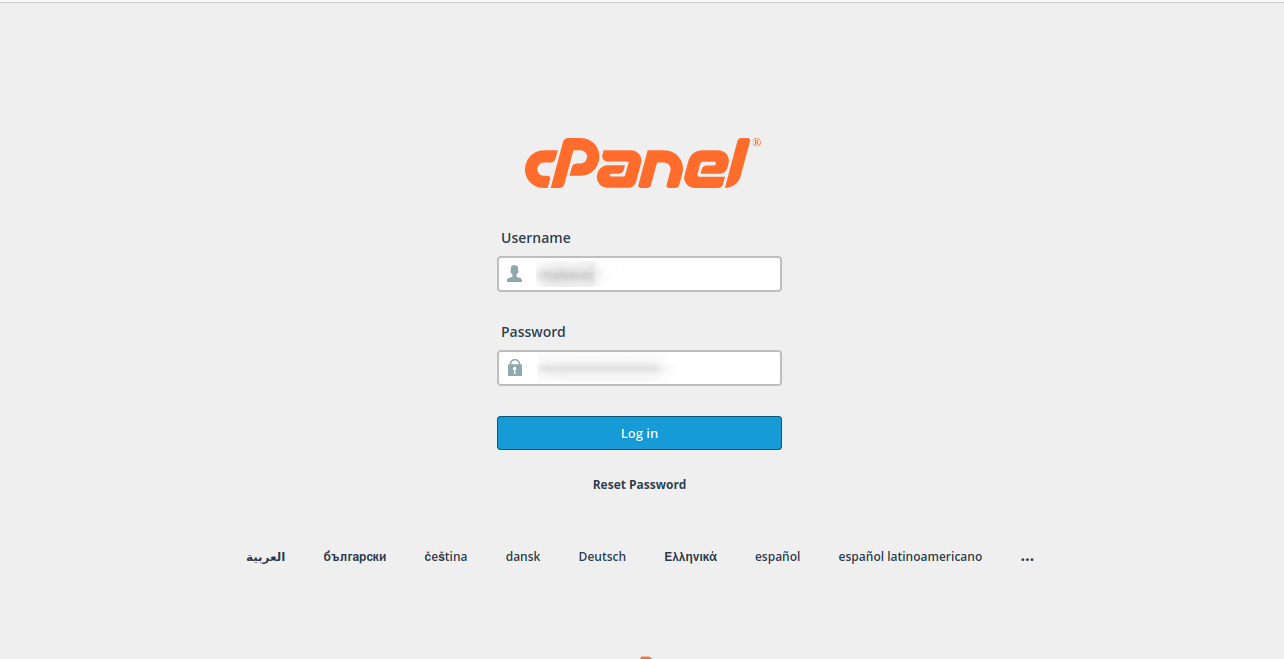
Login to your cPanel by entering this in your browser url
yourdomian.com/cpanel
Step: 1

Step: 2

Step: 3
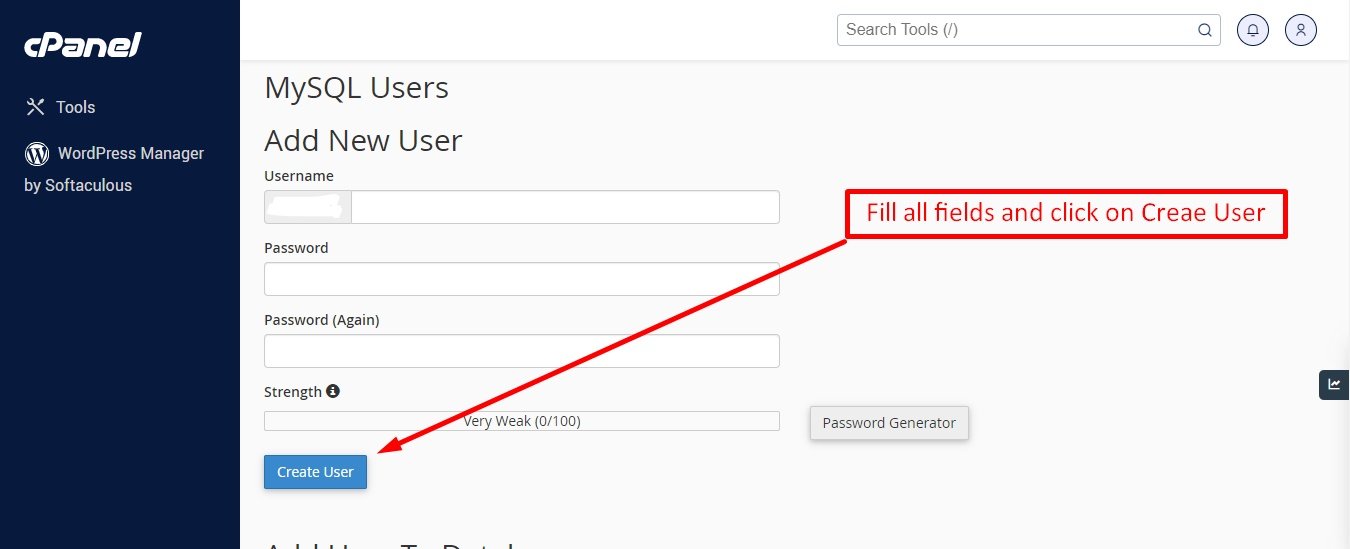
Now you need to create a new user. On the same page go to create a new database user
Step: 4
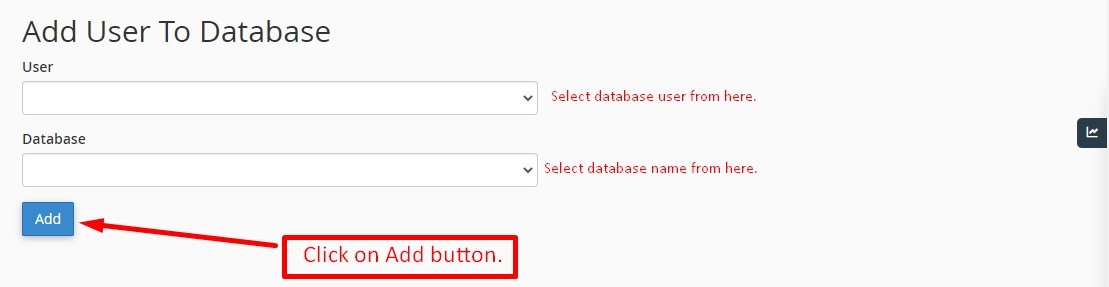
Now add the user to the database
Step: 5
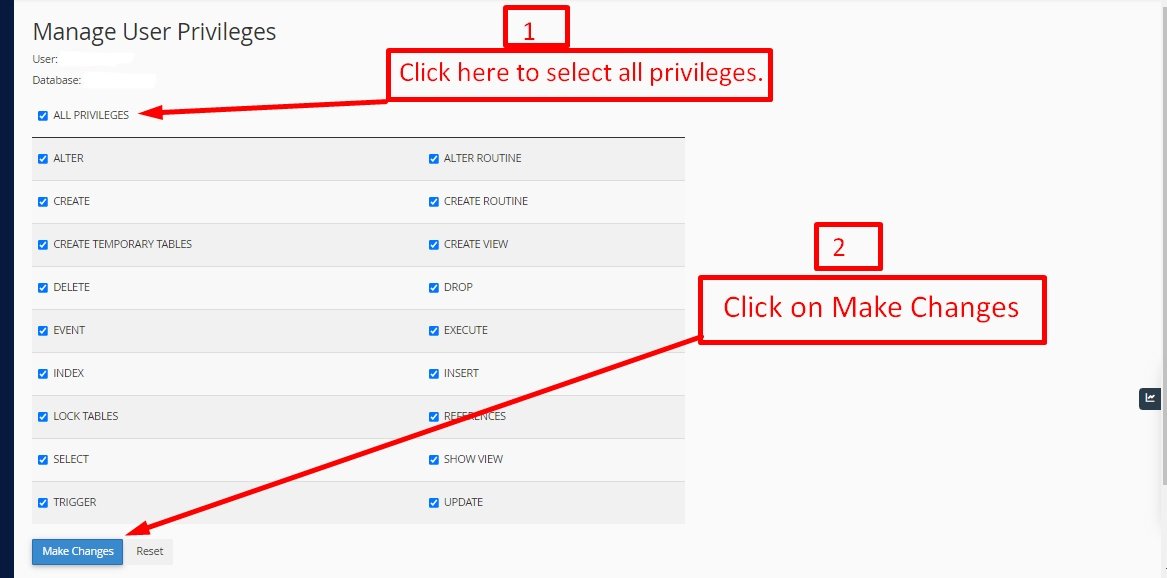
And select full permissions on the database to that user
Uploading Files
On some operating systems, the dotfiles are hidden by default. Before starting to upload the files, please make sure your file explorer has the option to view hidden files turned on.
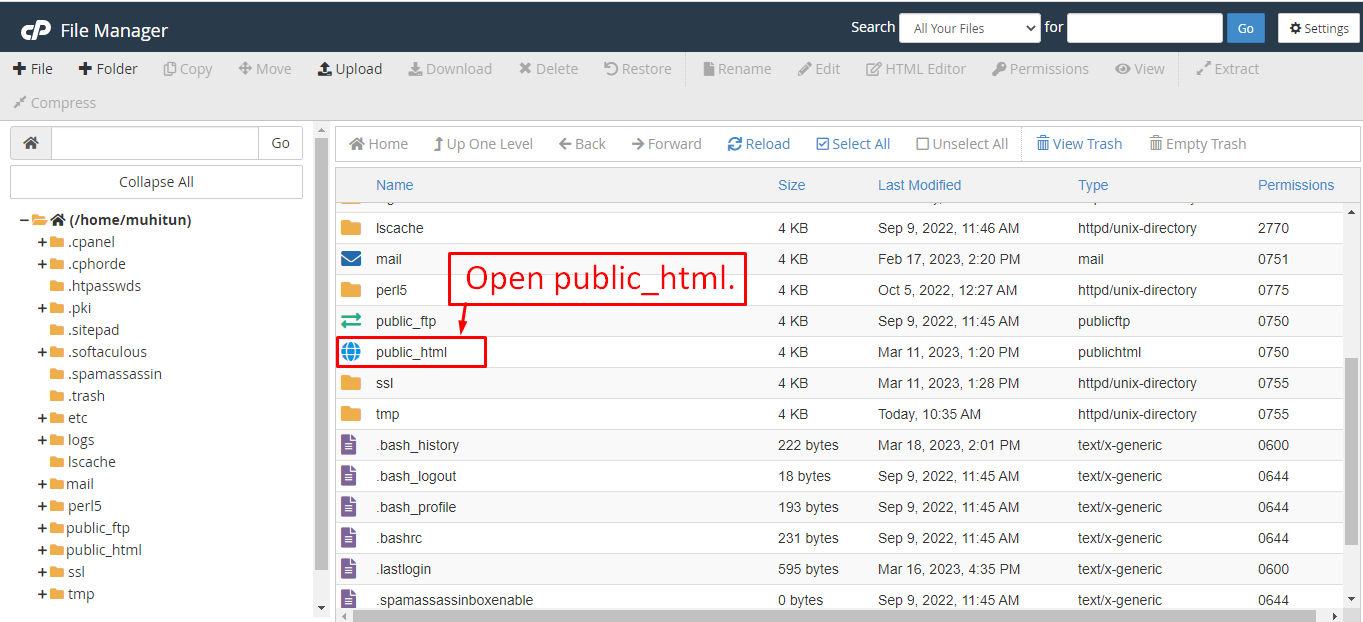
After creating a database, Upload the influ-media.zip file on the web root folder of your domain. This folder is generally called public_html, html, or example.com, but depending on your server's configuration, it might be named differently.
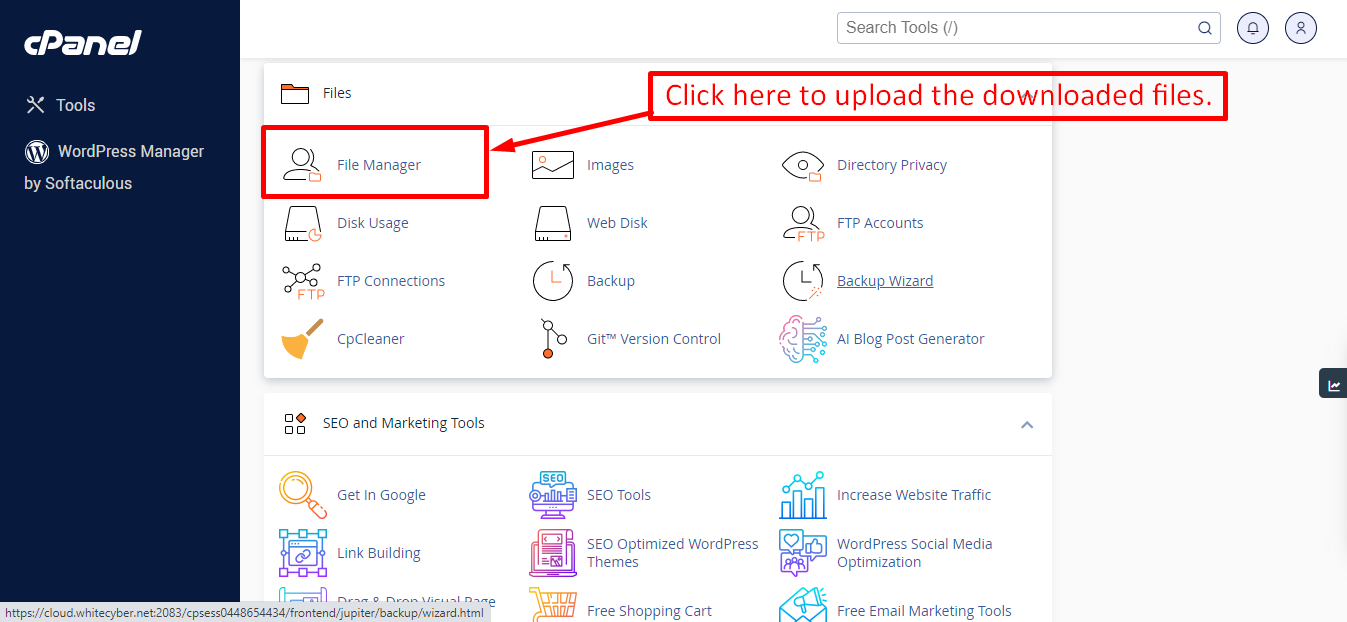
After that in the public_html directory upload the downloaded file.

Note: Important Make sure that you have .env file in your folder.
Note: Make sure that .htaccess file got copied properly from the download to your server.
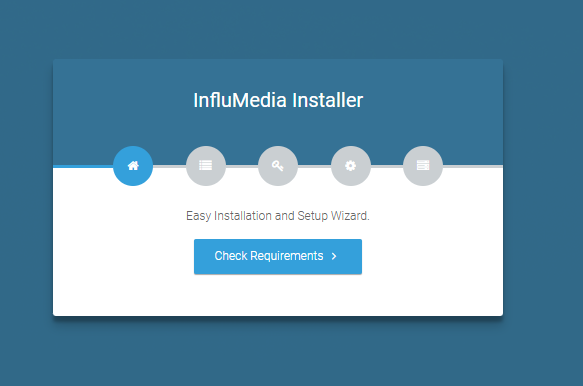
Installation Wizard
Go to your website address, then you'll see an installation wizard. To open the installer. Visit
yourdomain.com/install
Now the installer will show up.The First screen will be Welcome Screen
Note : If you are not able to access the website by accessing yourdomain.com/install, but you are able to access it via yourdomain.com/index.php/install, this means that you probably don't have Apache mod_rewrite installed and enabled.
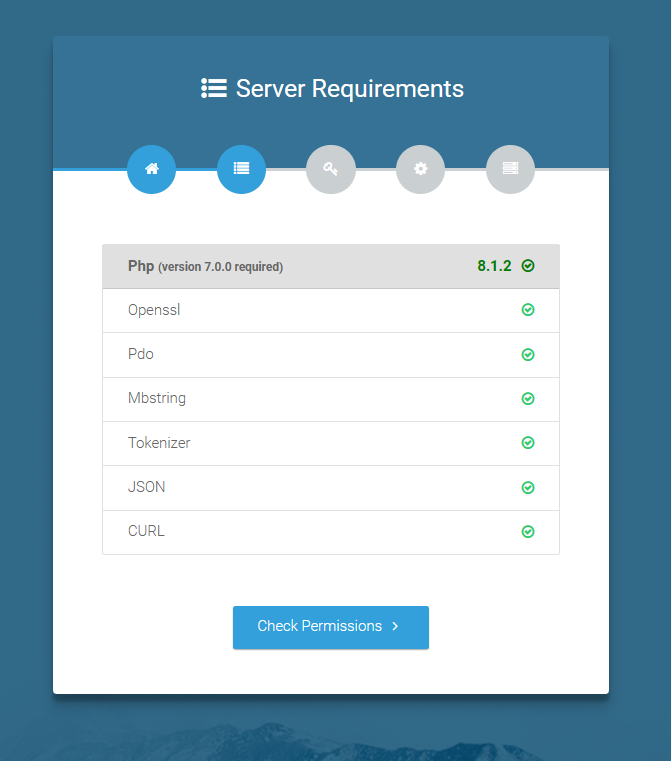
Server Requirements
After clicking on "Check requirement" button, you will be redirected to System Requirements step during the installation wizard, System Requirements.
Directory Permissions
After successfully enabling and installing all required PHP extensions, next step is to set the appropriate permissions for some system folders that shows on below picture.
For giving permissions please open your terminal window. and type command sudo
chmod
777 directory_name for example sudo chmod 777 app
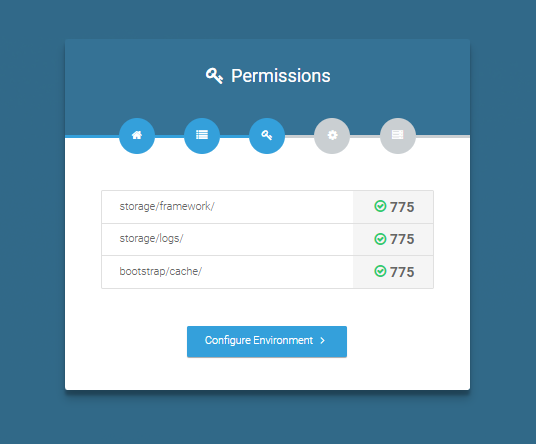
Note : If your control panel has no terminal window, then go to public_html or the directory where you have uploaded the project. now give permission for some system folders that show on Installer. For example, we have demonstrated storage/framework directory permission in the below image.
Open required directory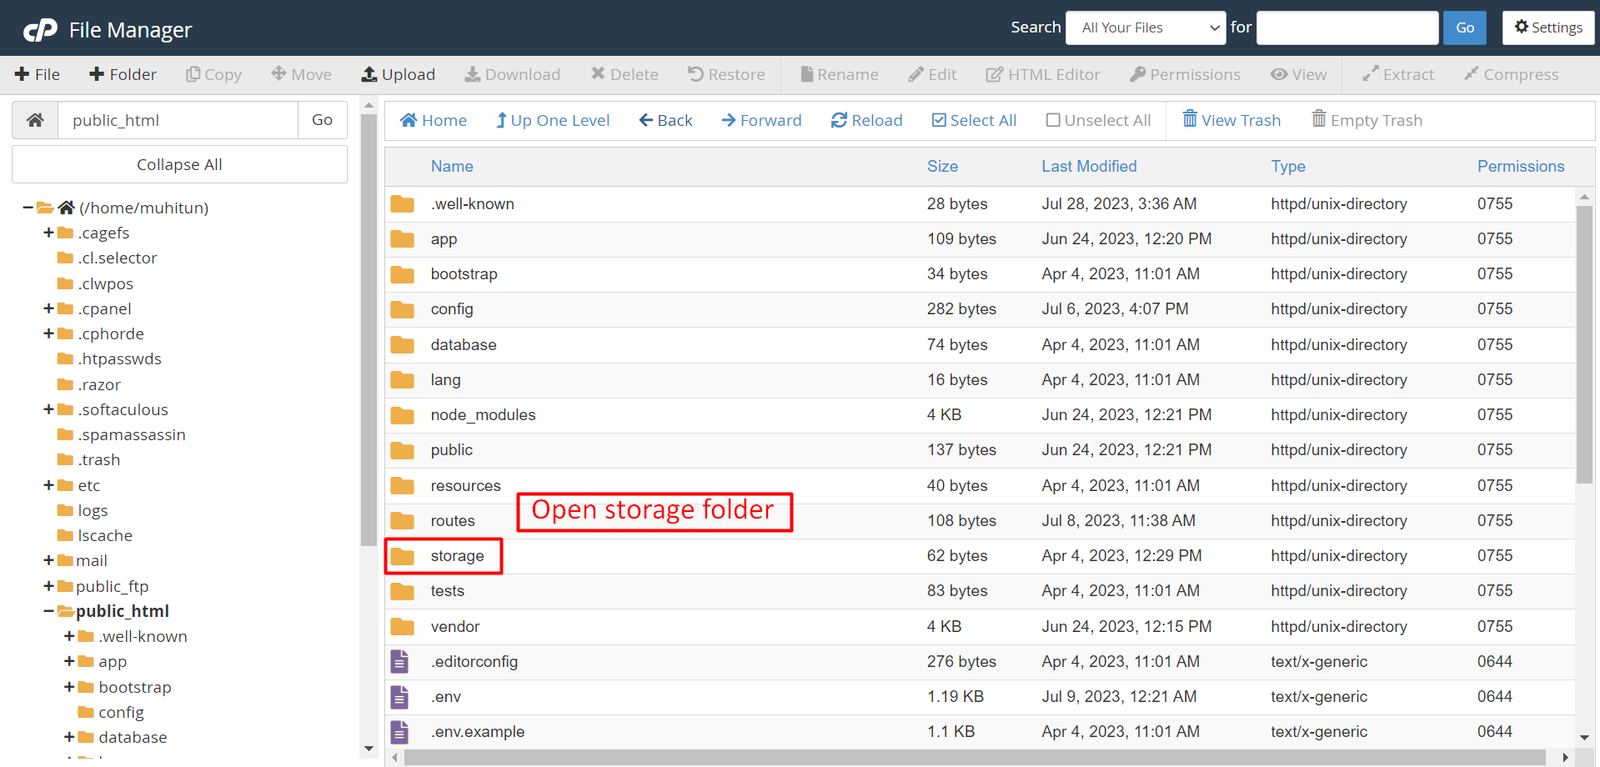 Change permissions for specific directory
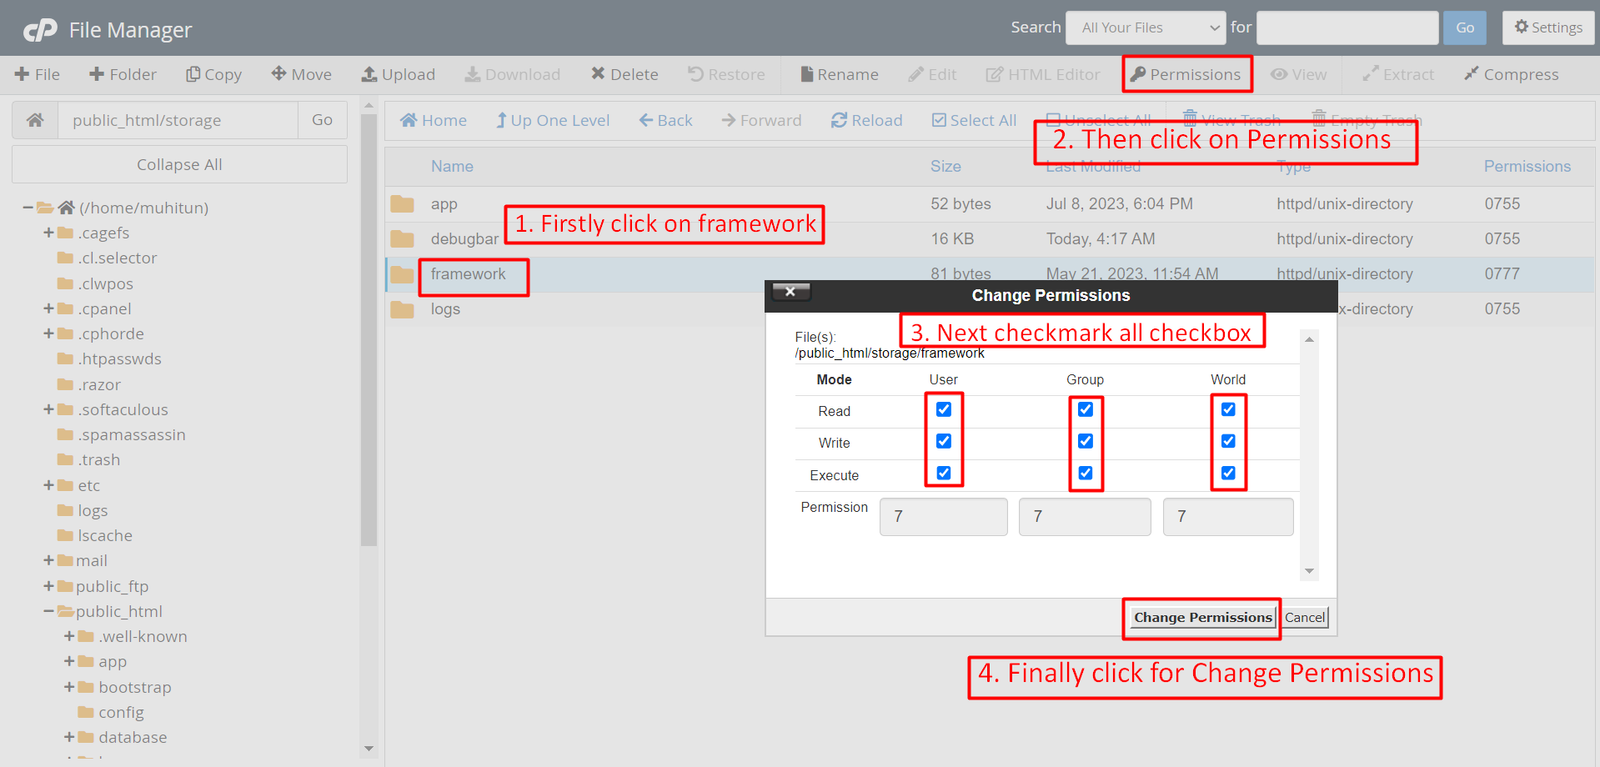
Note: You have to change the directory permissions for the storage/logs and bootstrap/cache folders as shown in the image. If these folders do not have the correct permissions, please adjust them accordingly.
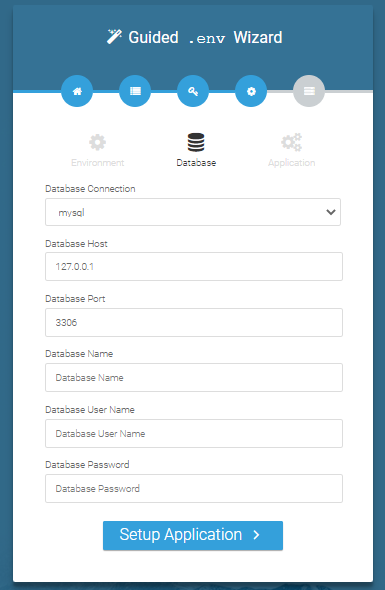
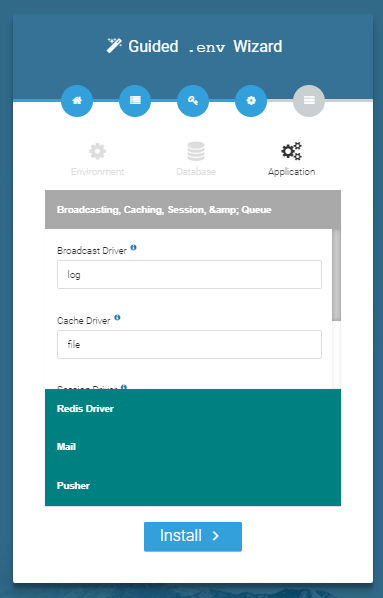
Database/Environment Setting
You have to fill in your database credentials

Exit
The last step is exit step.

Congratulations you have successfully installed this project on your server. 😀
Default Password
You can login using several methods depending on your role.
Super Admin
superadmin@superadmin.com
superadmin
Admin
admin@admin.com
admin
Manager
manager@manager.com
manager

In this project, different modules are assigned based on user roles: Super Admin, Admin, and Manager. Each role has distinct responsibilities tailored to their specific tasks and permissions. Below, we will discuss how each user role operates within the system.
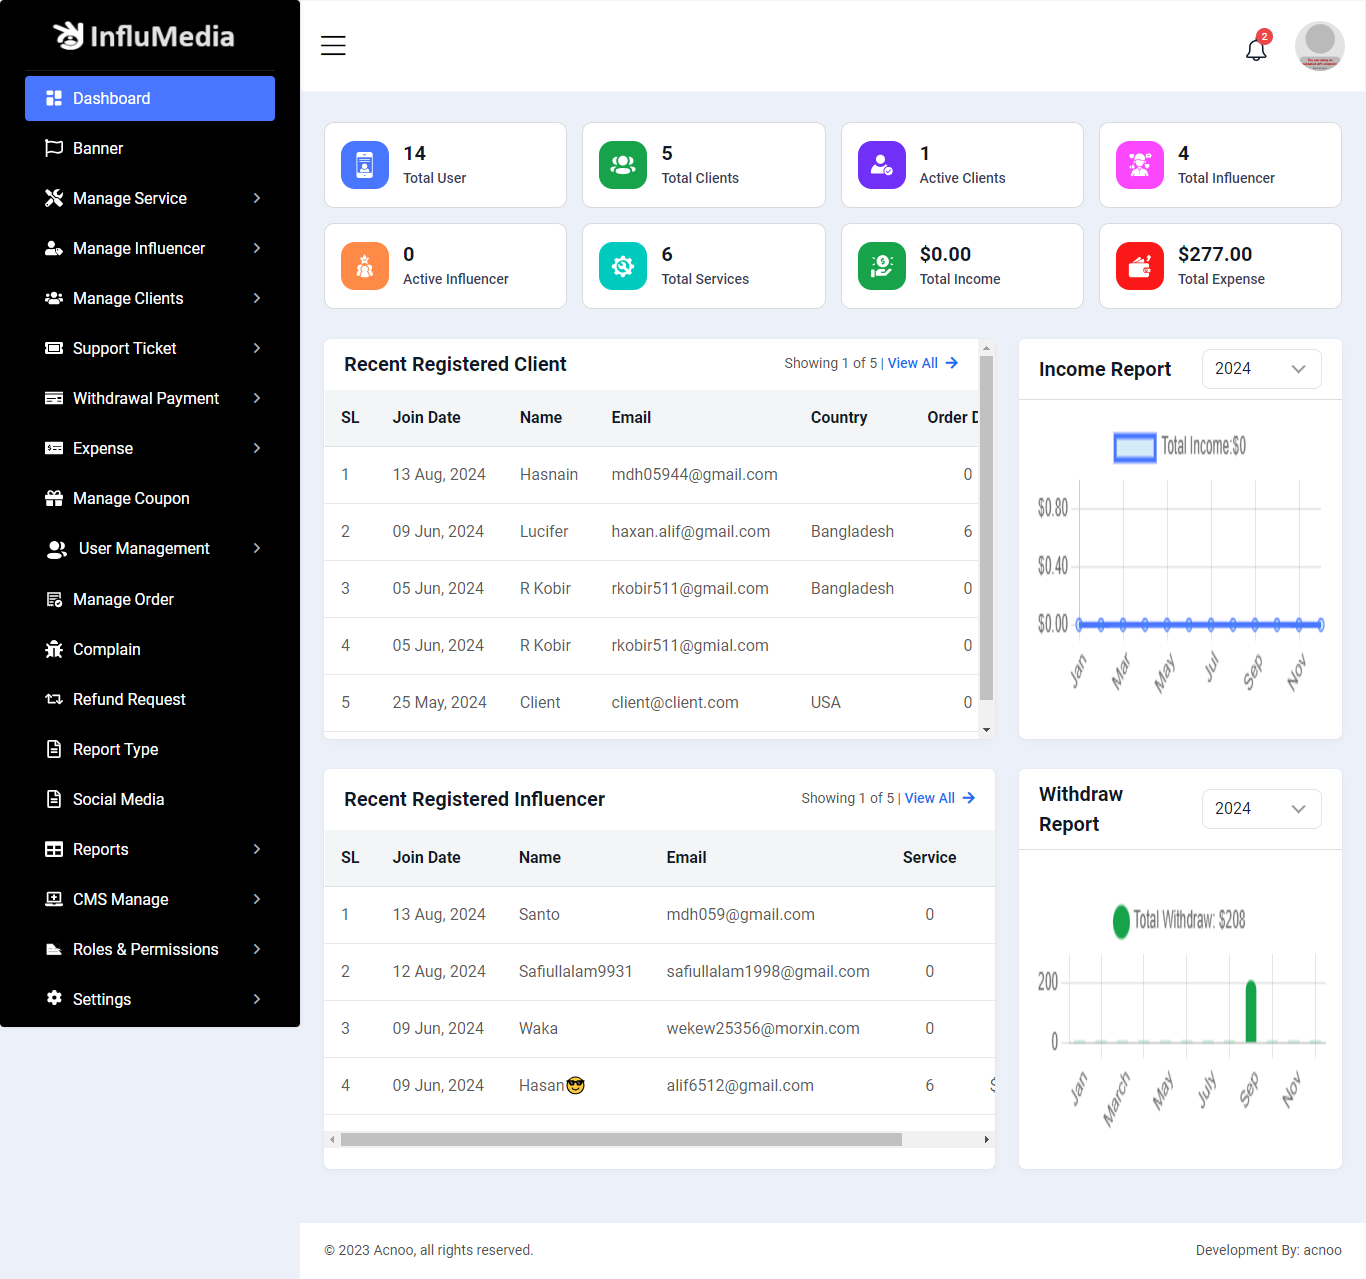
Dashboard
This is the admin dashboard page. The essential information regarding the project are displayed here.
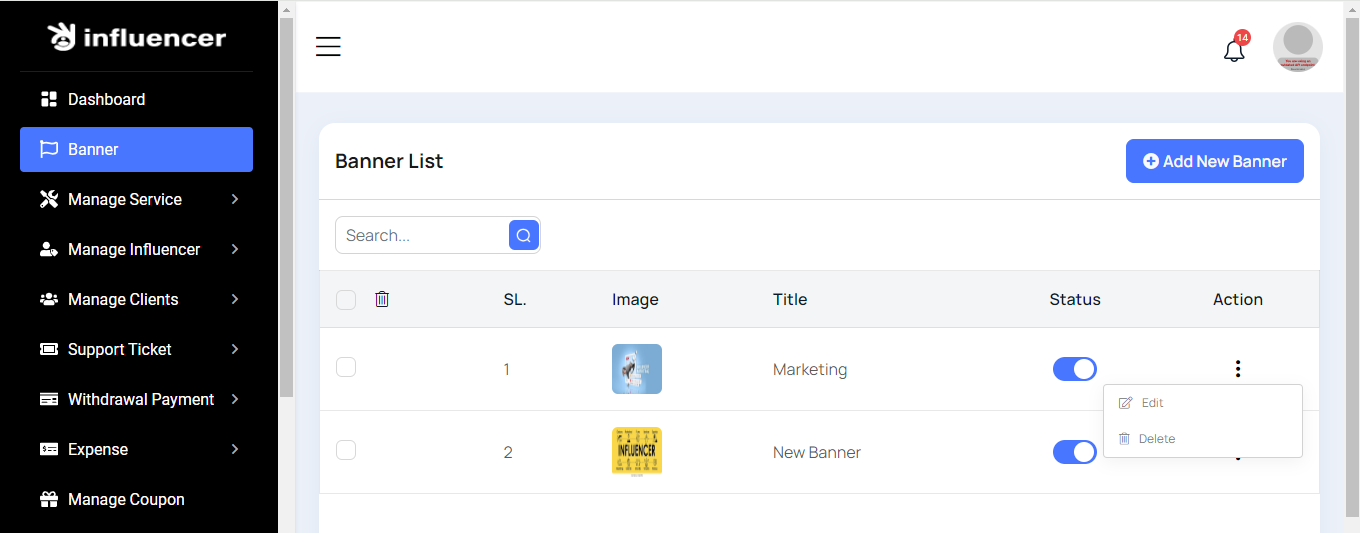
Banner List
This list displays the current banners along with their statuses, with options to filter data using the search function. You can also edit, delete, or use the multi-delete option for managing multiple banners at once.
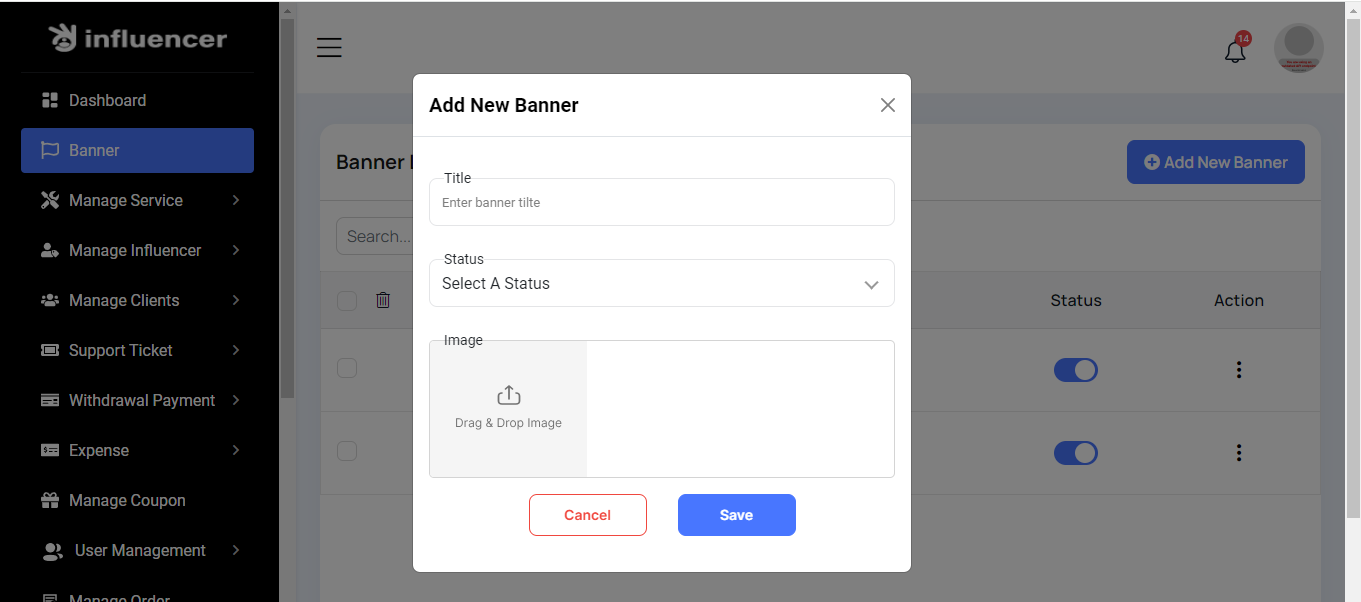
Create Banner
By clicking on the "Create Banner" button, you can create a new Banner. You will need to fill the necessary fields. Here is the screenshot of the create Banner page.
Manage Service
Here, we will discuss the services and categories.
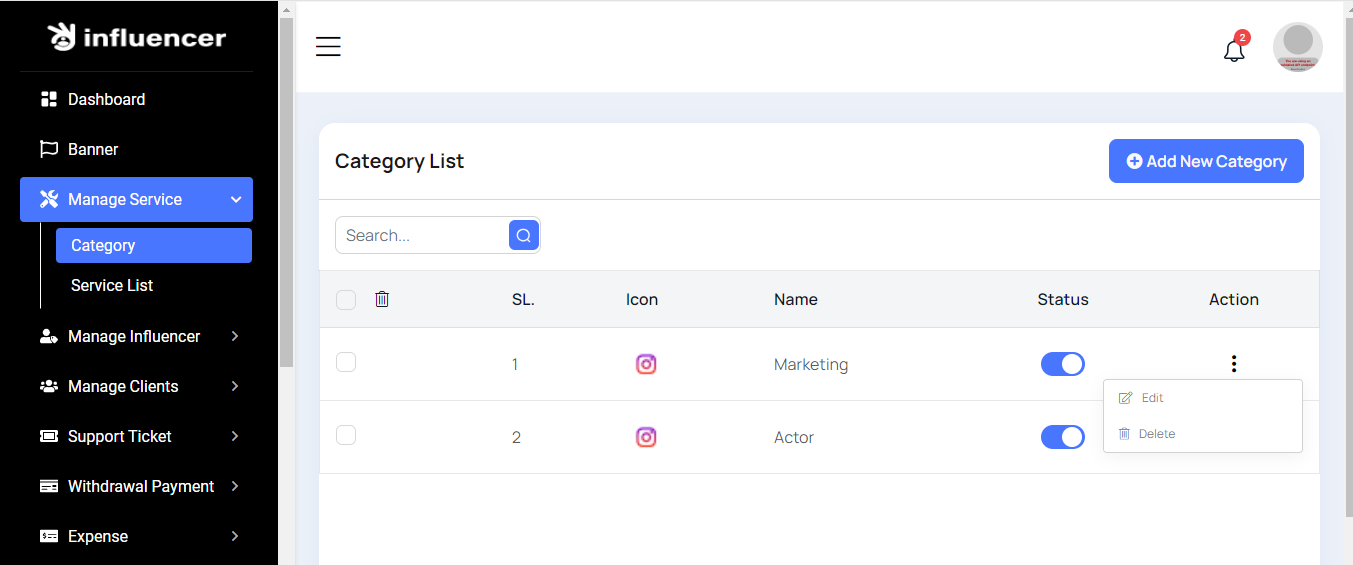
Category List
Here you can view different categories with the option to change their status. You can also search the list, as well as edit, delete, or multi-delete categories.
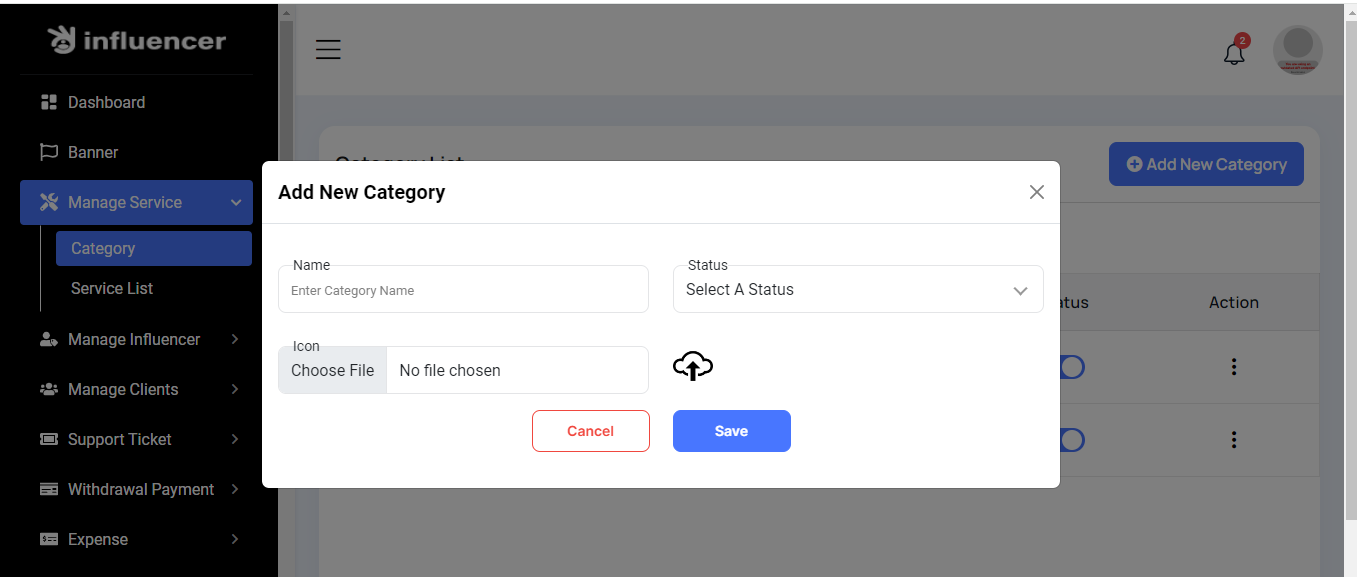
Create category
Click the 'Add New Category' button to create a new category for your service. Simply fill in the required fields.
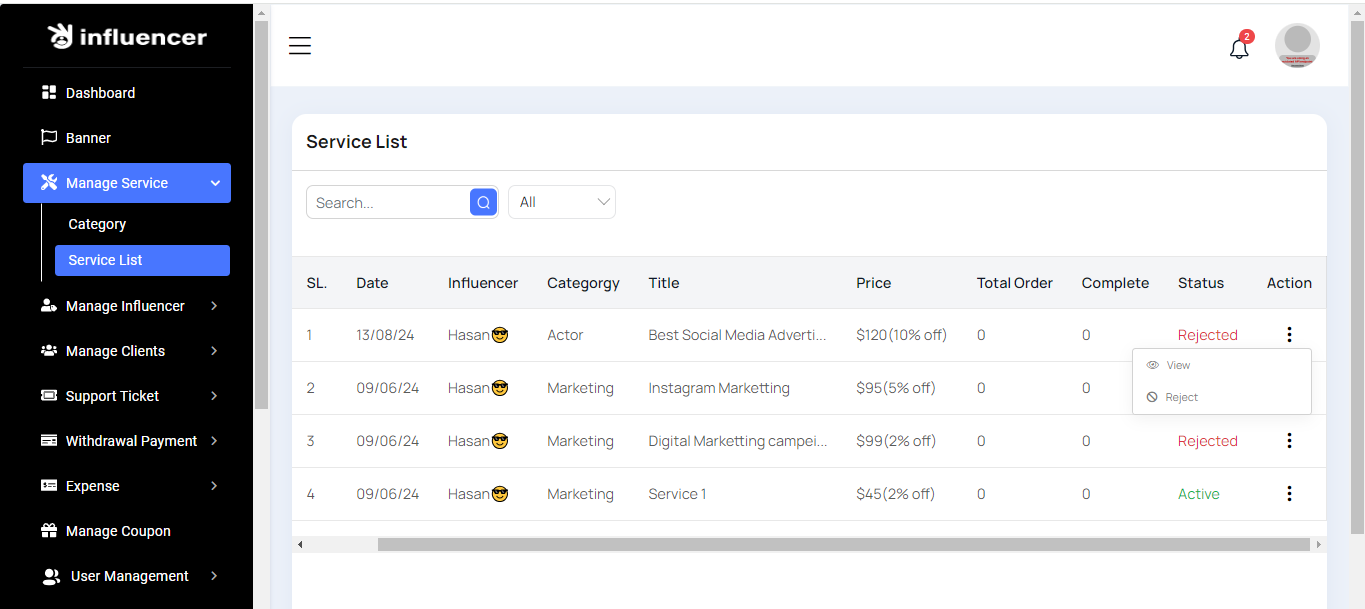
Service List
Here, you can view a list of different services with the option to filter data. From the frontend, you can add a service. You can also see details by clicking the 'View' button, and you have the option to reject services.
Manage Influencer
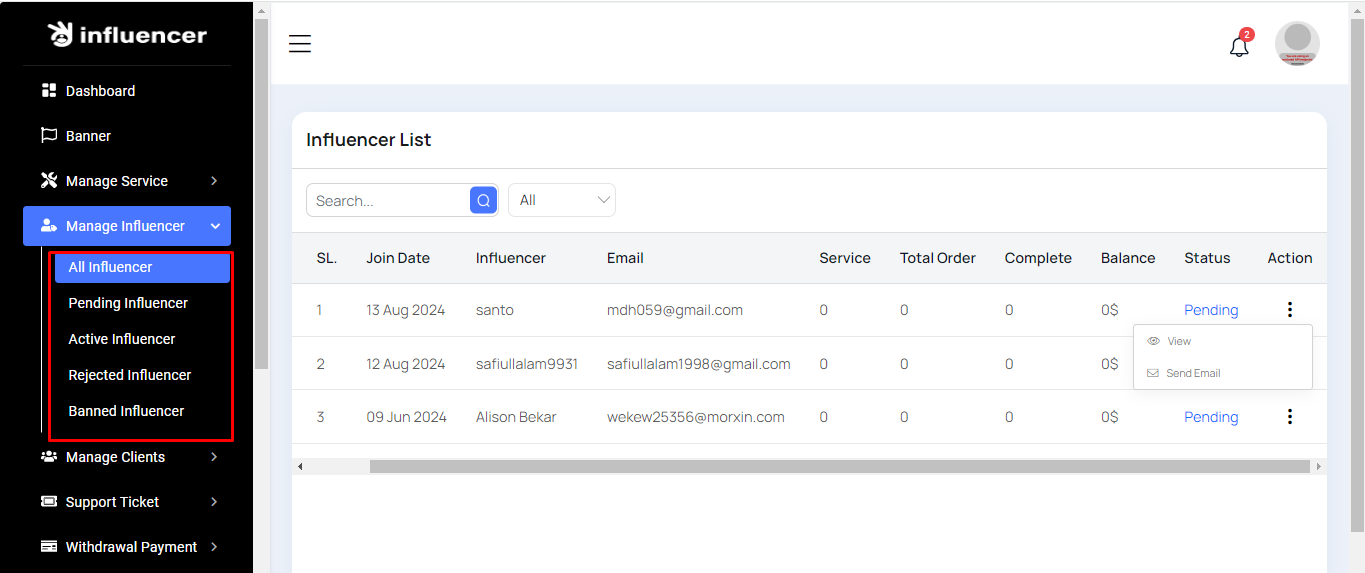
Here, you can view the influencer list categorized by different types. Clicking 'All Influencers' will show influencers of all types. Selecting 'Pending Influencers' will display those pending, and similarly for 'Active,' 'Rejected,' and 'Banned' influencers. The operations on all list pages are the same, with one example provided below. On each list page, you can also filter data using the search function. To view details, click the 'View' button. To send an email, click the 'Send Mail' button.
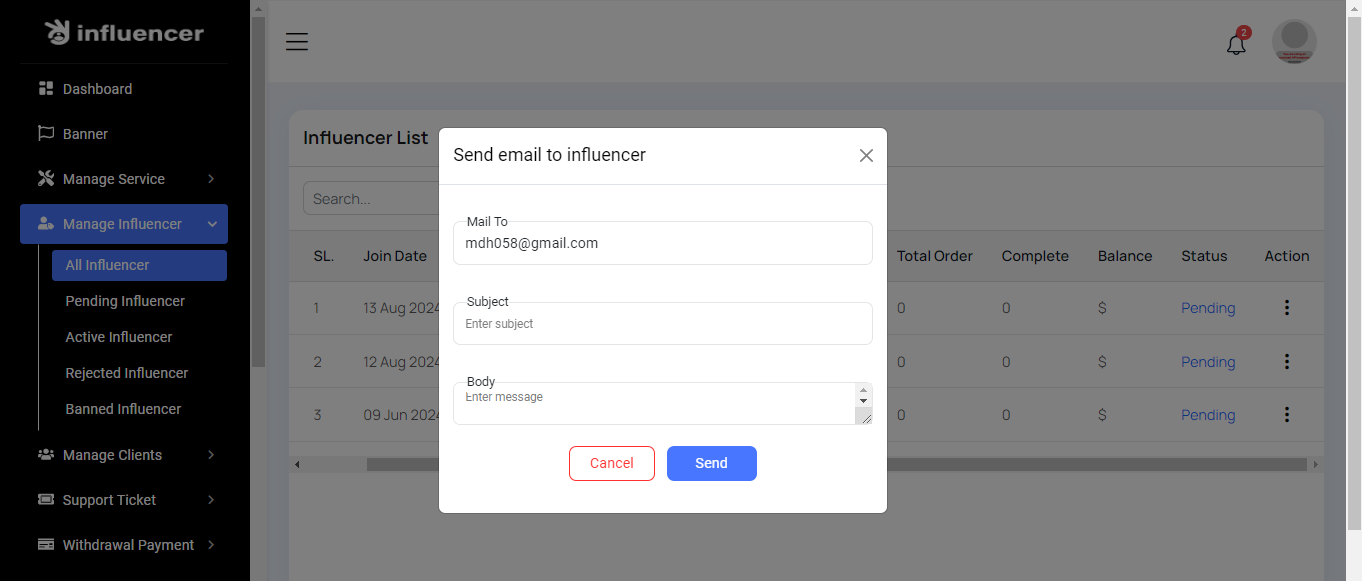
Send Email
When you click the 'Send Mail' button, a popup will appear. Fill out this form to send an email.
Manage Clients
This section is similar to the influencer list. Here, you can view the clients list categorized by different types. Clicking 'All Clients' will show clients of all types. Selecting 'Pending Clients' will display those pending, while 'Active,' 'Rejected,' and 'Banned' will show clients in those respective categories. The operations on all list pages are the same, with an example provided below. Each list page also includes a search function for filtering data. Additionally, you can view details, send emails, change status, and delete clients from the list.

Support Ticket
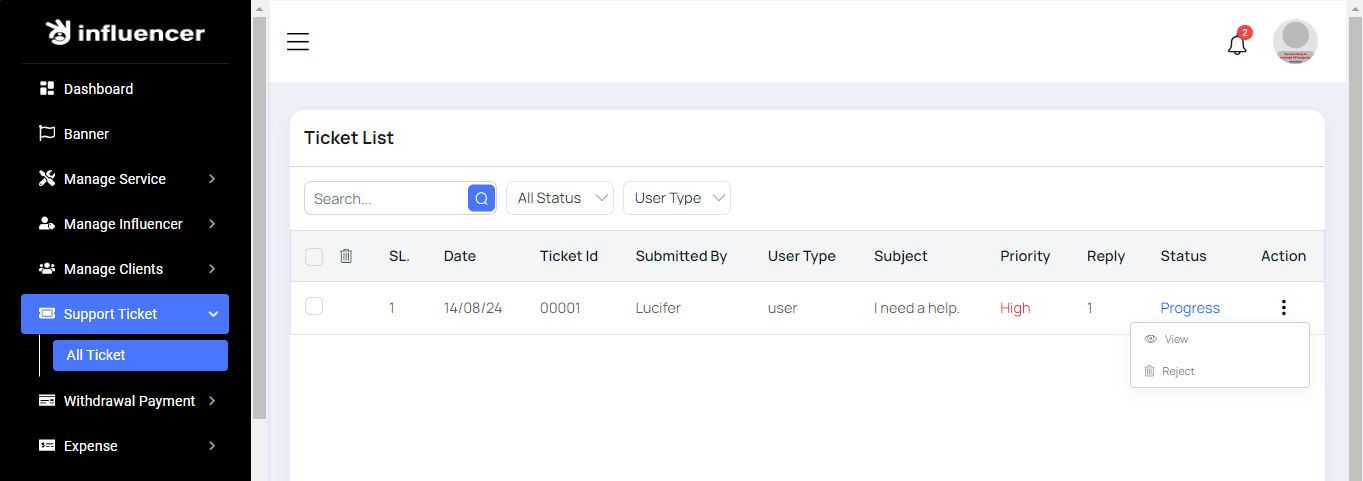
Here, you will see a list of support tickets generated from the frontend. Filtering options are available for easier navigation. To view more details, click the 'View' button. You can also reject tickets by clicking the 'Reject' button.
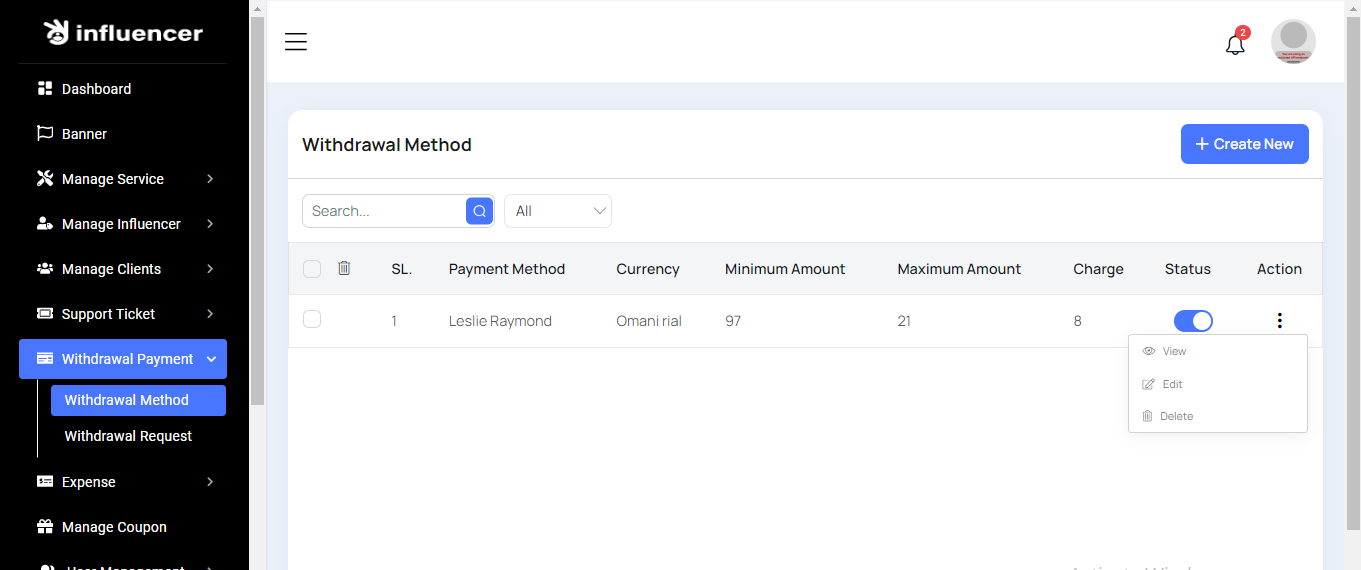
Withdraw Method List
Here, you will be able to view a list of withdrawal methods with filter options. You can also view, edit, delete, or perform multi deletions from the list.
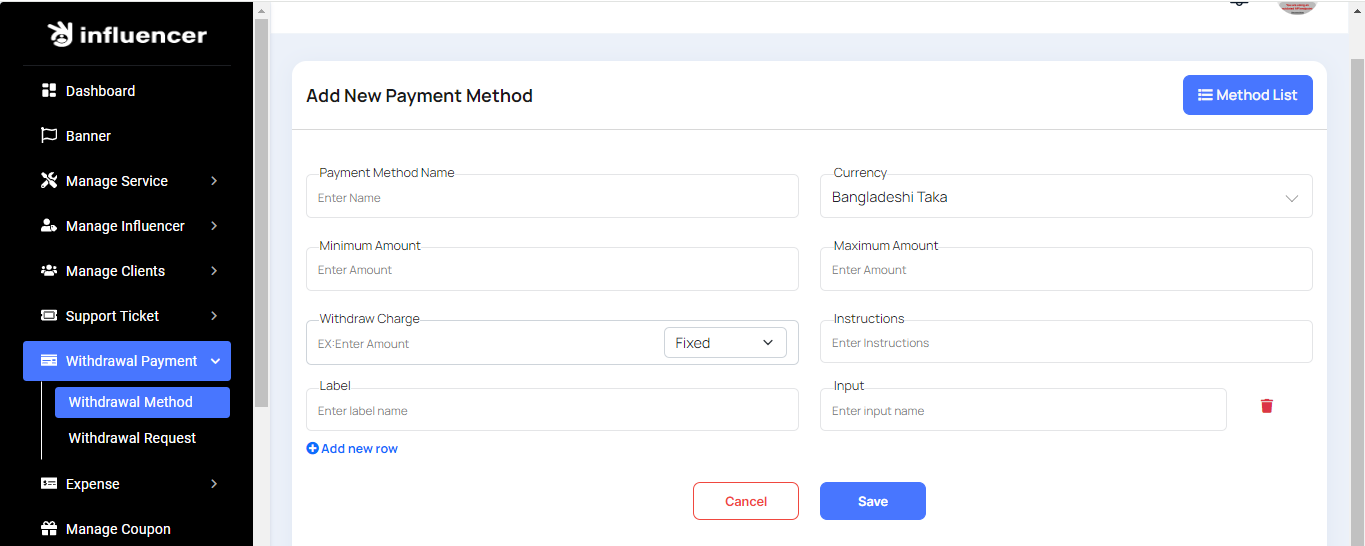
Create Withdraw Method
Here, you can create a withdrawal method by filling out the form. You can set the withdrawal charge as either a flat fee or a percentage. Additionally, you can add multiple labels and input fields as needed.
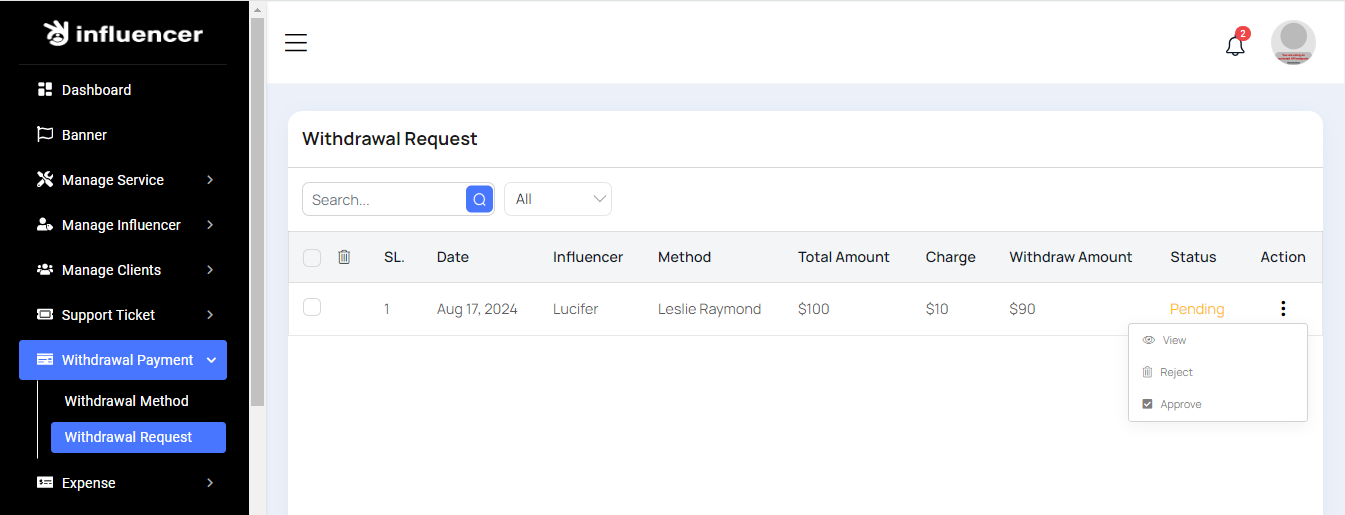
Withdraw Request
Here, you can view a list of withdraw requests with filtering options. These requests originate from the frontend, and you have the ability to approve or reject them. For more details click view button.
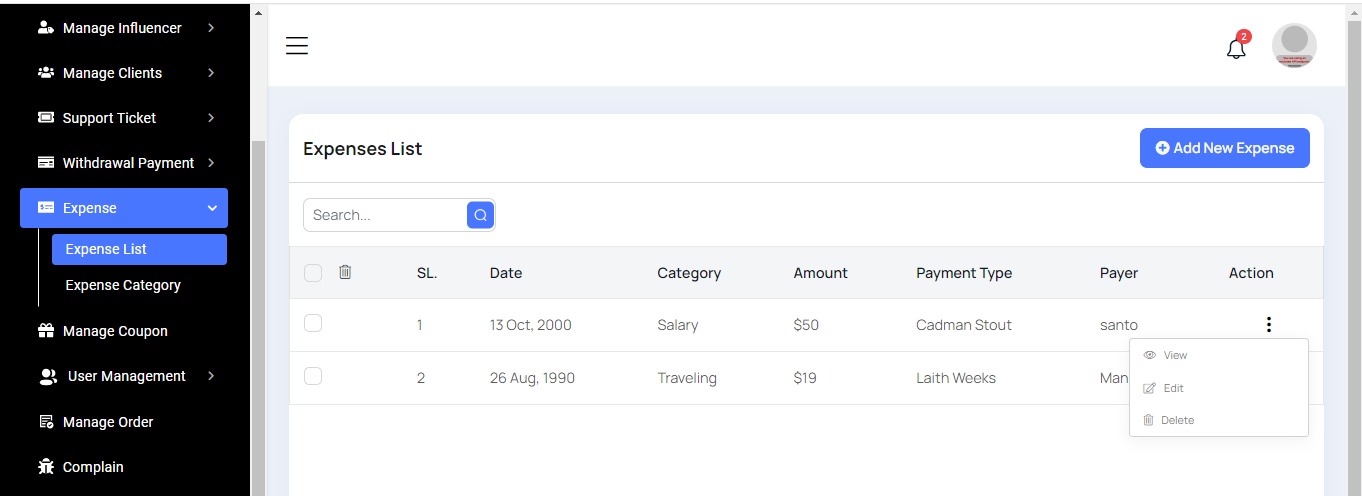
Expense List
You can view the expense list with a search feature. For more details, click the "View" button. Similar to other sections, you have options to edit, delete, or perform multi deletions.
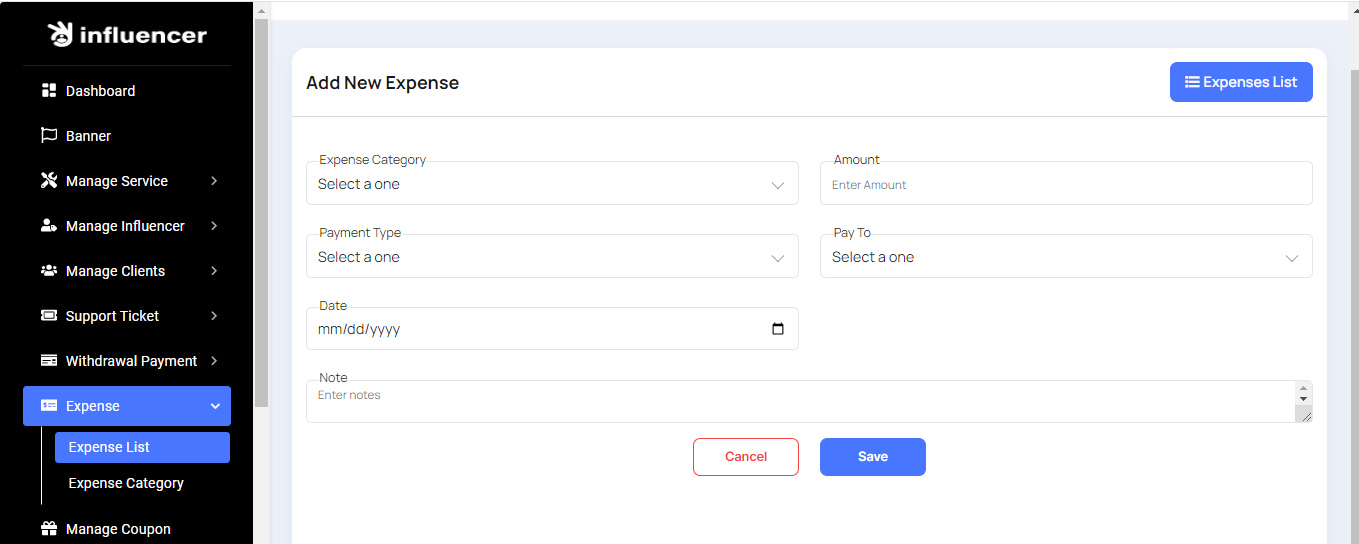
Create Expense
Here, you can create an expense categorized by expense type. Simply fill out the necessary fields to complete the process.
Category List
You can view the category list with a search feature. You also have the options to edit, delete, or perform multi-deletions.
Create Category
Here, you can create a category by simply filling out the necessary fields to complete the process.
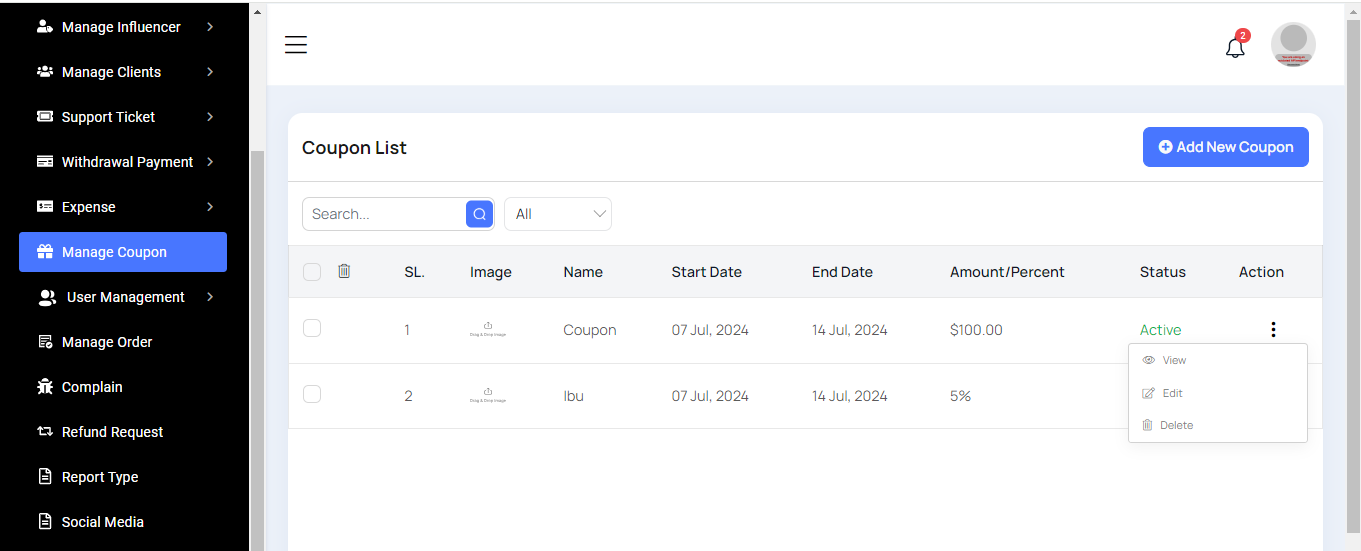
Coupon List
You can view the coupon list with filtering options. For more details, click the "View" button. You also have the options to edit, delete, or perform multi-deletions.
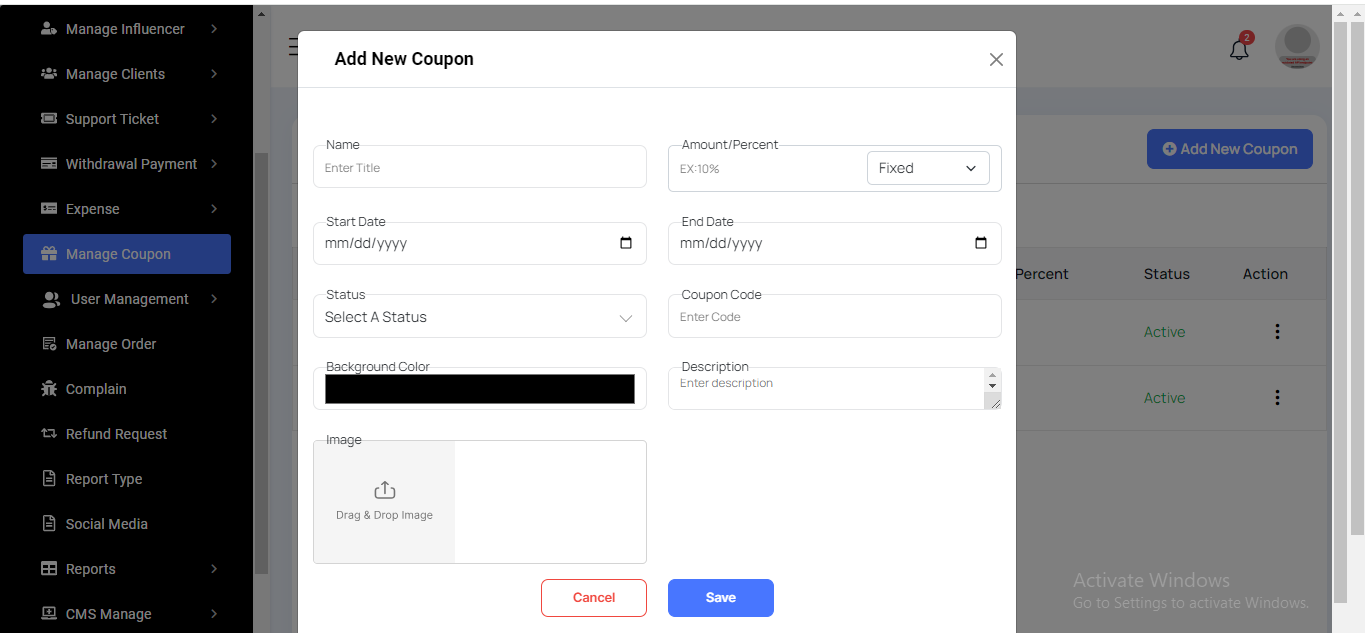
Create Coupon
Here, you can create a coupon. You can choose the amount as either a flat or a percentage. Fill out the required fields to complete the form, and be careful when setting up the coupon's duration time.
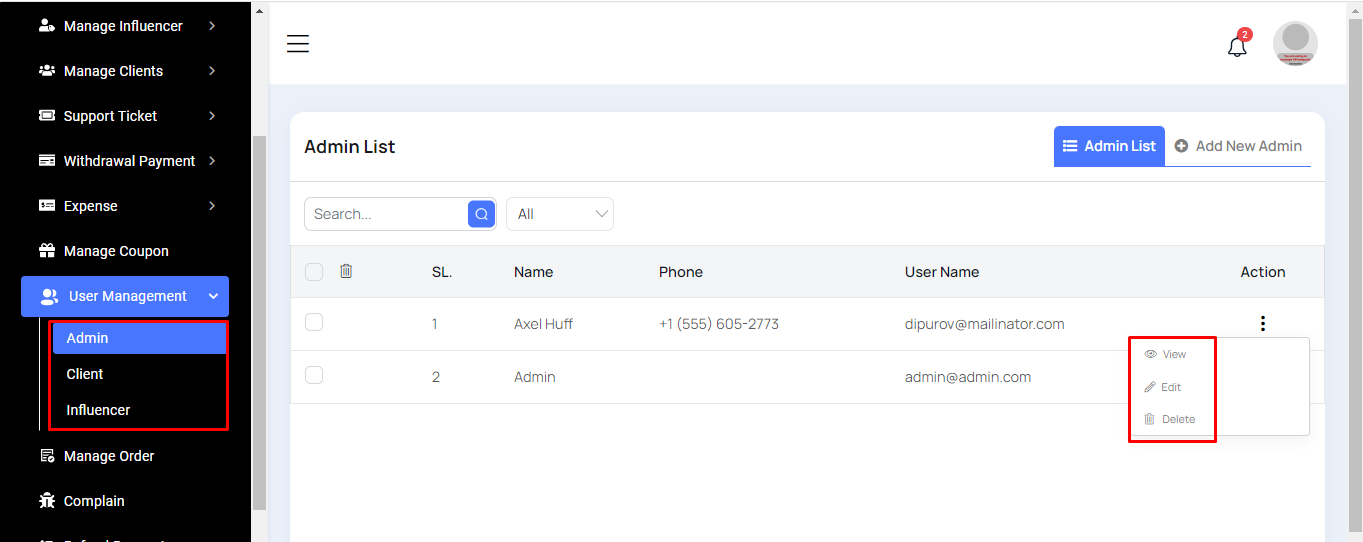
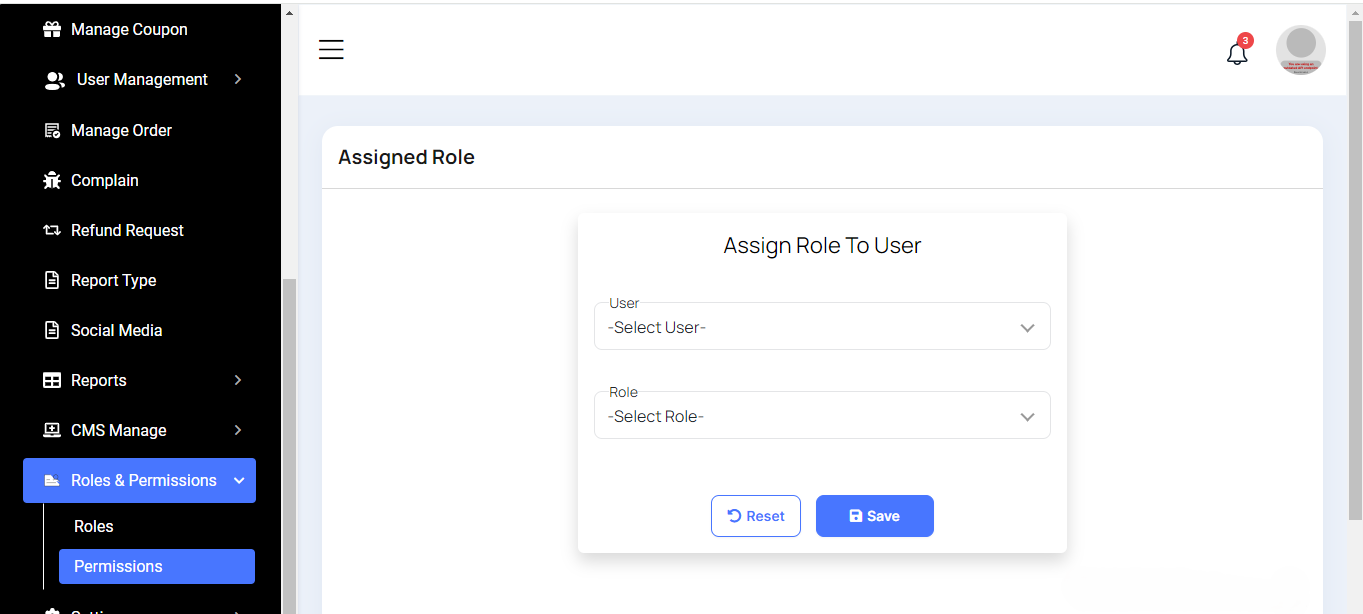
User Management
Here, we will discuss the procedures for Admin, Client, and Influencer. The procedures are similar for each, and we will use the Admin process as an example.
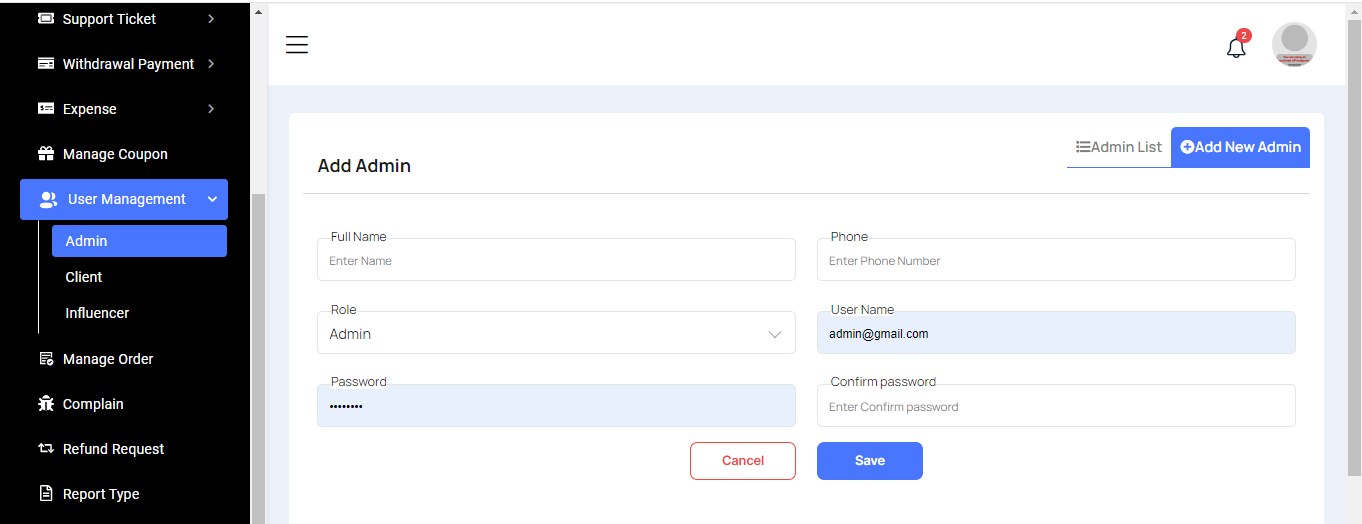
Admin List
Here, you can view the list of Admin users with filtering options. For more information, click the "View" button. You also have the options to edit, delete, or perform multi-deletions.
Create Amin
You can create a user as an Admin by filling out the necessary fields. Please ensure that the email and password are entered carefully.
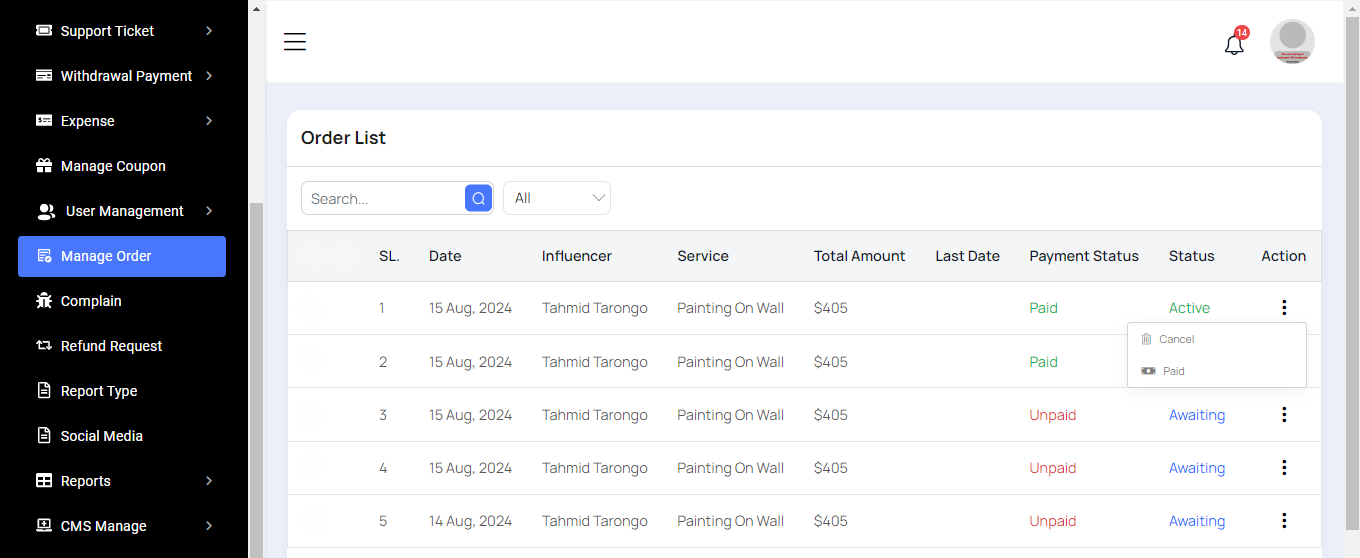
Order List
Here, you can view the order list and filter the data. Orders can be placed from the frontend. You also have the option to mark orders as paid or canceled.
Complain List
All complaint lists from the frontend will be displayed here.
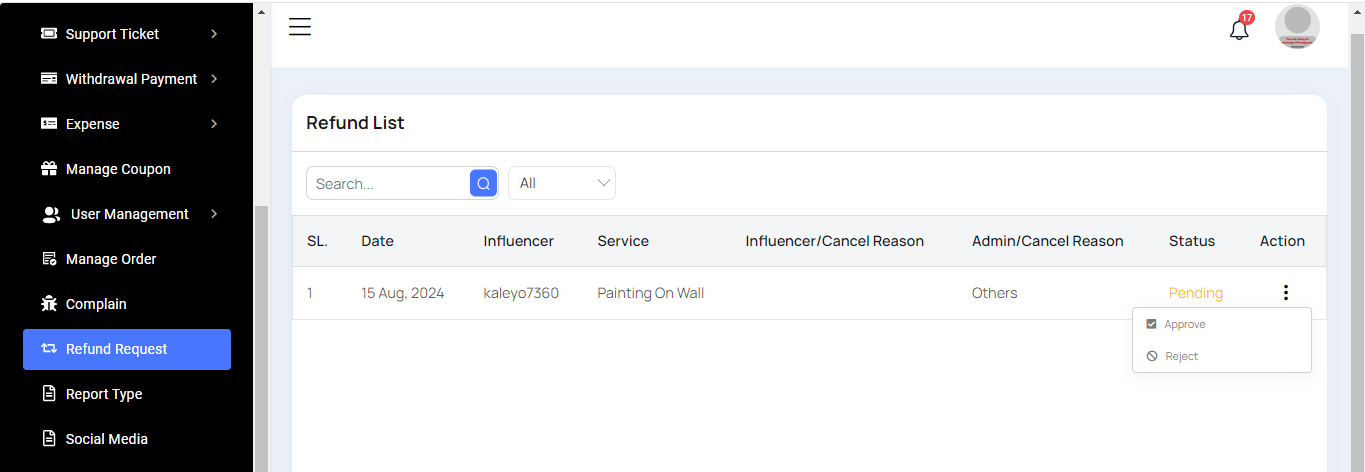
Refund List
Here, you can view a list of refund requests with filtering options. These requests originate from the frontend, and you have the ability to approve or reject them.
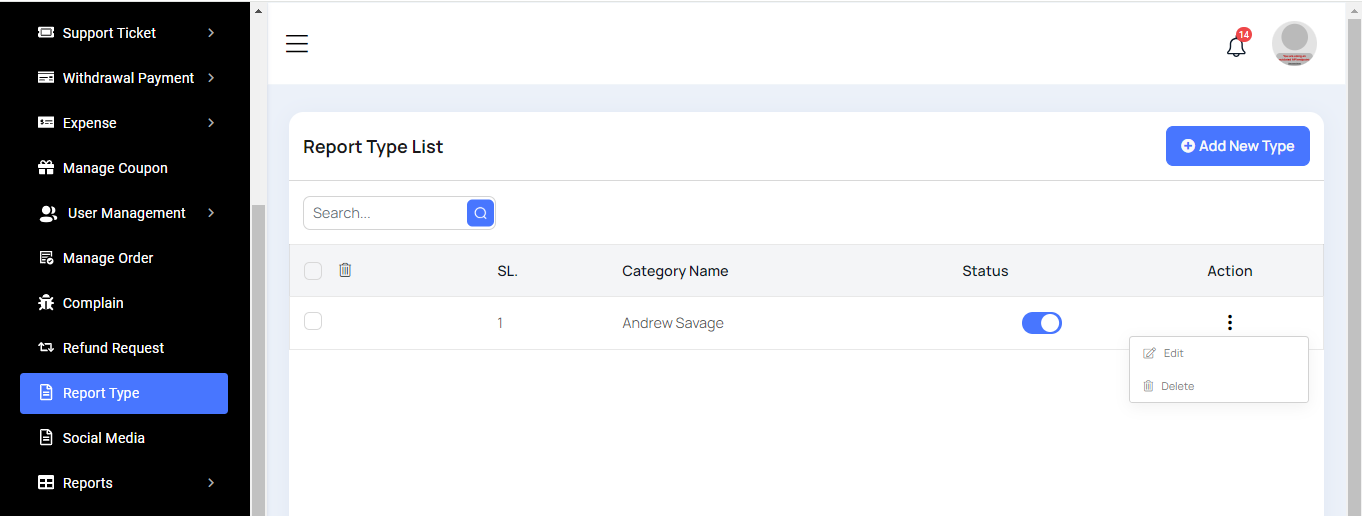
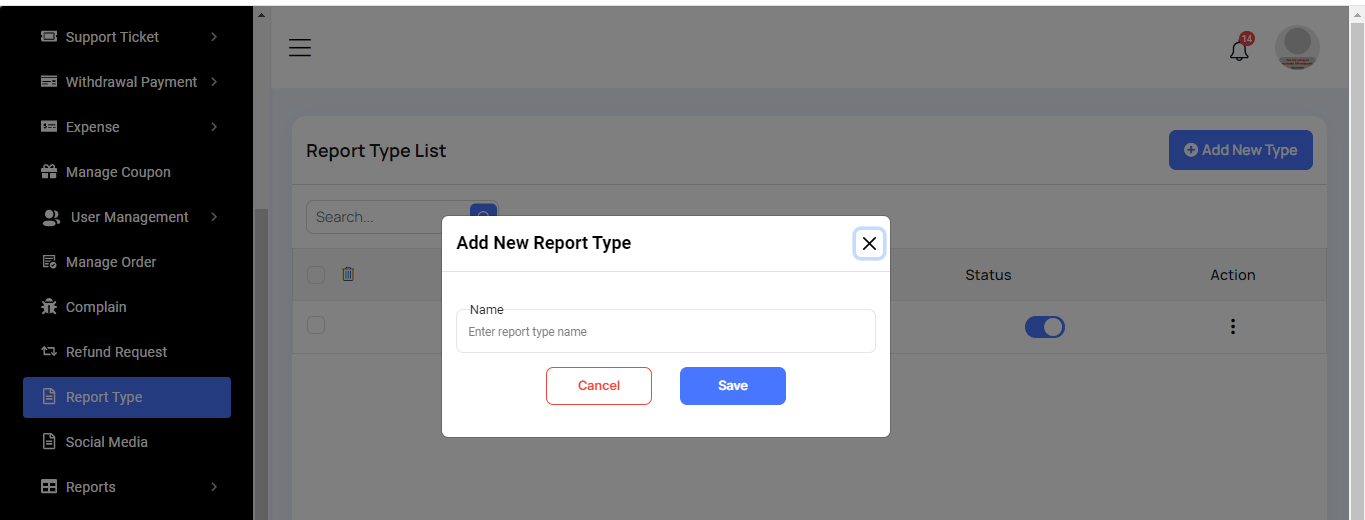
Report Type List
You can view the report type list with a search feature. You also have the options to edit, delete, or perform multi-deletions.
Create Report Type
You can create a report type here by filling in the report type name.
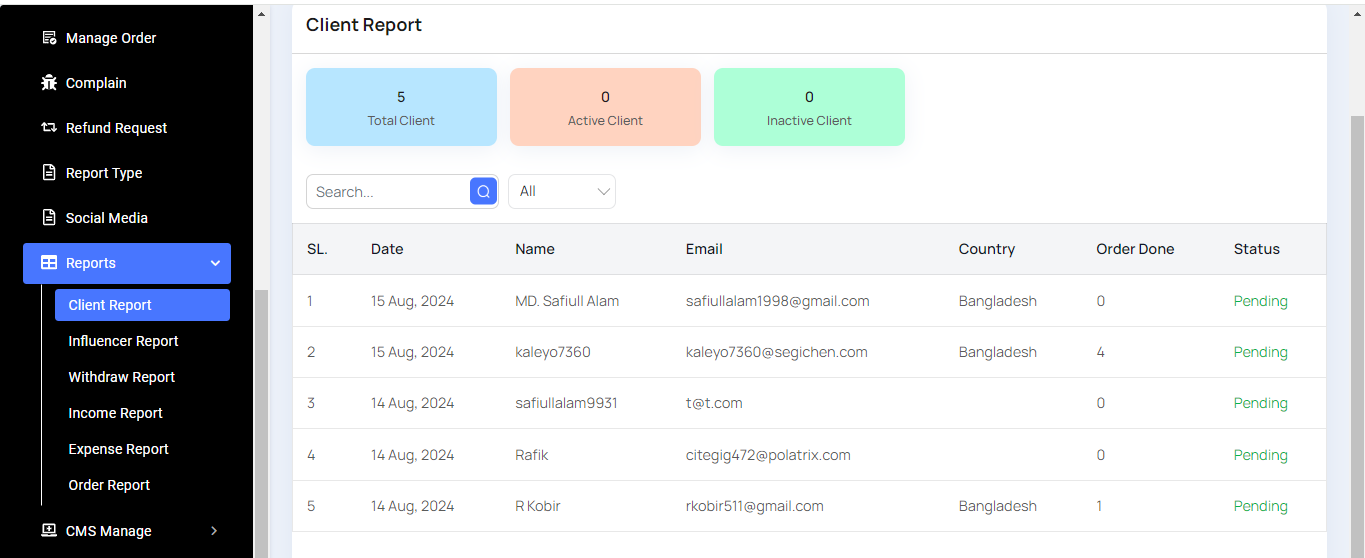
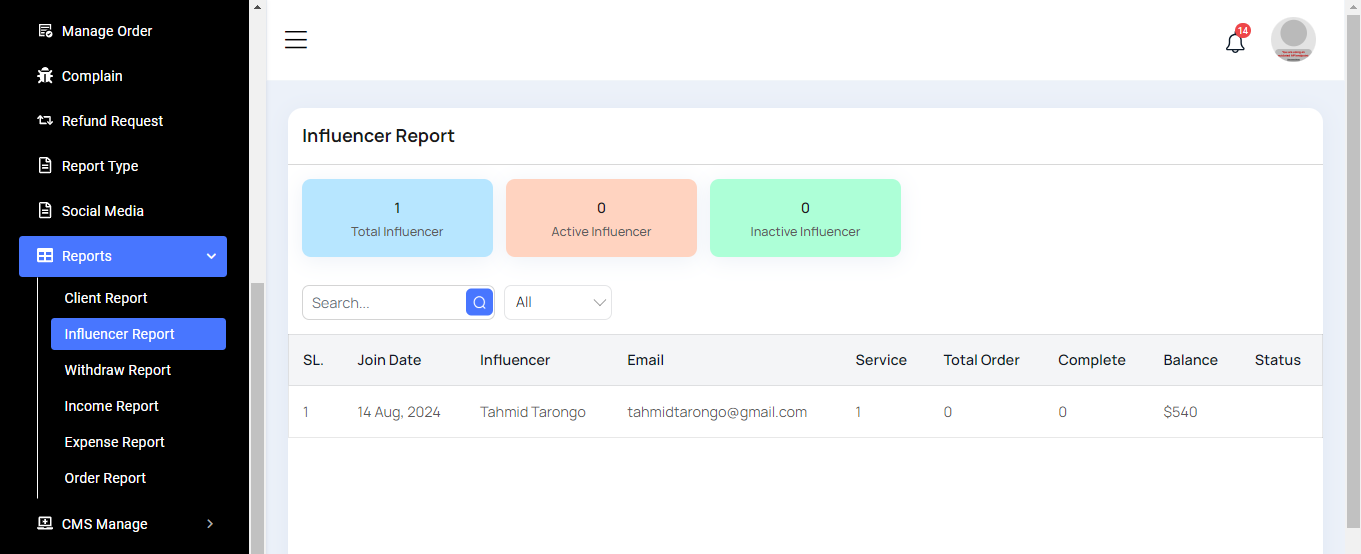
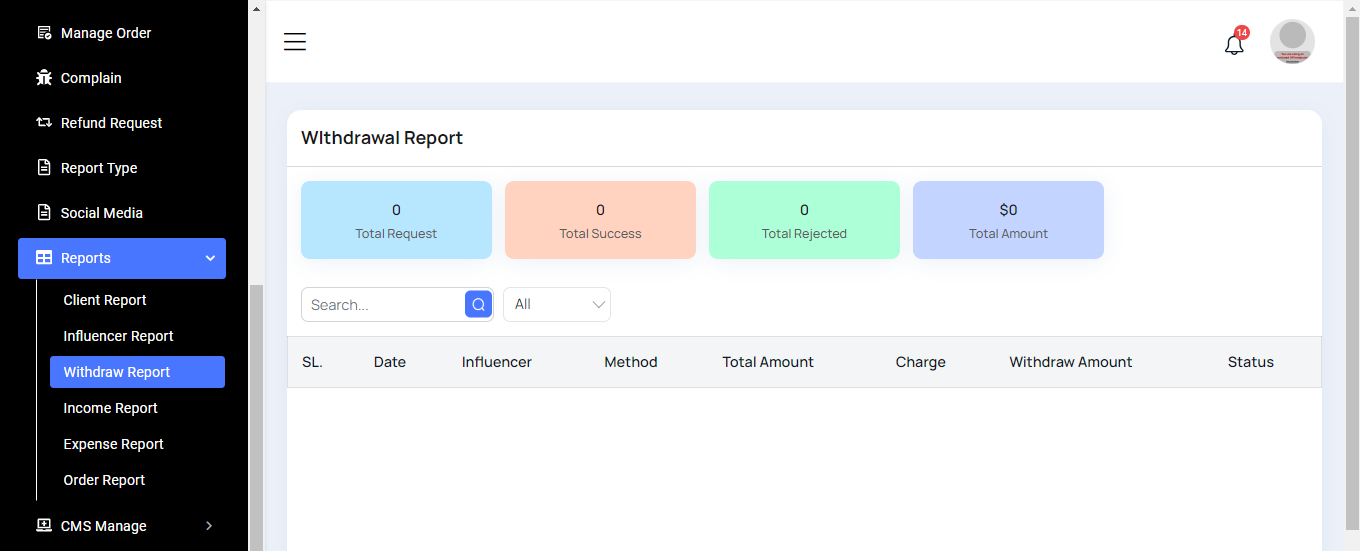
Reports
Here, we will display various reports, including Client, Influencer, Withdrawal, Income, Expense, and Order reports. Each report comes with filtering options for data.
Client Report
Influencer Report
Withdraw Report
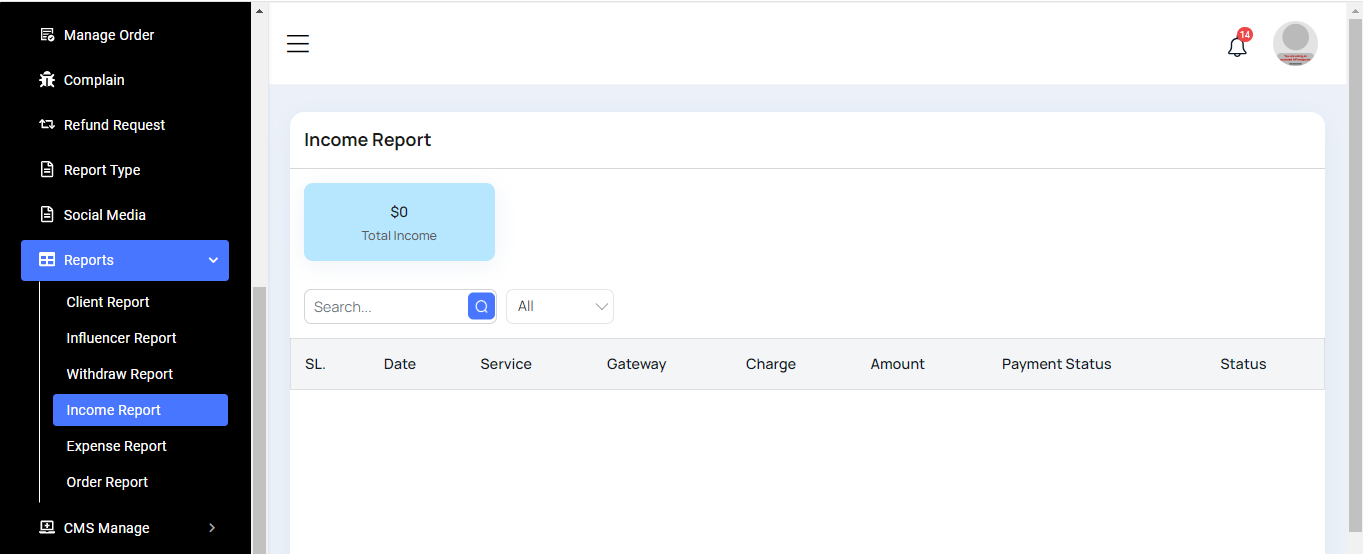
Income Report
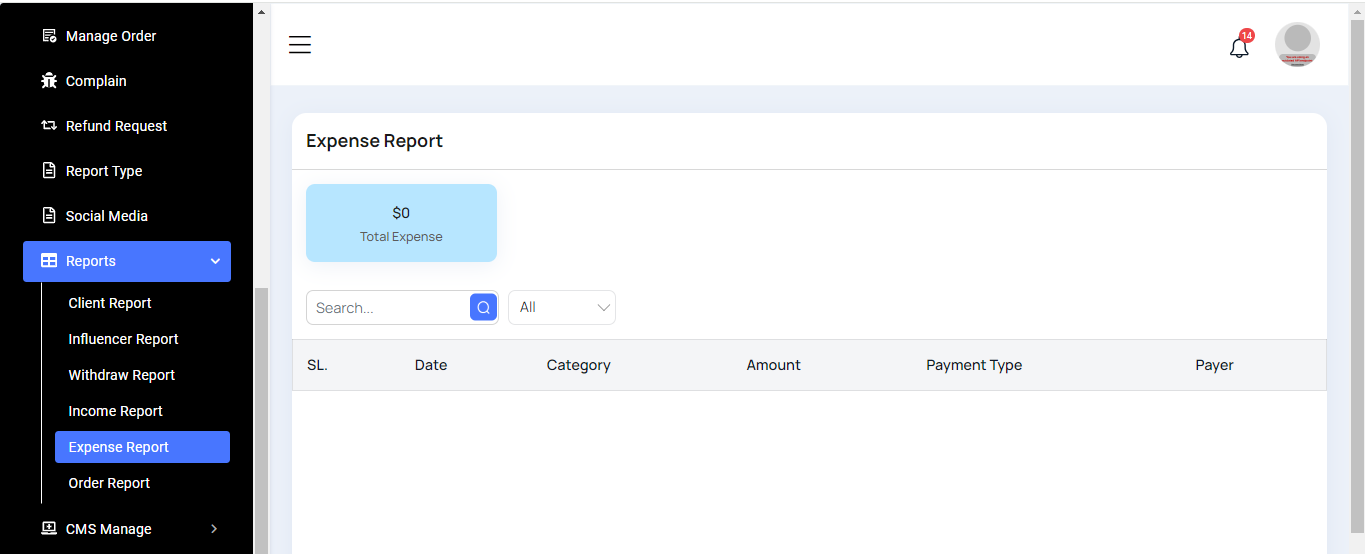
Expense Report
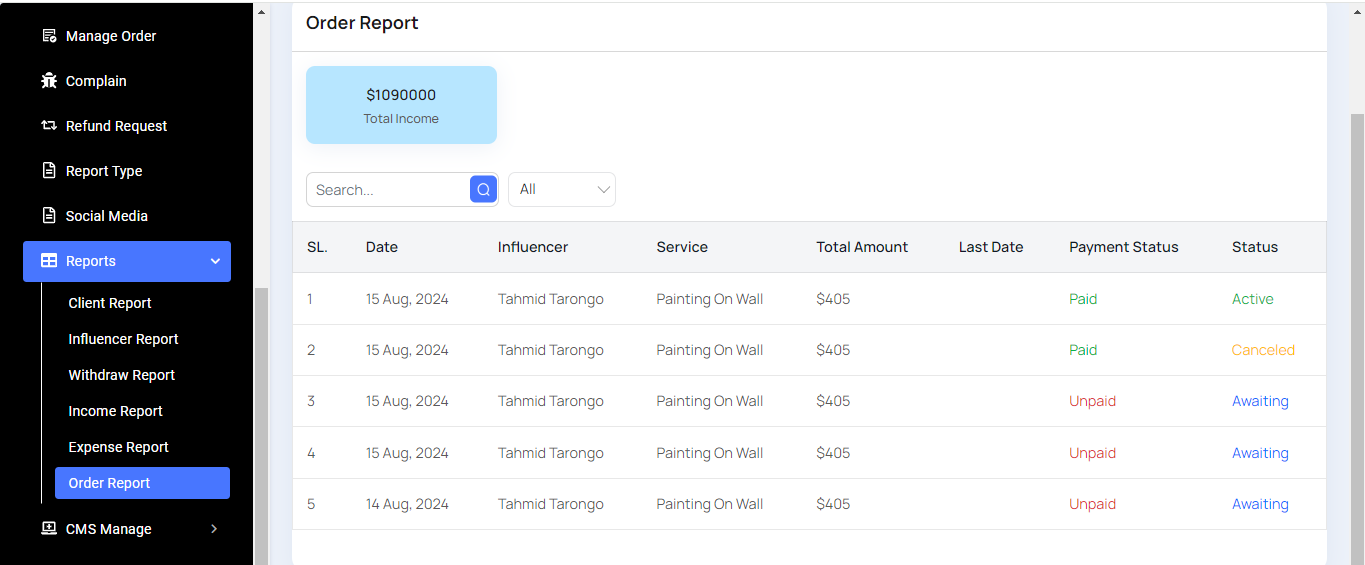
Order Report
CMS Manage
Here, we will discuss the following sections: Blogs, Terms & Conditions, About Us, and Help & Support.
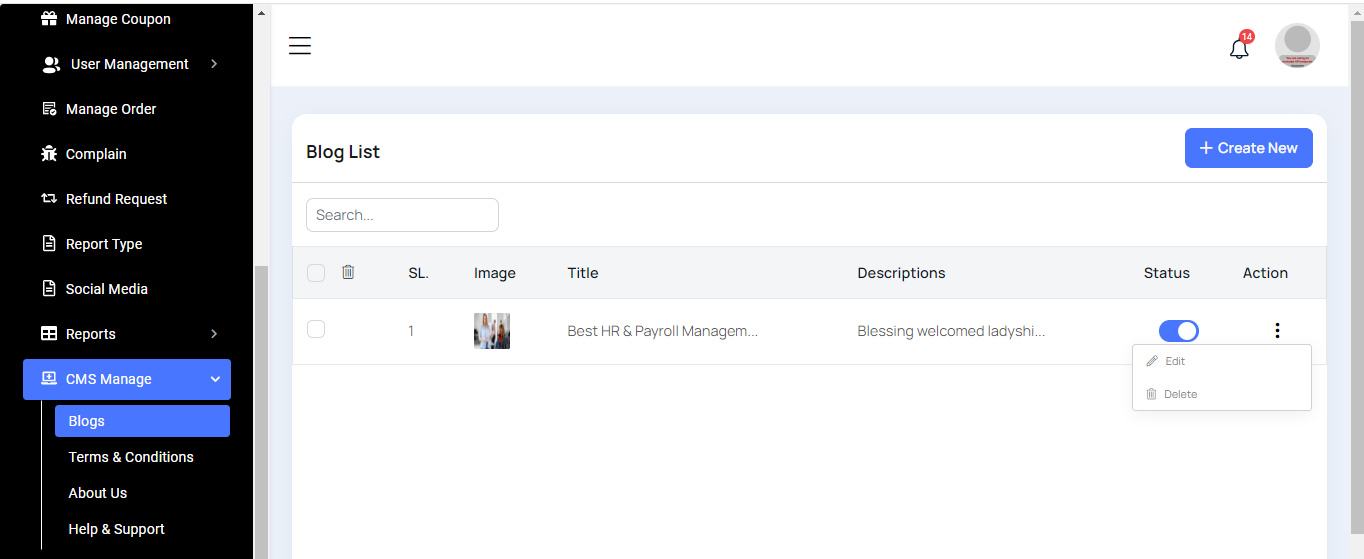
Blog List
All blog entries will be displayed here with a search feature. You also have options to edit, delete, or perform multi-deletions.
Create Blog
Here, you can create a blog by filling out the necessary fields.

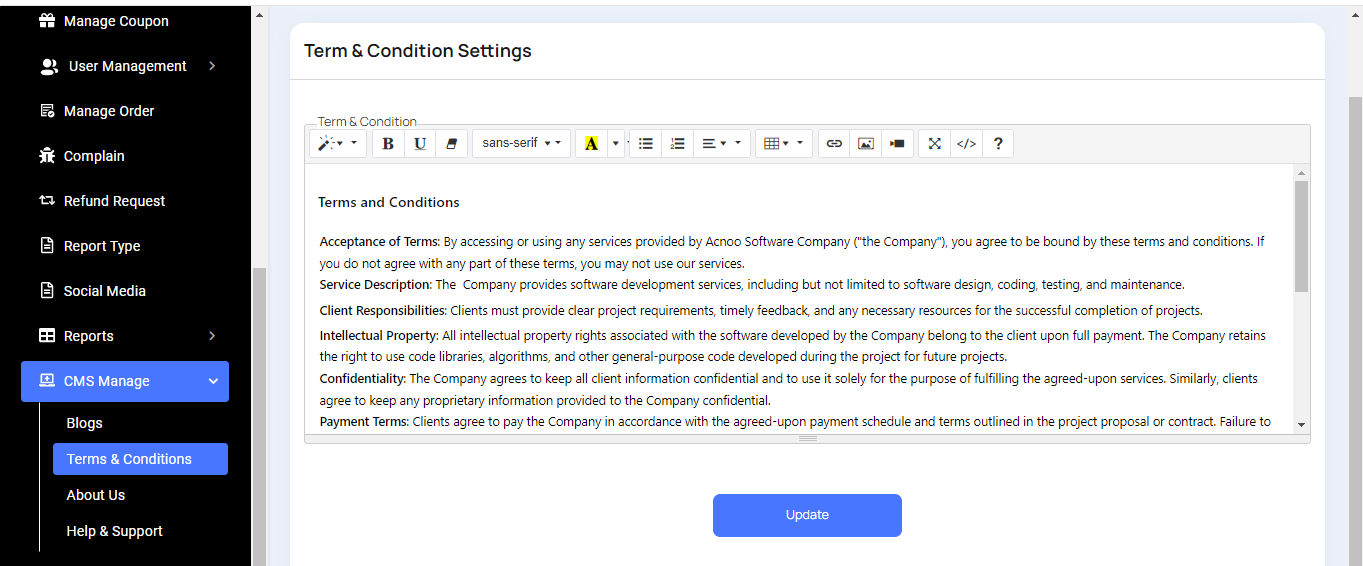
Here, you can update your Terms & Conditions.
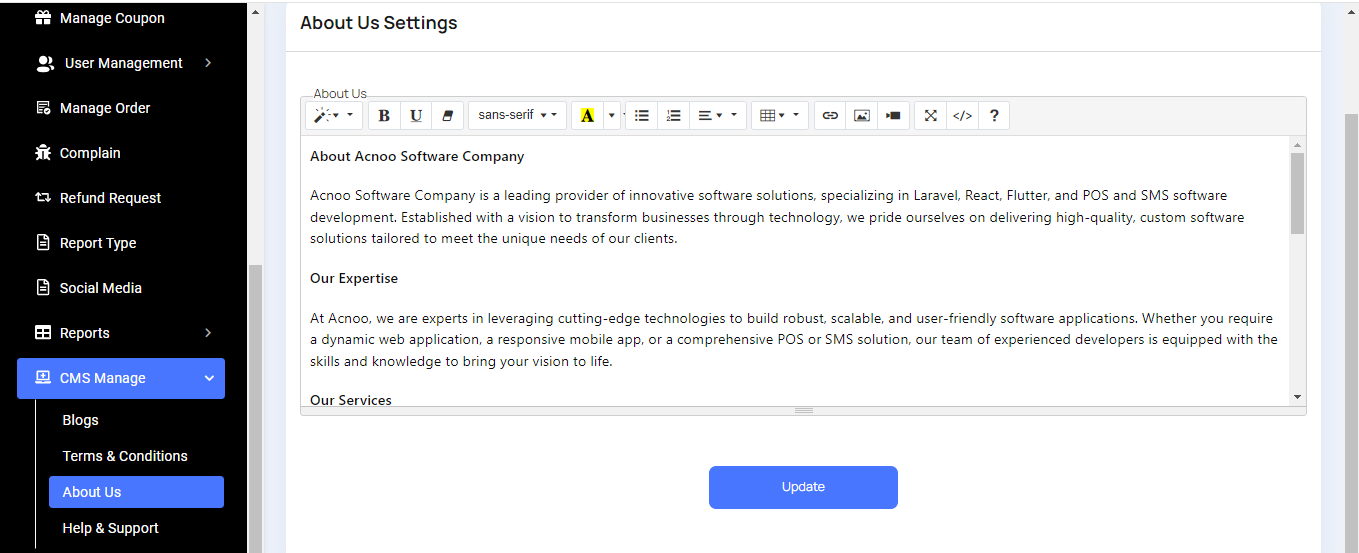
You can update the "About Us" section here.
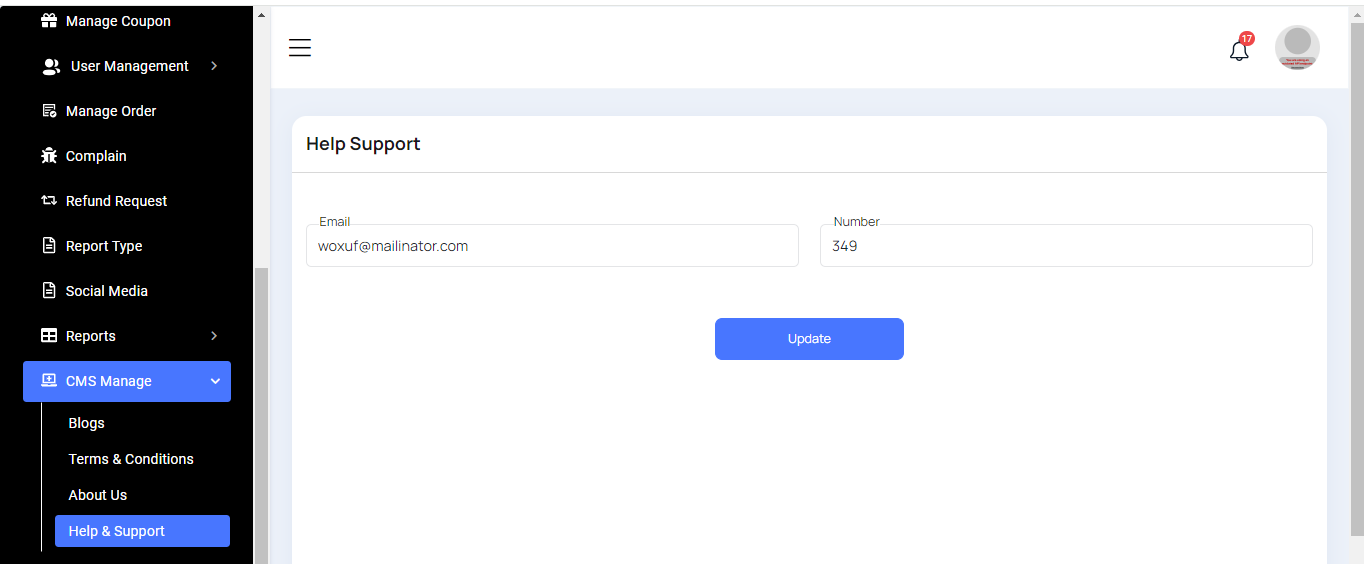
Here, you can update the "Help & Support" section.
Roles & Permissions
In this section, you have the ability to define roles and allocate specific permissions to different users as needed.
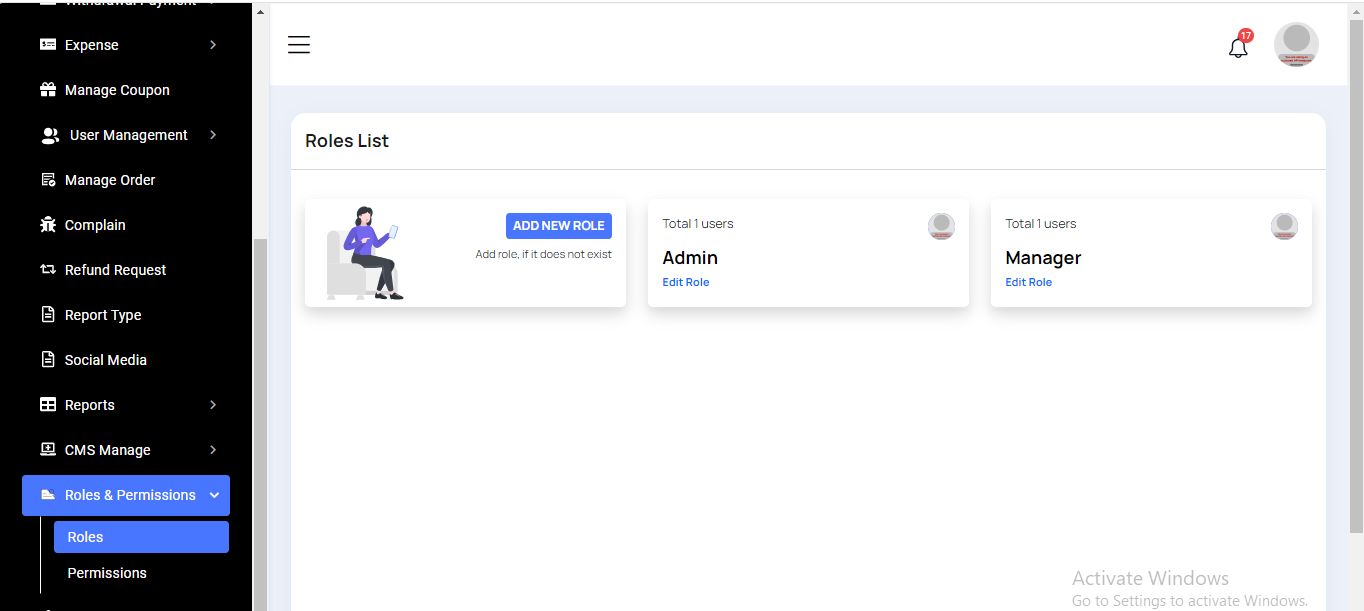
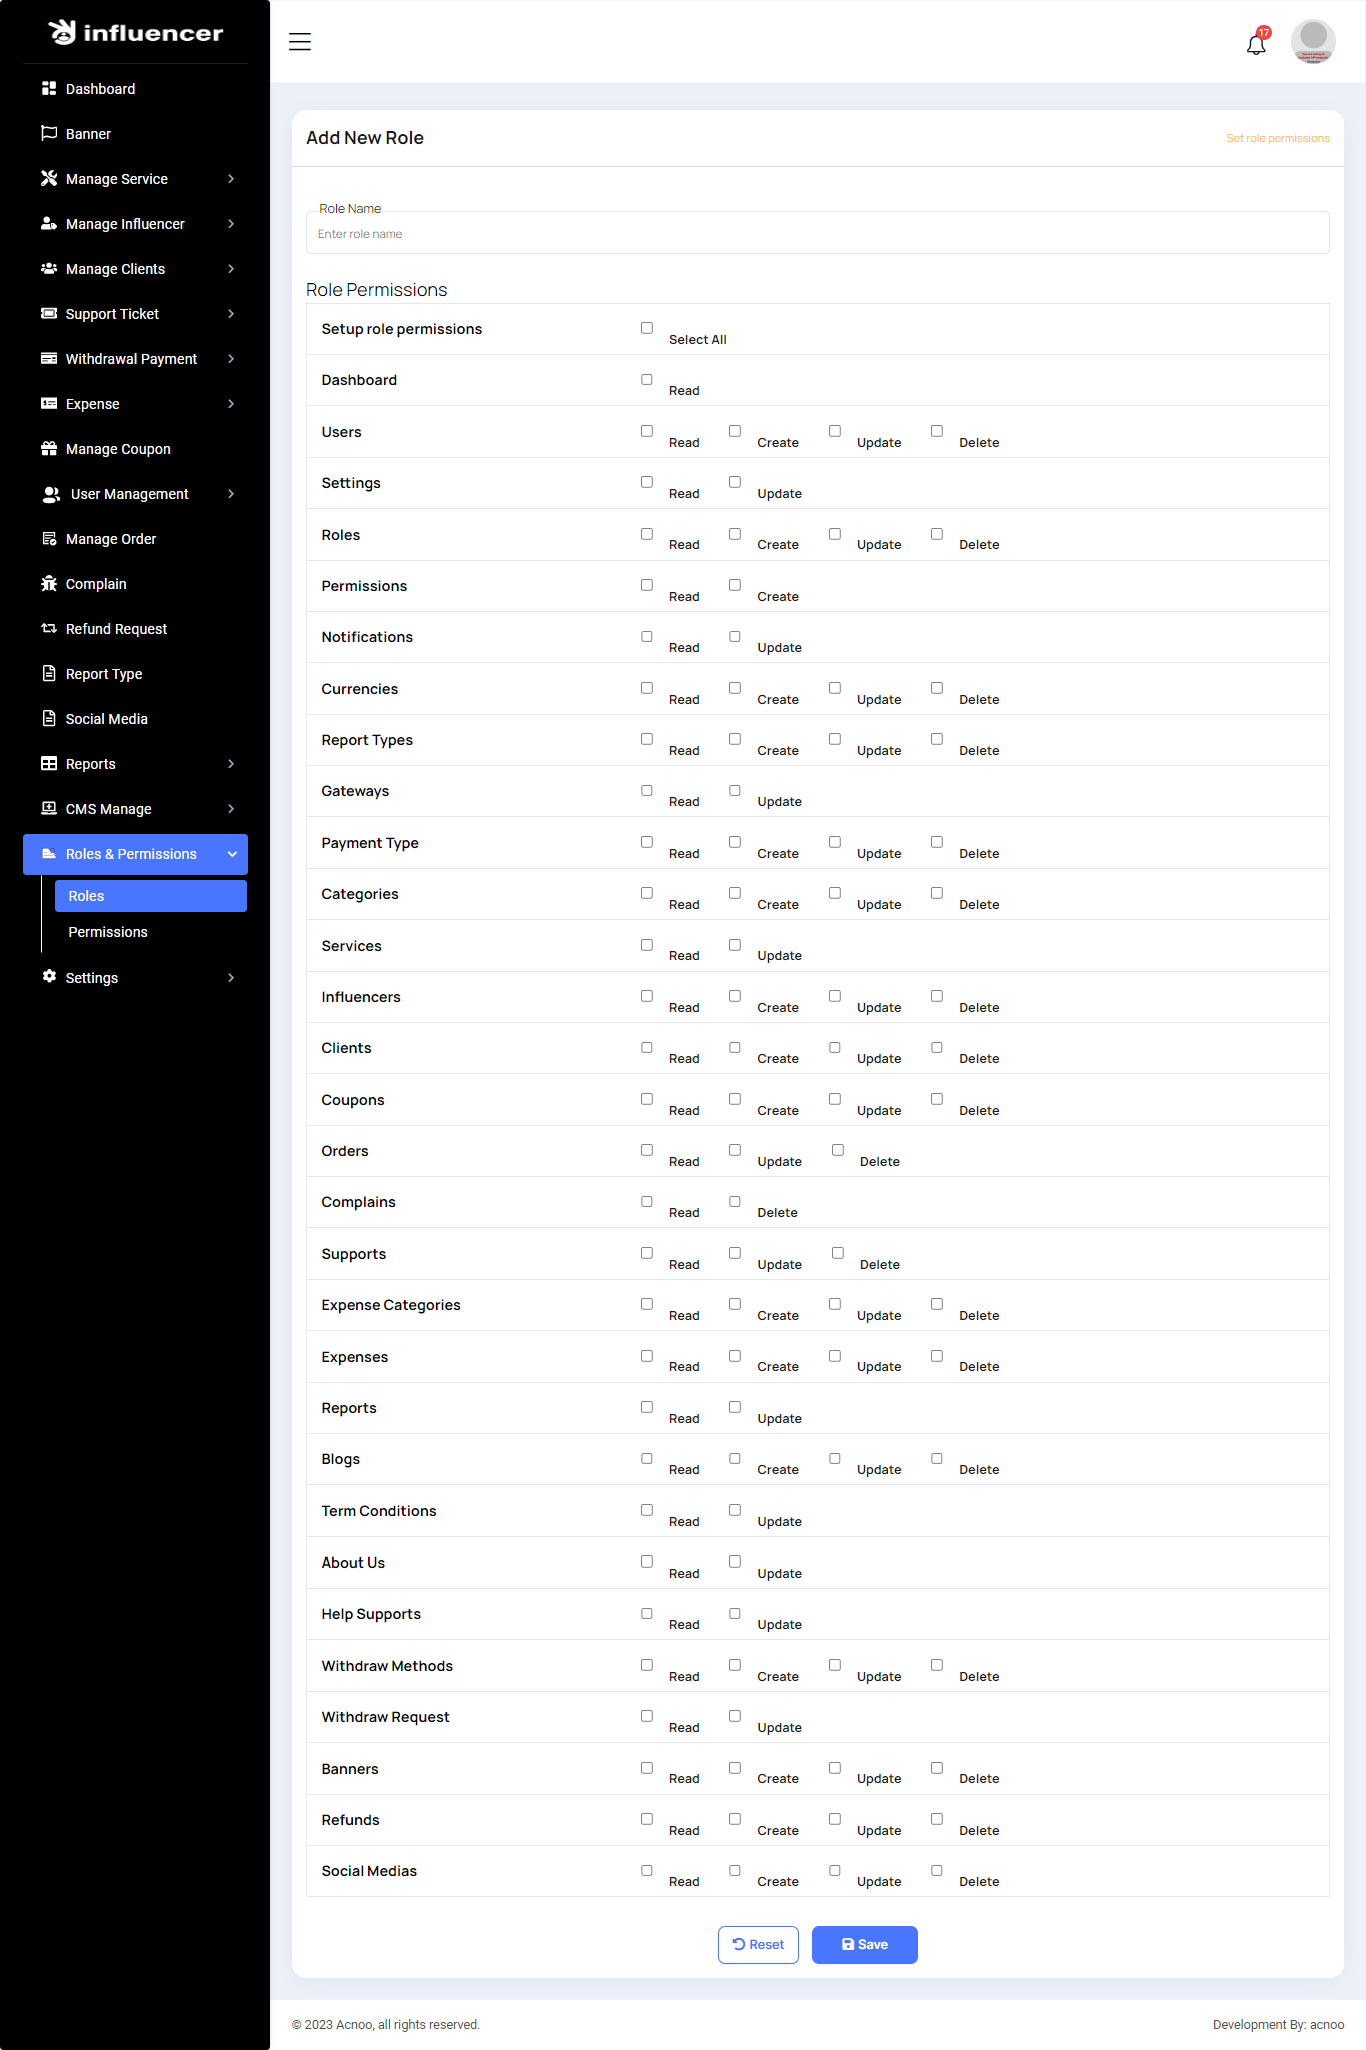
Roles
In this section, you have the capability to create new roles and update existing ones. When updating roles, you can configure their specific role permissions, granting or restricting access to various features and functionalities as required. This allows you to tailor user roles to your organizational needs and security requirements.
Permissions
In this section, you have the capability to set role-specific permissions, allowing you to fine-tune and control access rights for each role according to your organization's needs and security requirements.
Setting
In the Setting section, you have the capability to configure the fundamental aspects or core elements of this project.
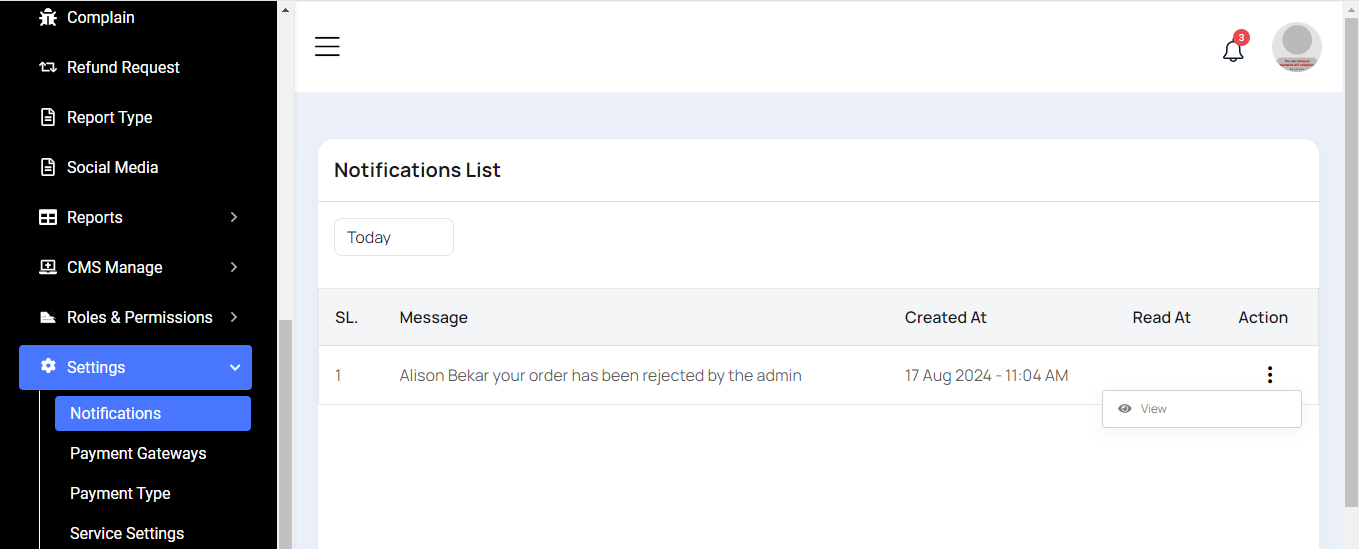
Notification
Here, you can view a list of various notifications. You also have the option to filter these notifications based on available criteria.In each list, clicking the "View" button allows you to see detailed information.
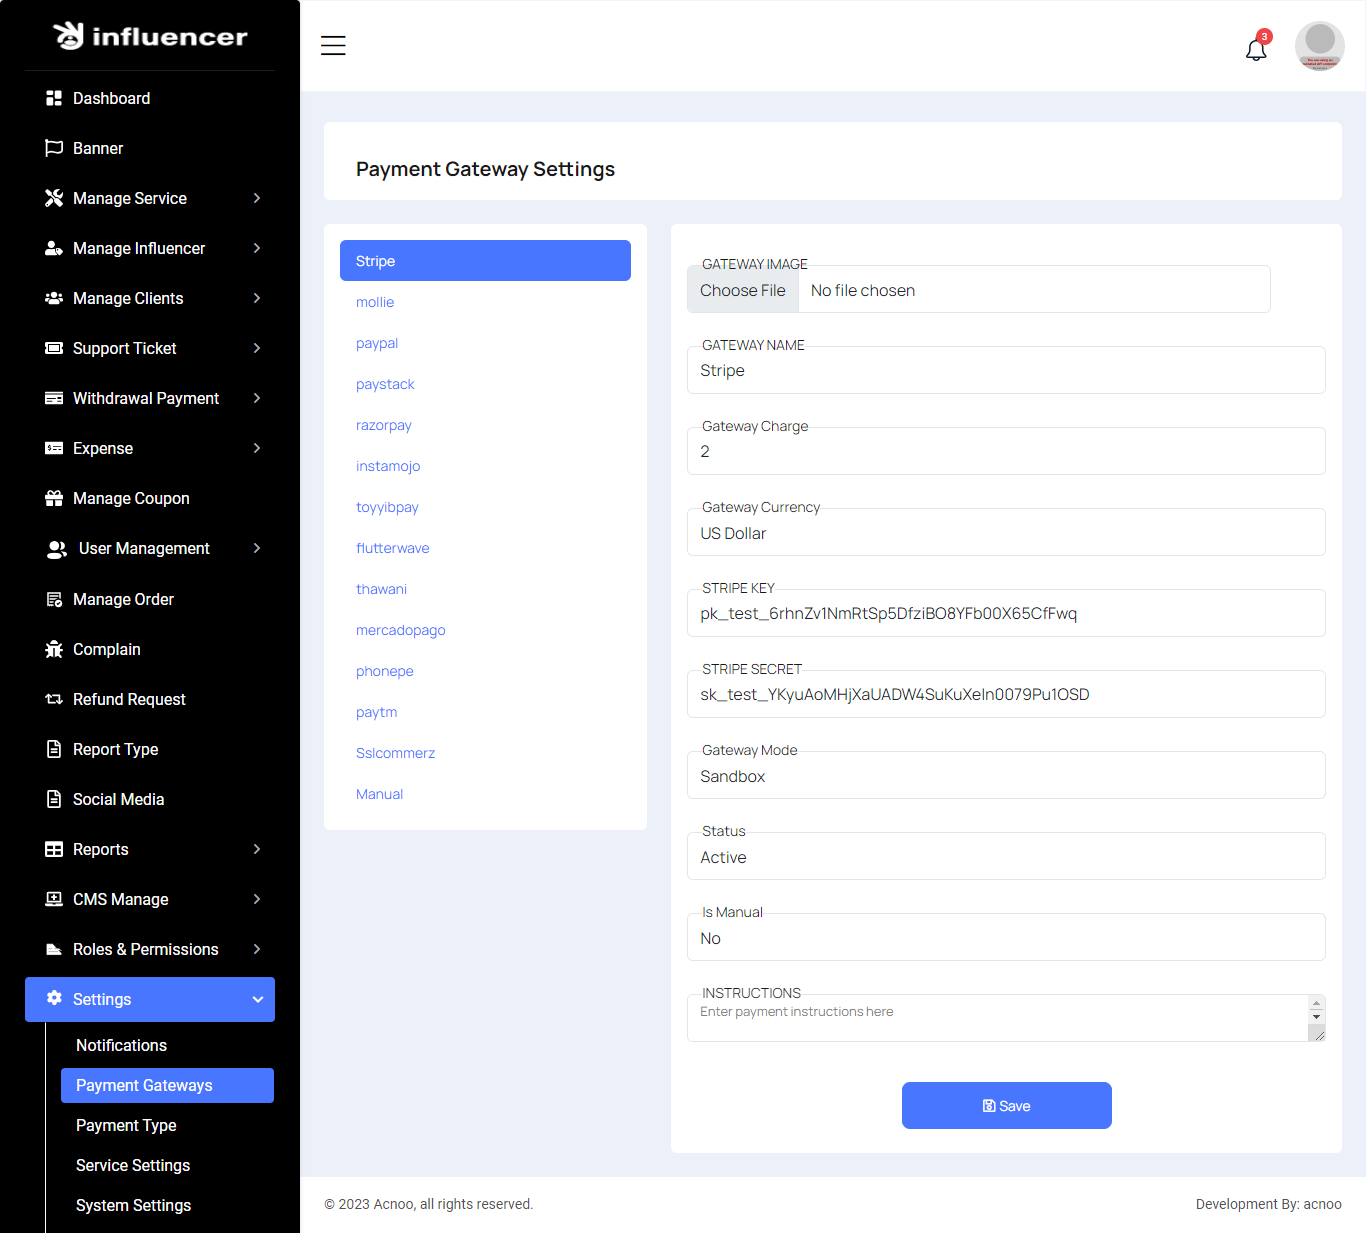
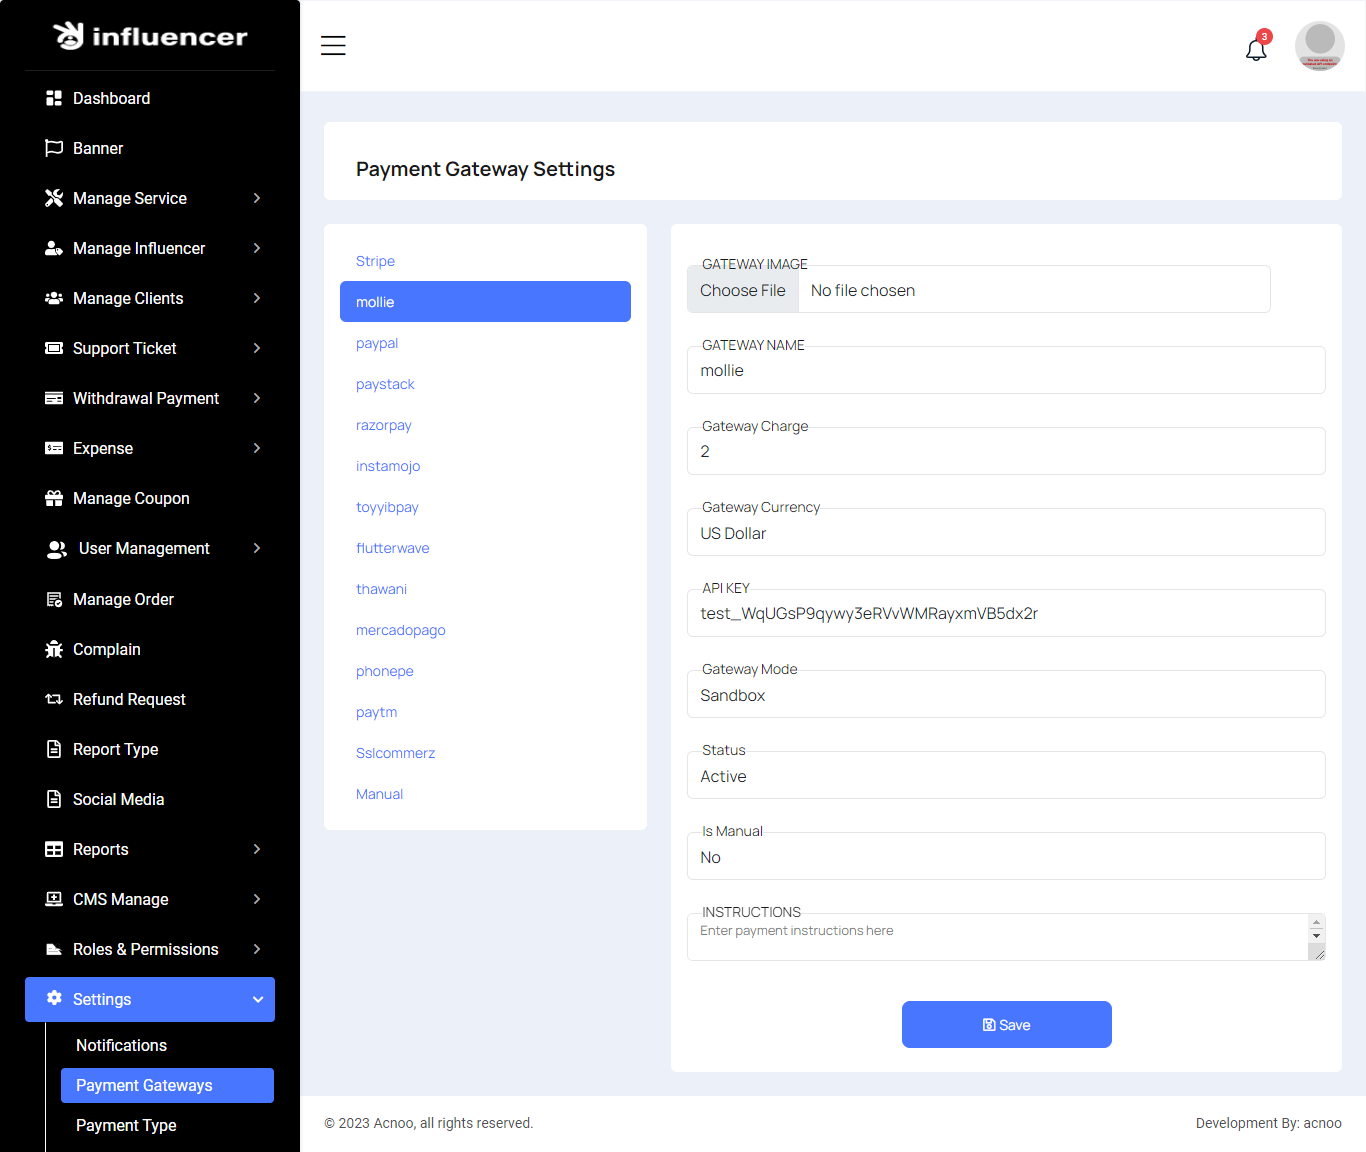
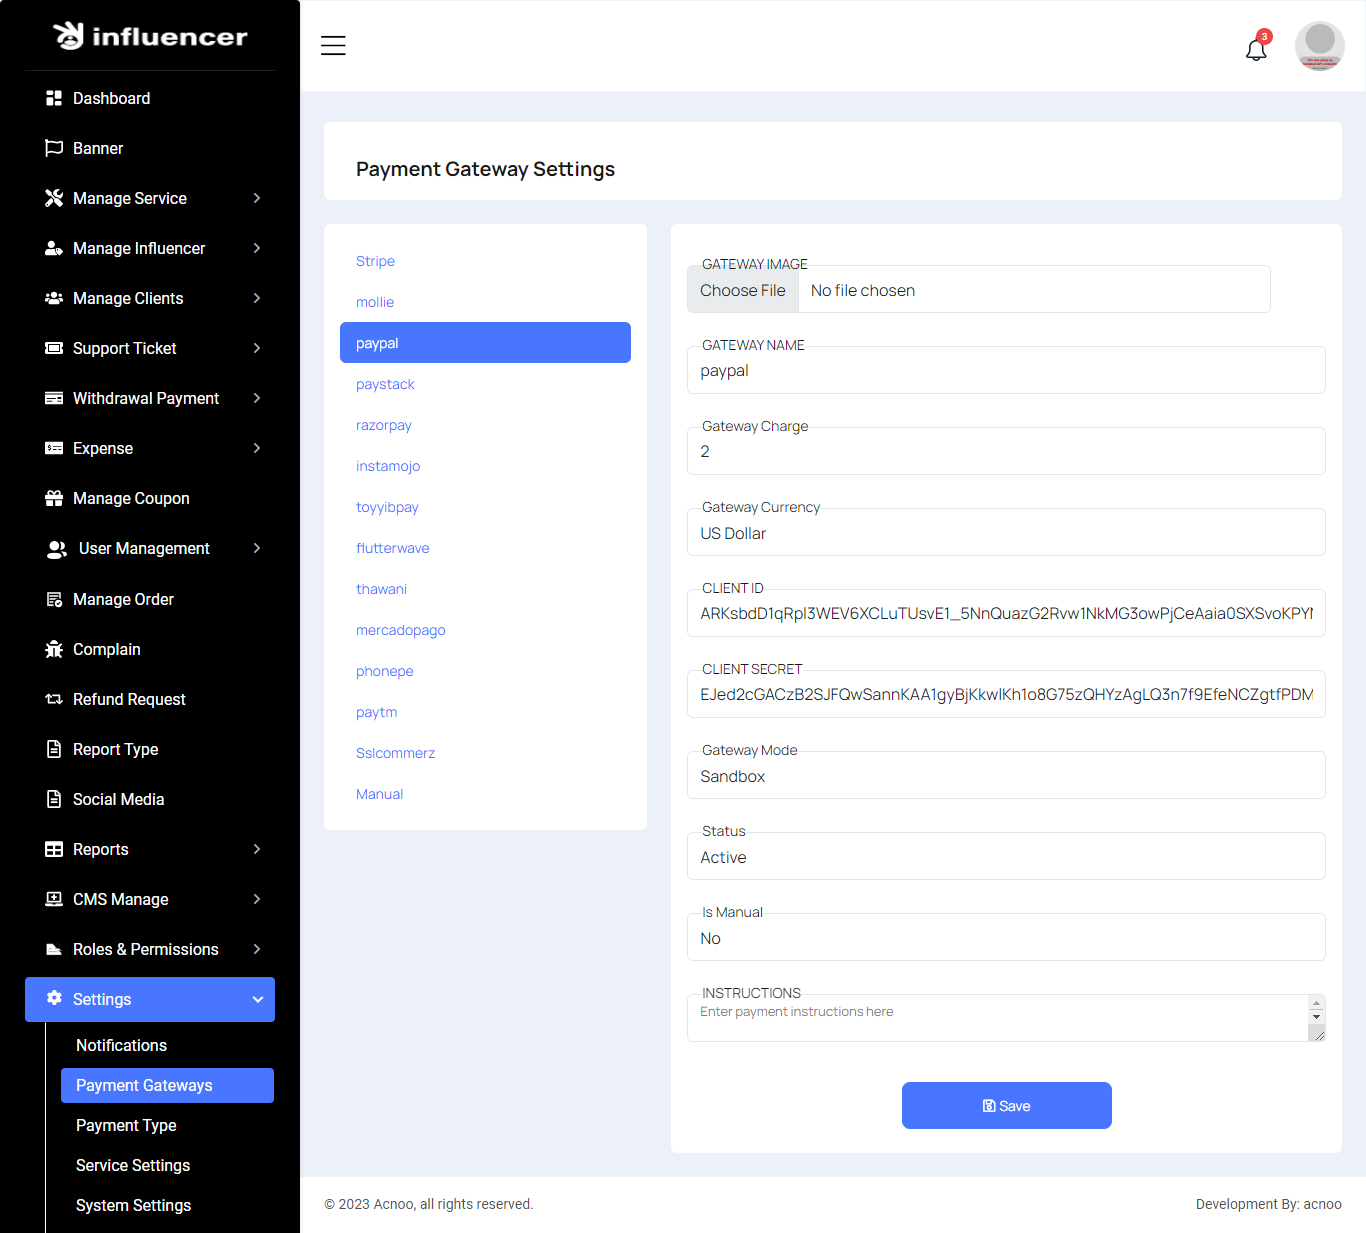
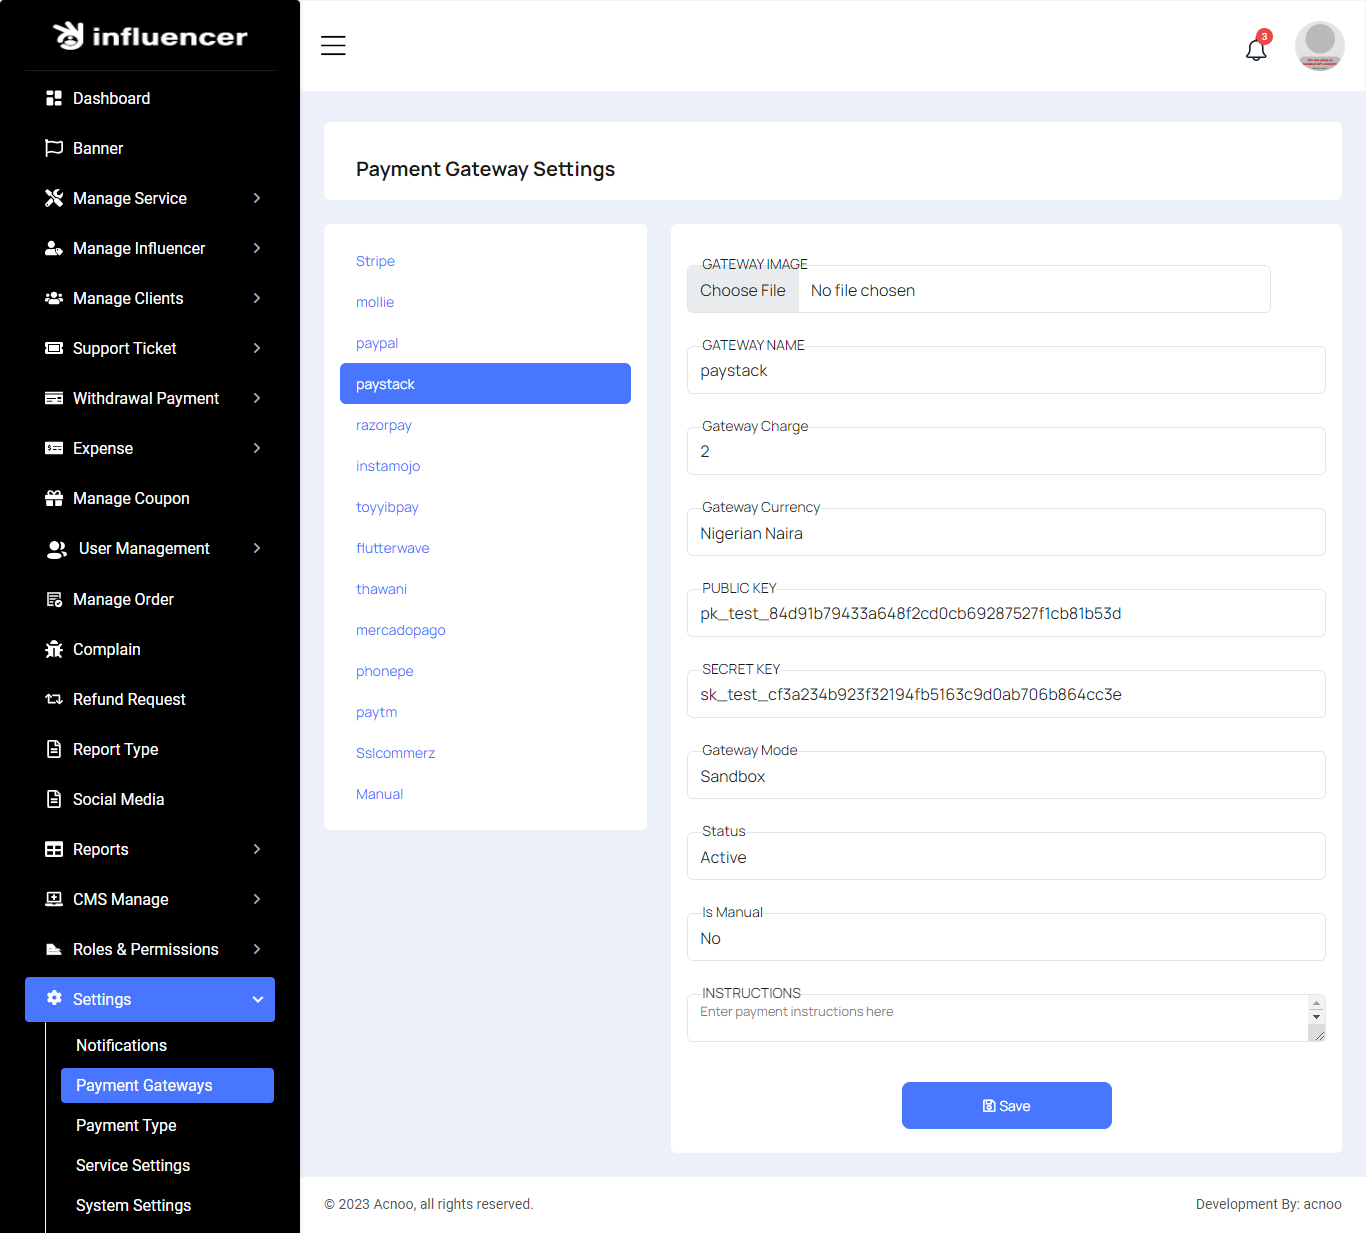
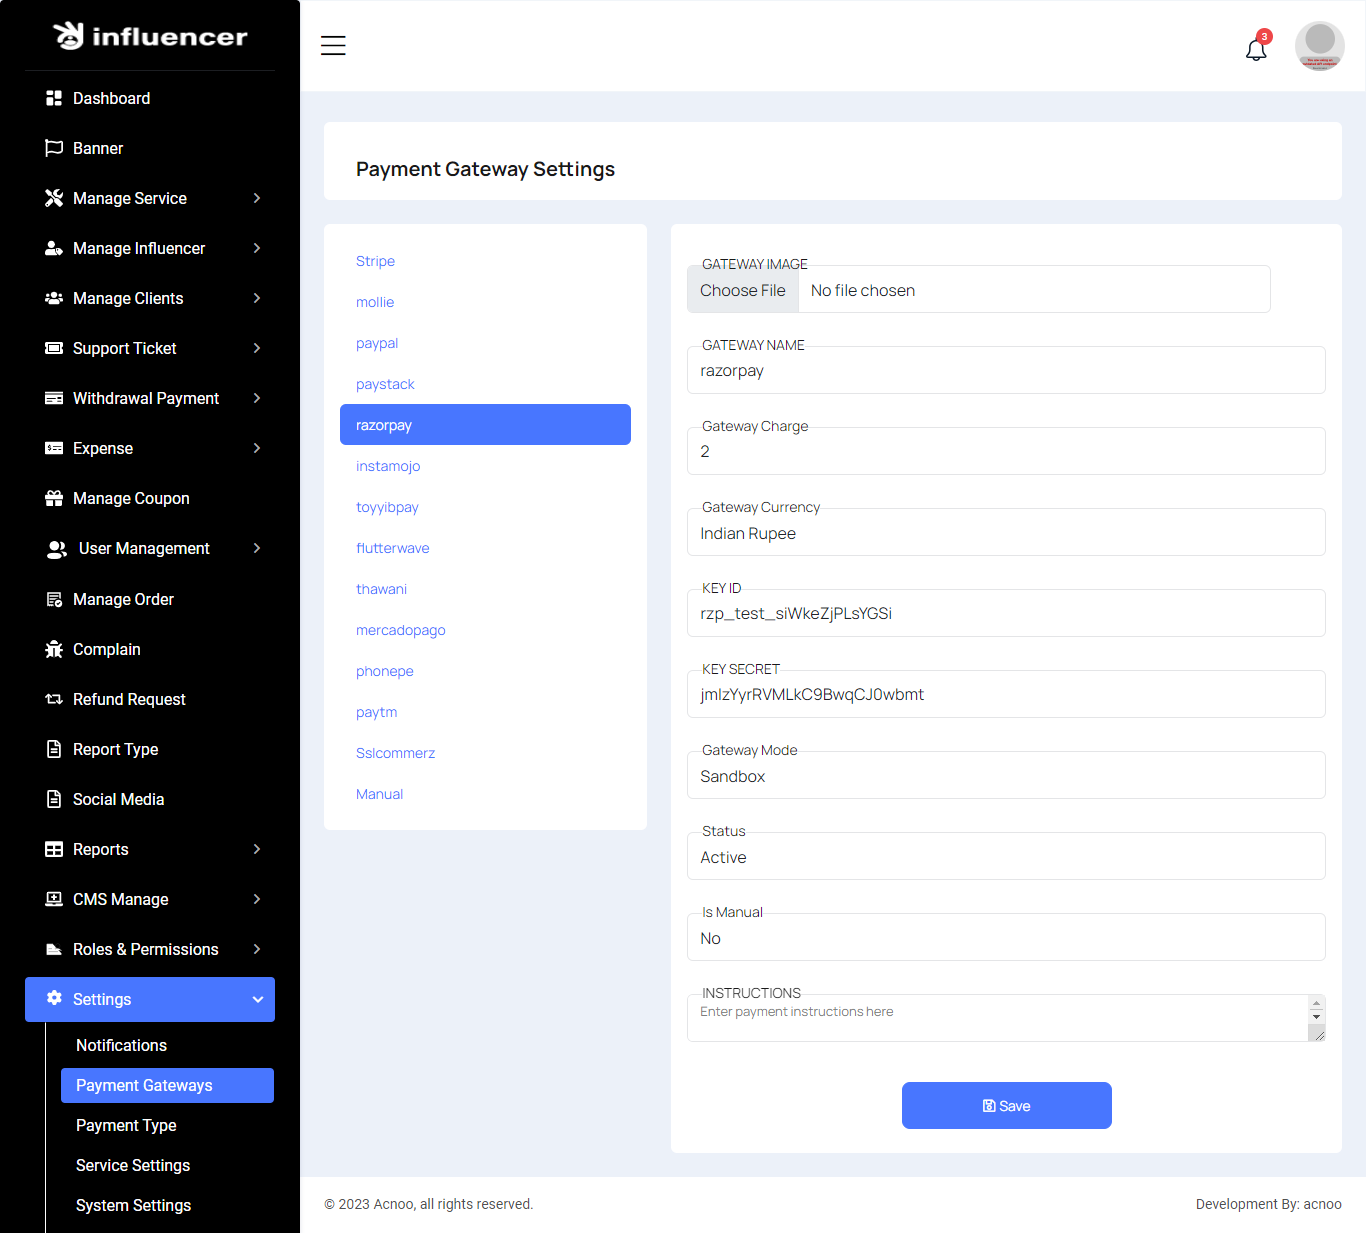
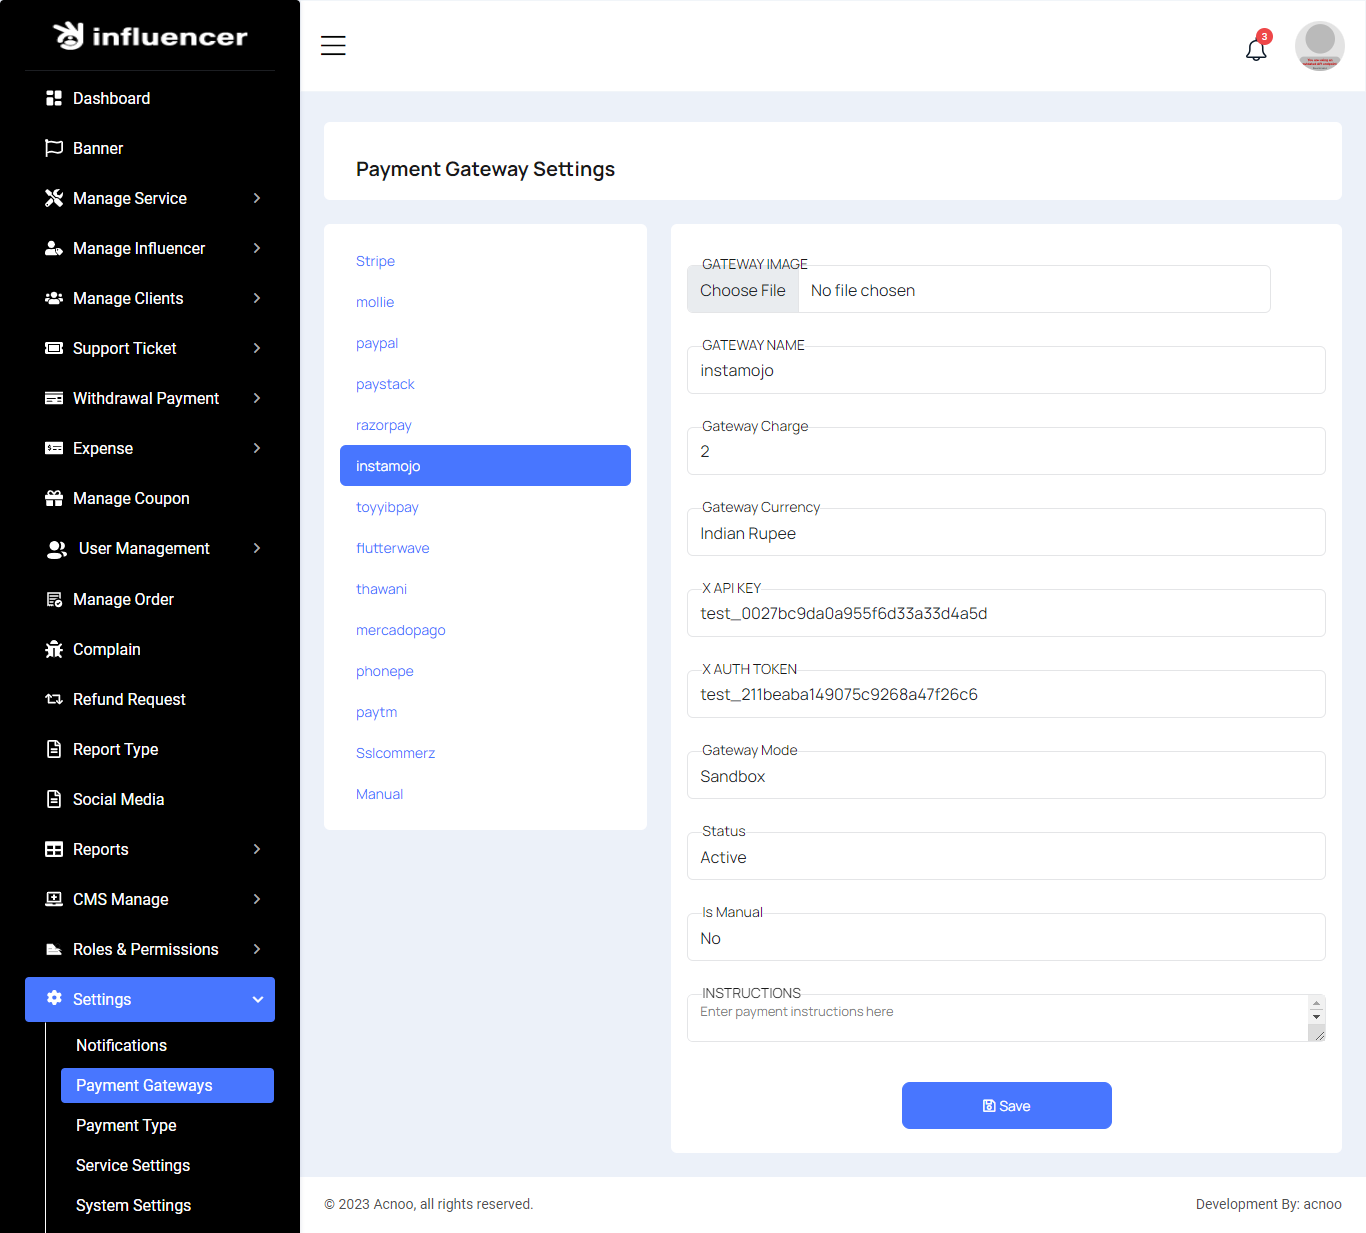
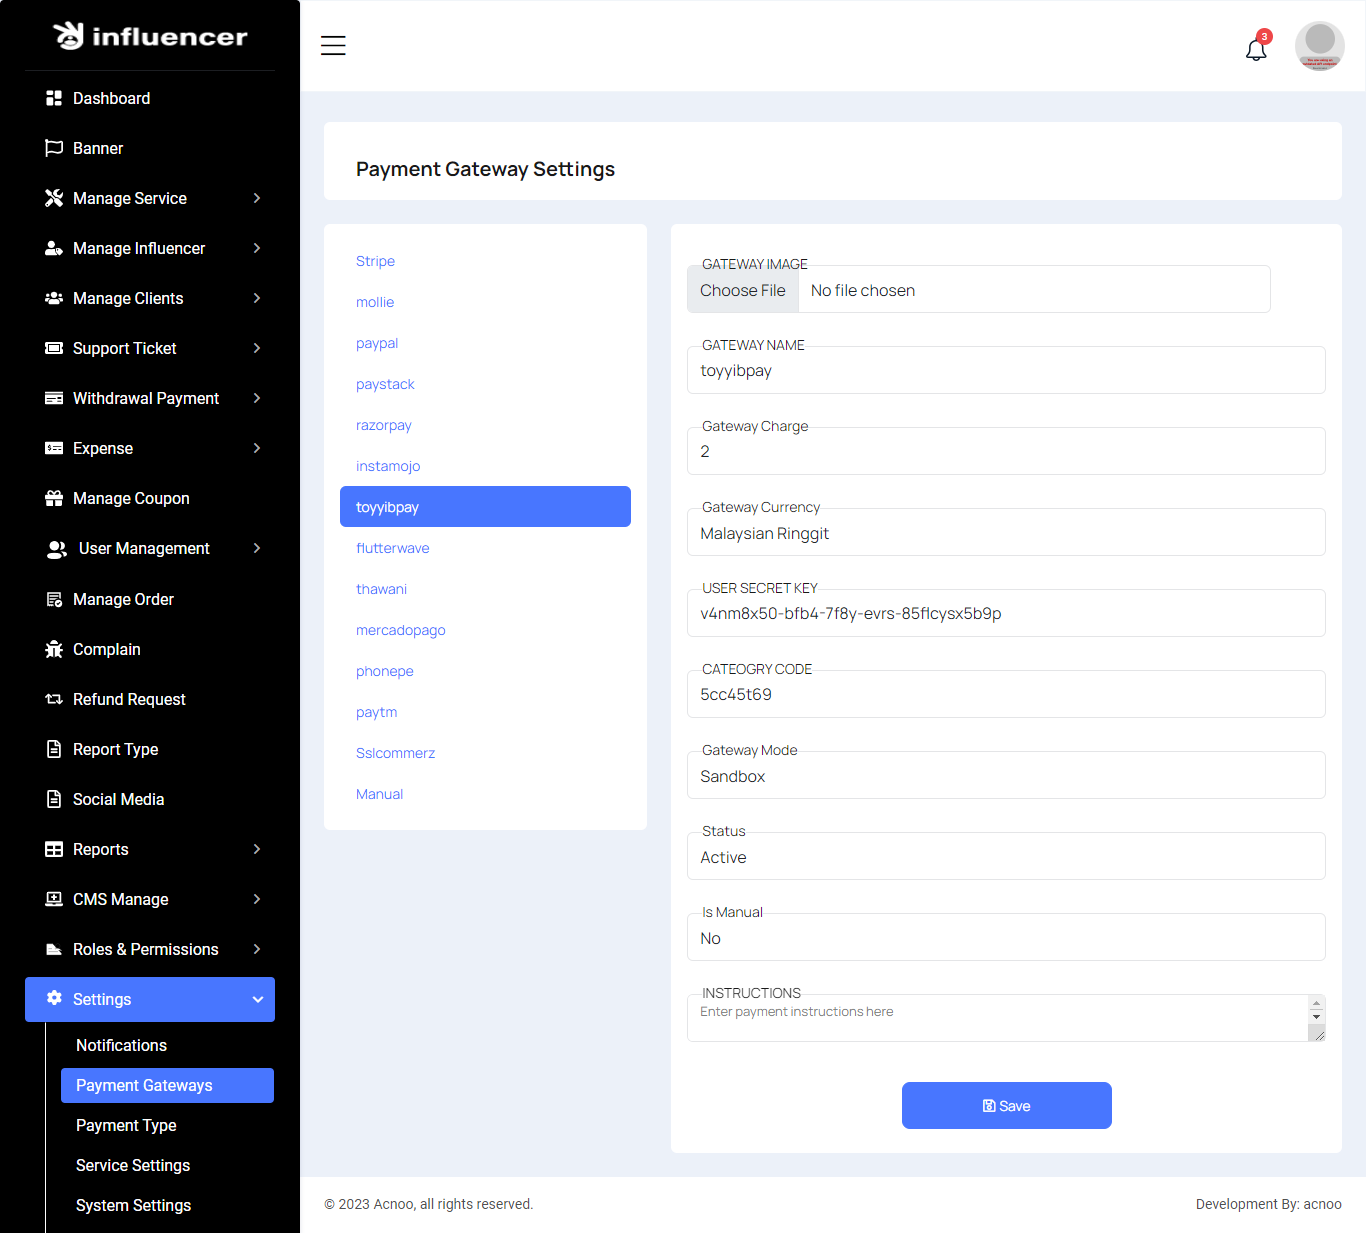
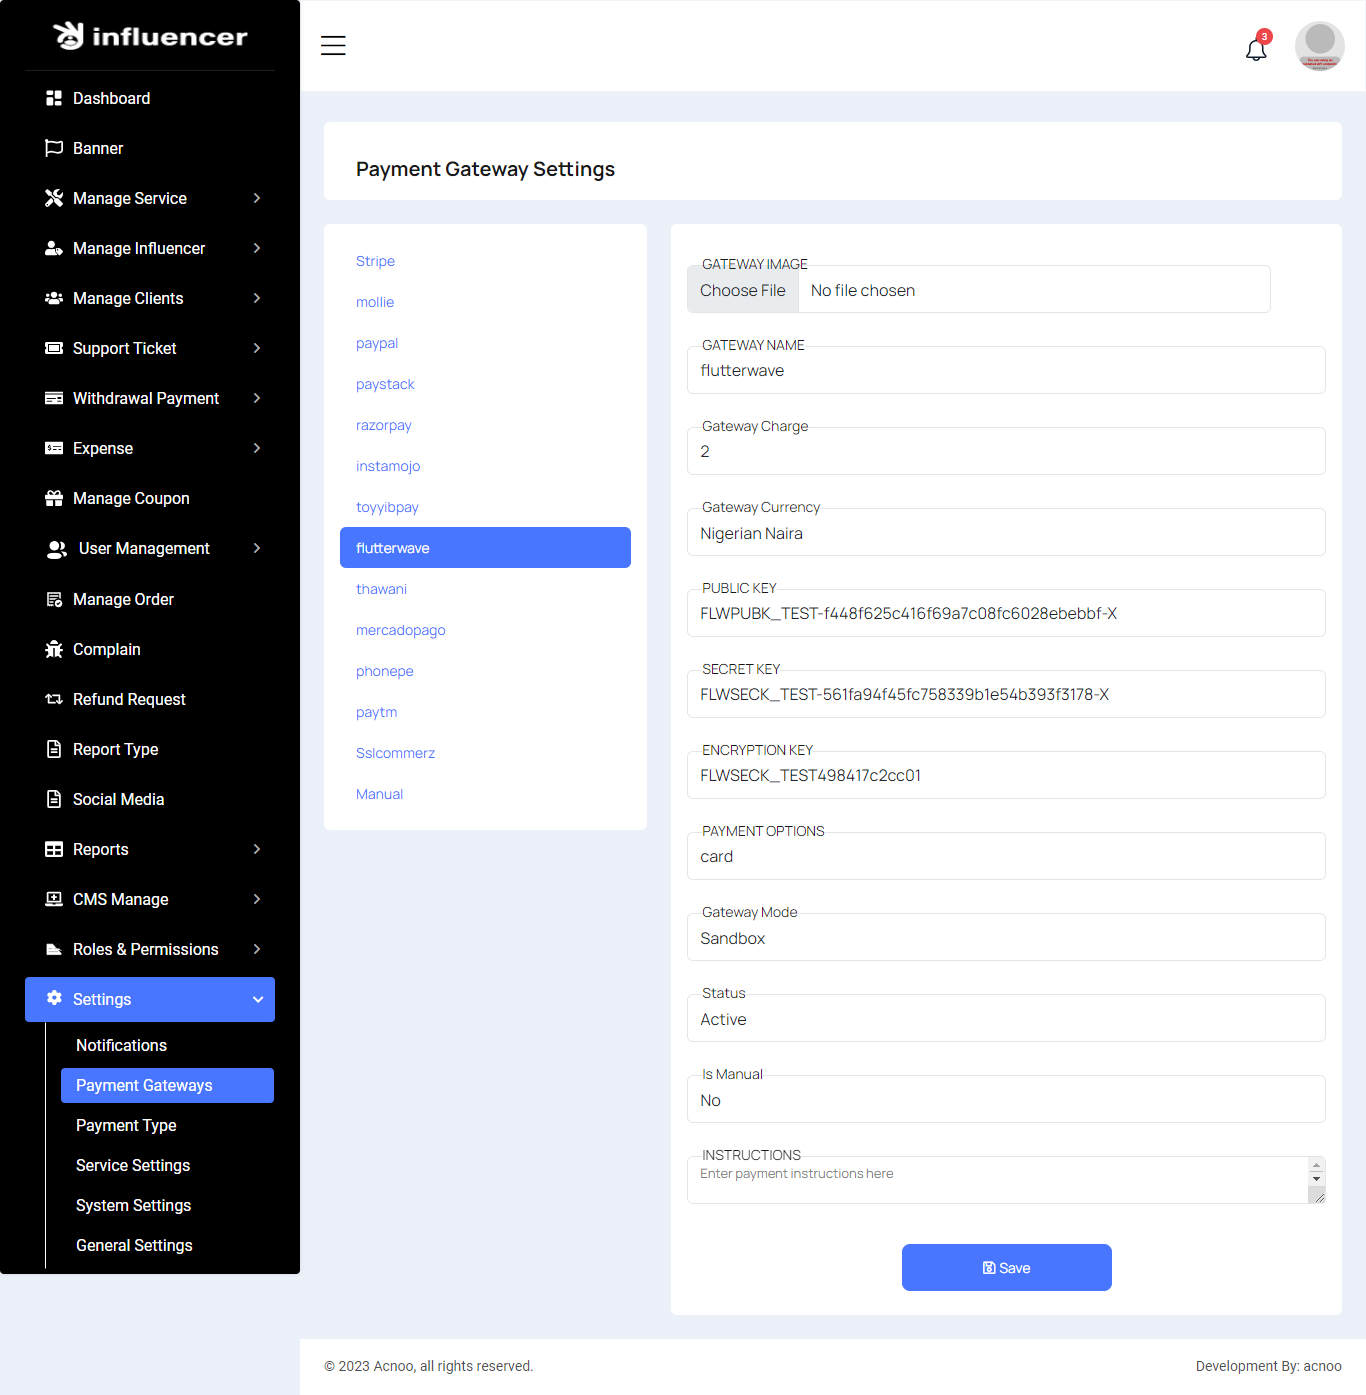
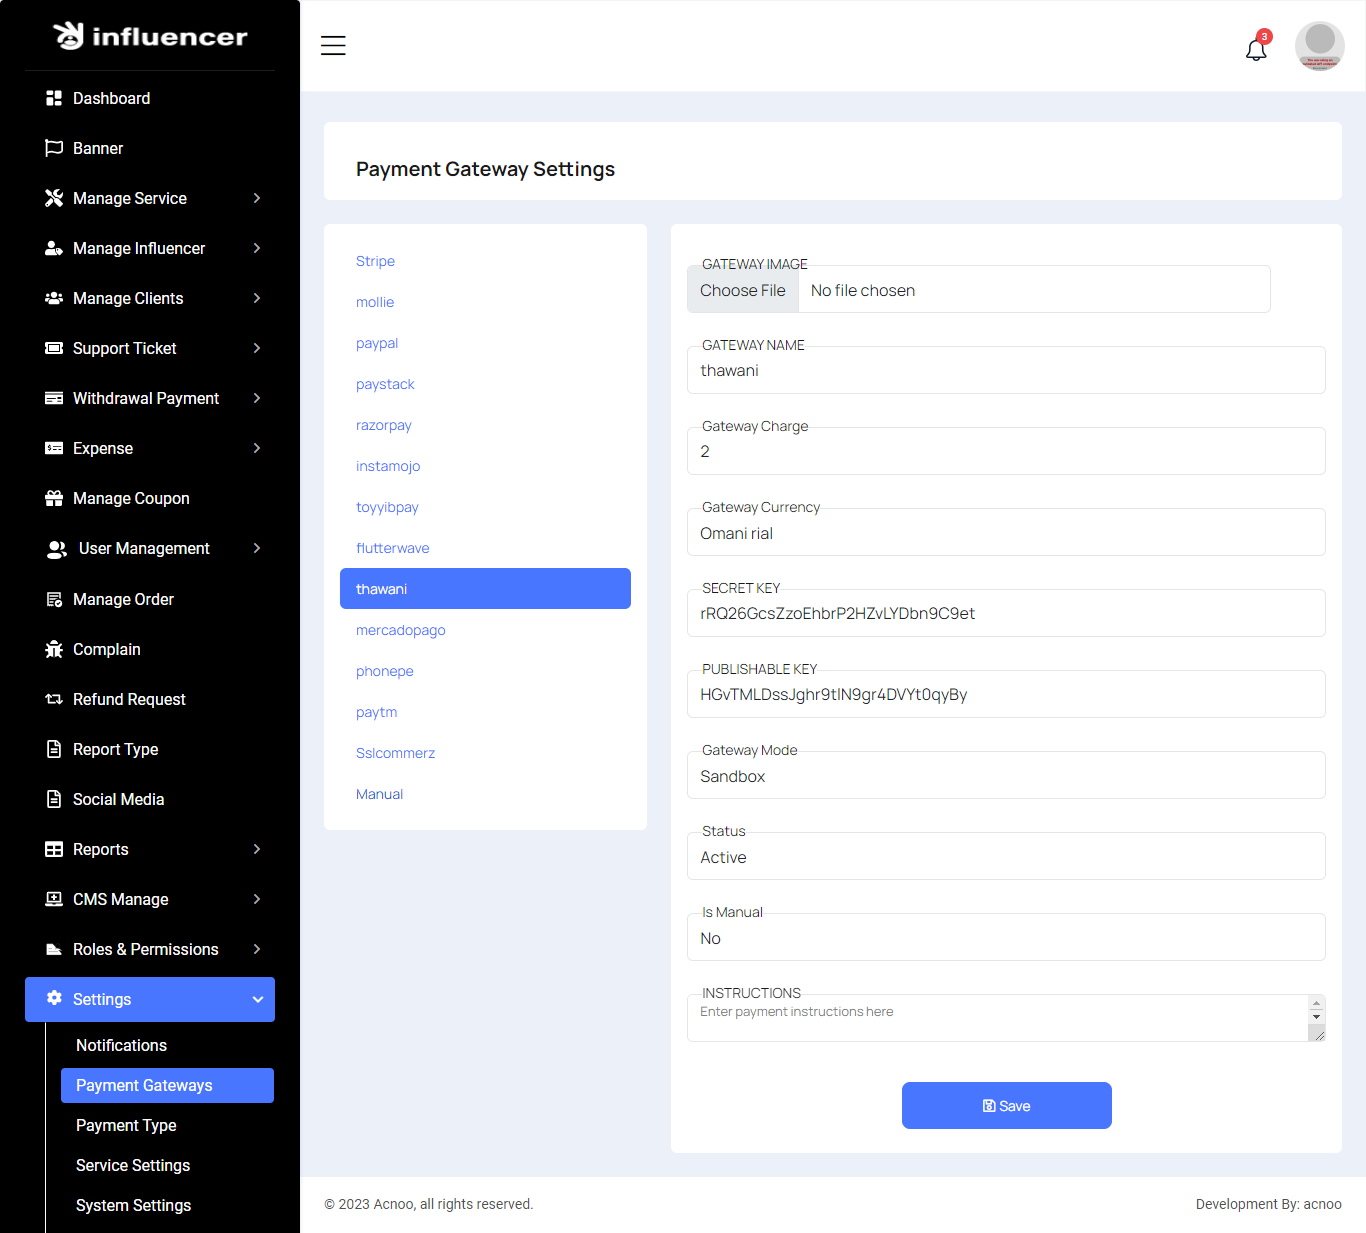
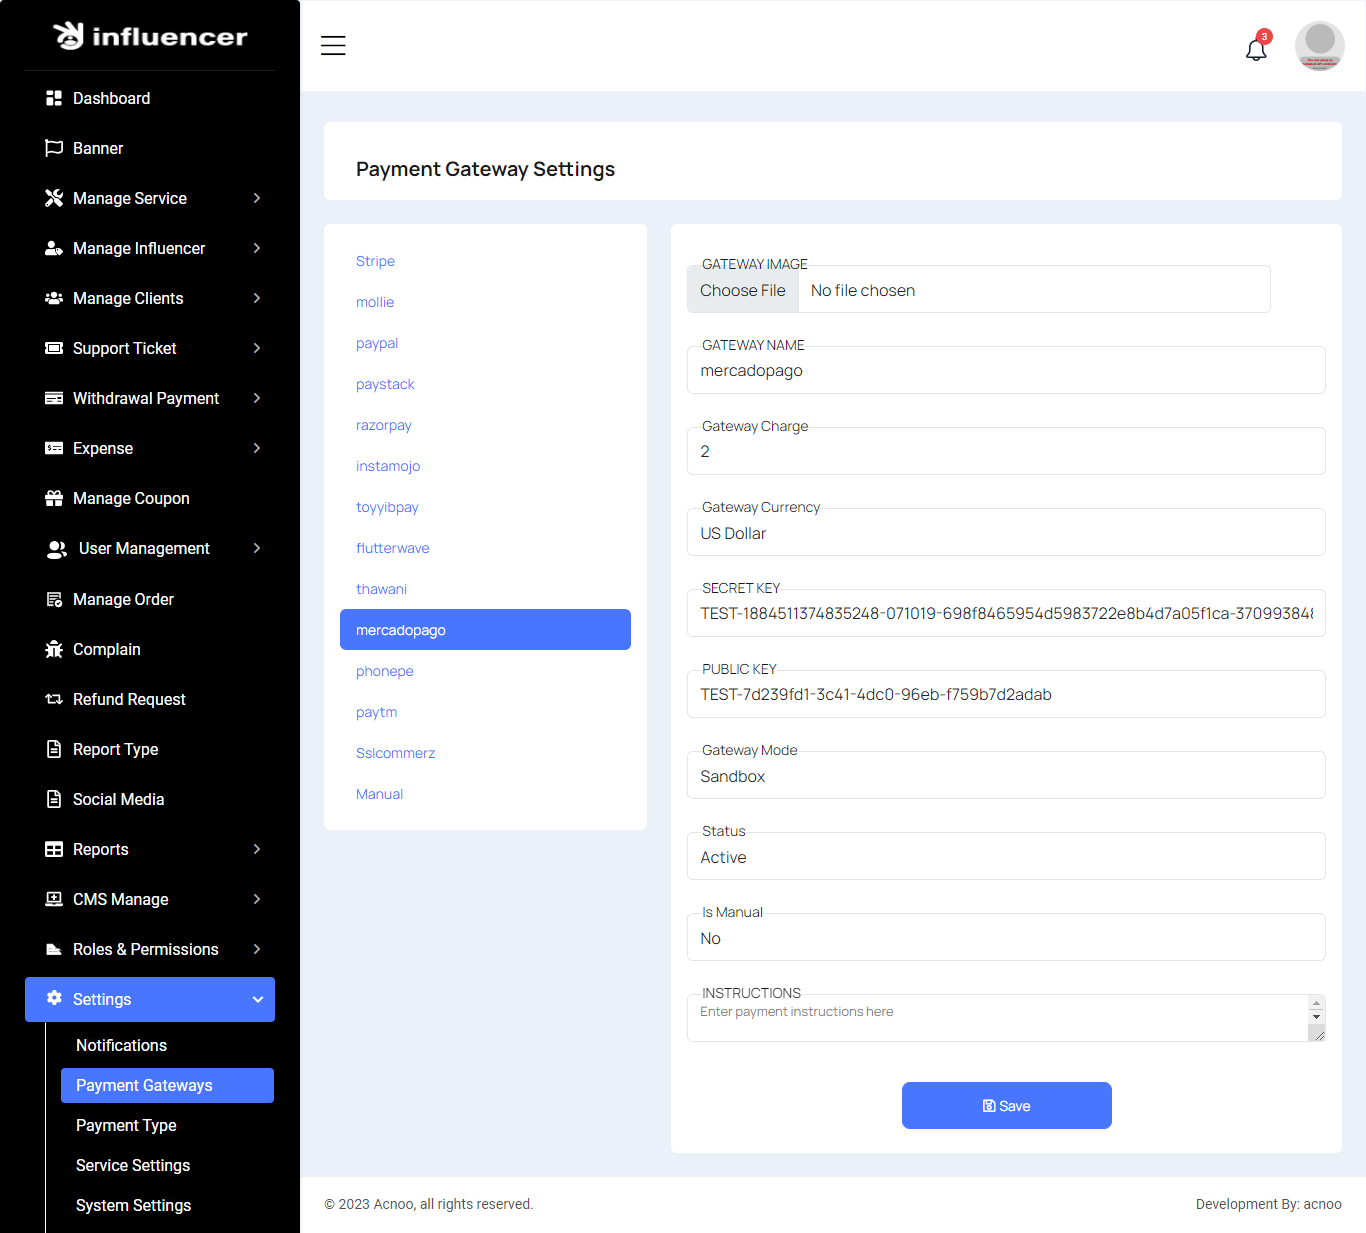
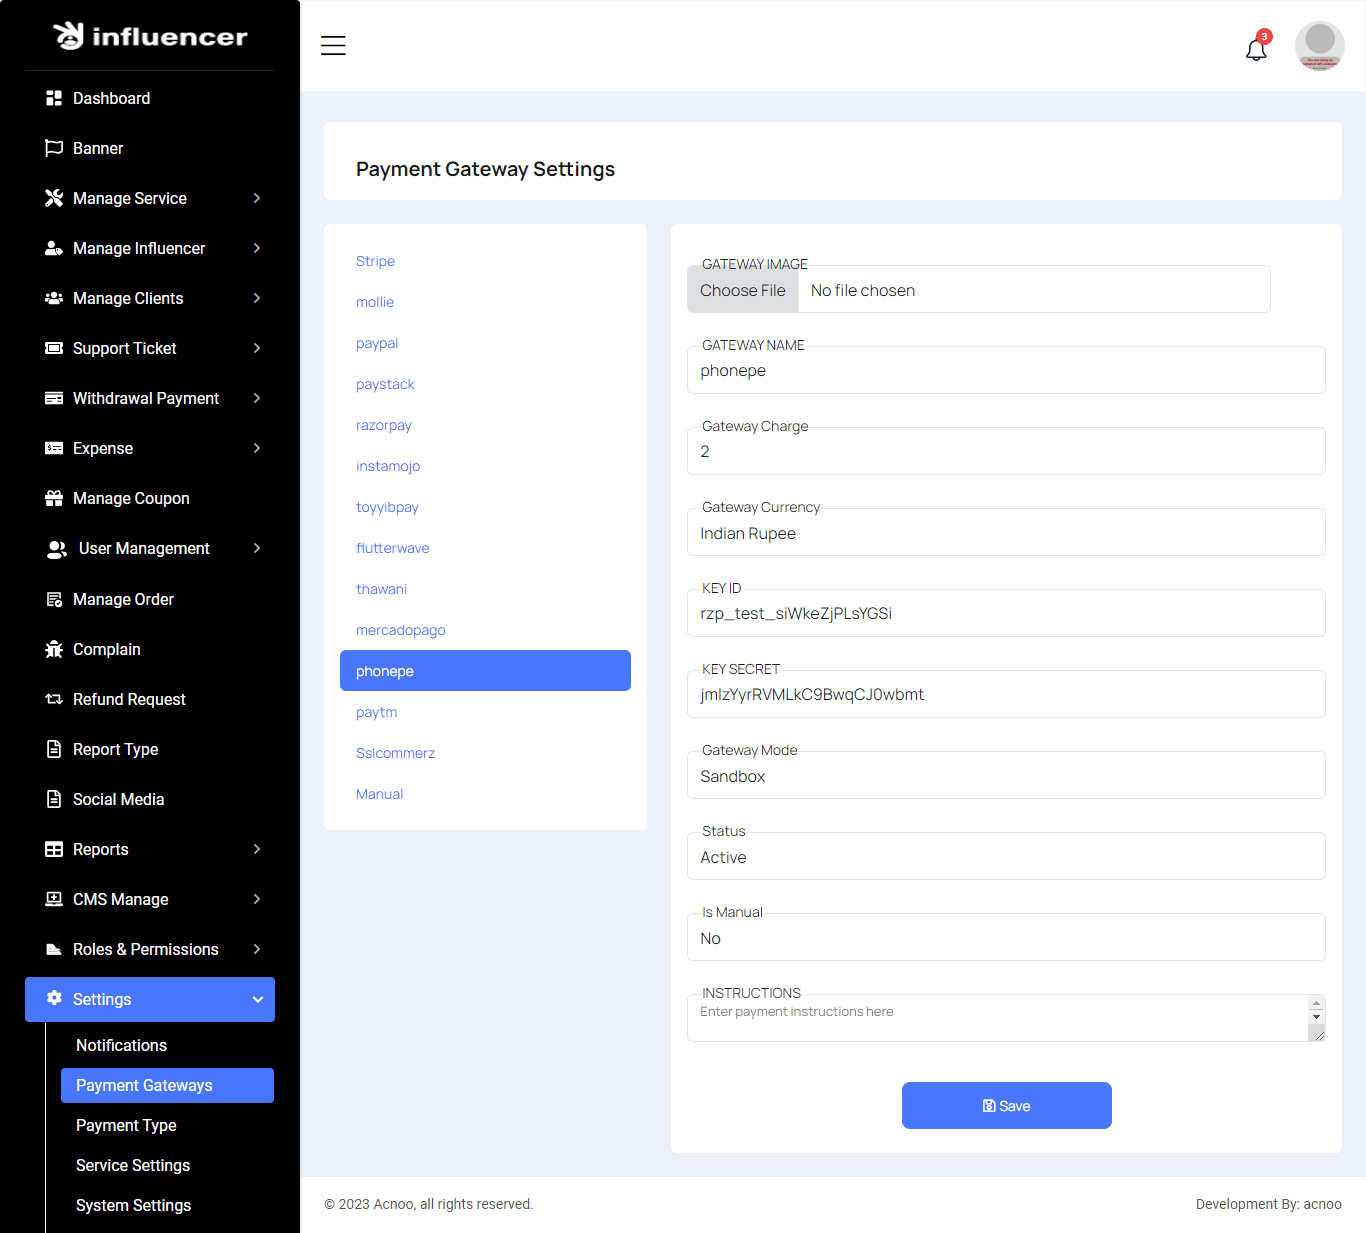
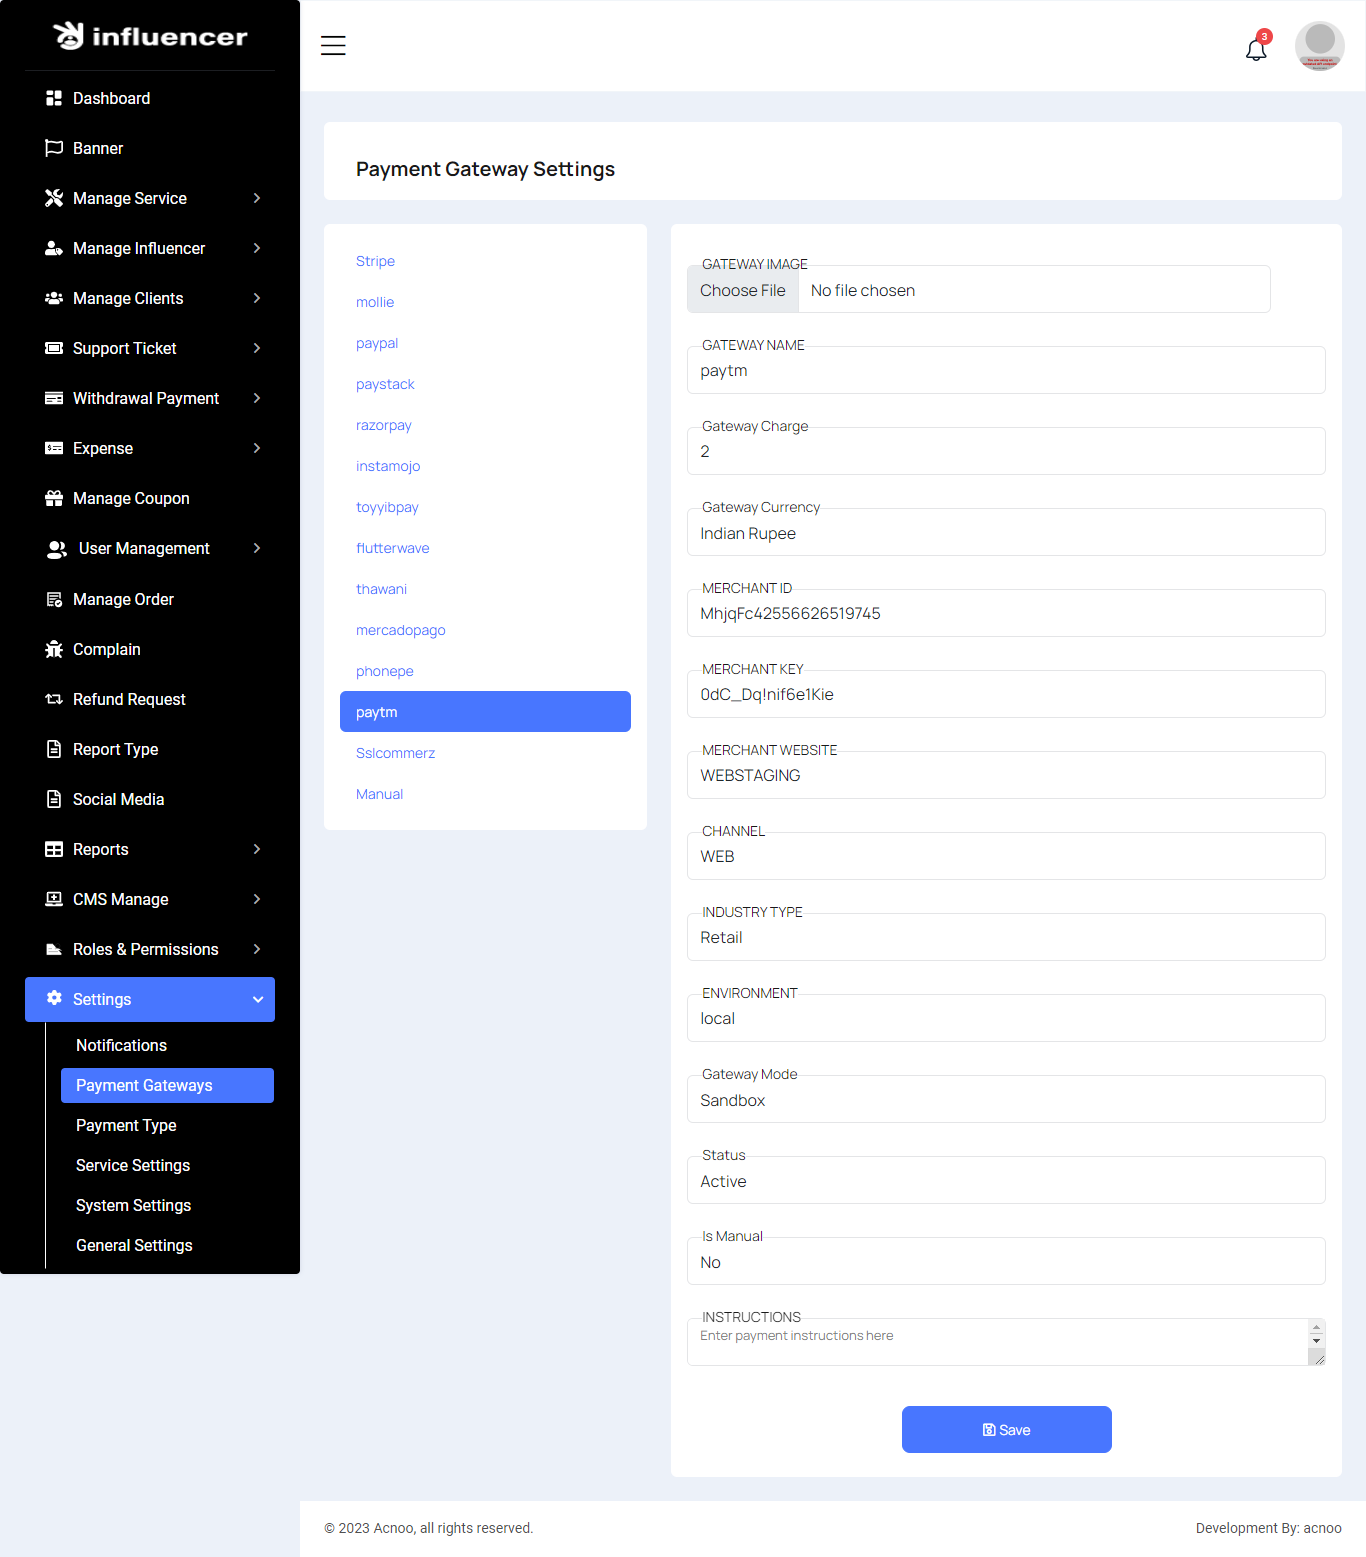
Payment Gateway Settings
Here, you can modify various payment gateways like Stripe, PayPal, SSLCommerz, manual and many others options.
Stripe
Mobile
Paypal
Paystack
Razorpay
Instamojo
Toyyibpay
Flutter Wave
Thawani
Mercadopago
Phonepe
Paytm
Sslcommerz
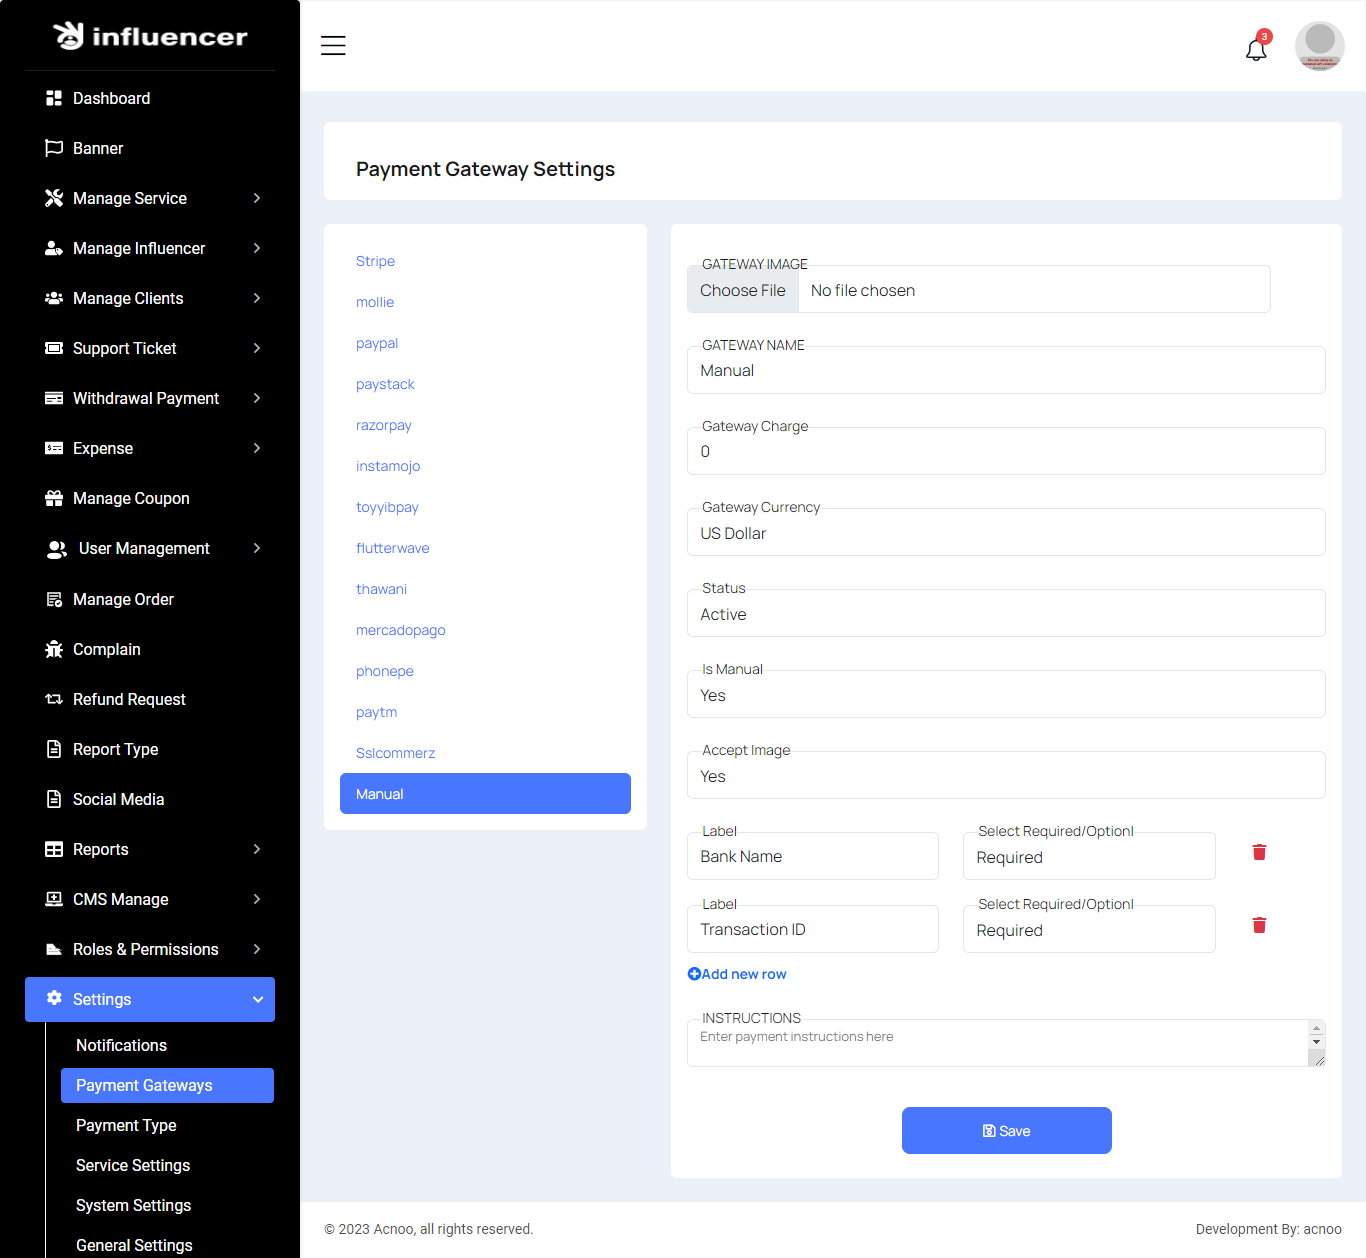
Manual

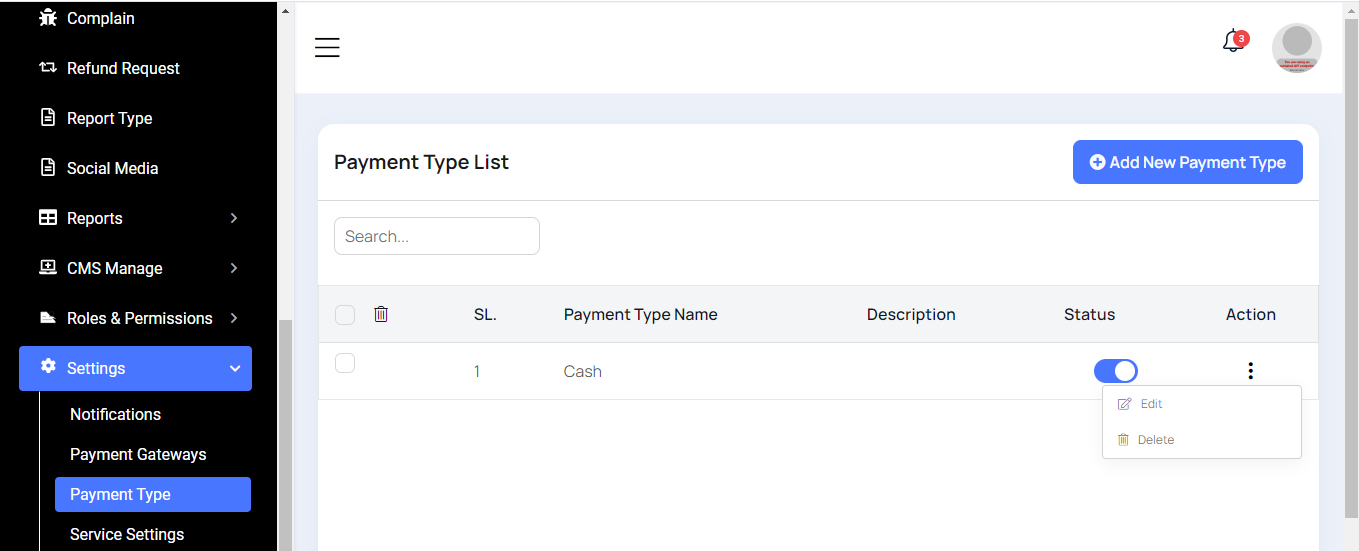
Payment Type List
Here, you can view the Payment Type list with a search feature. You also have options to edit, delete, or perform multi-deletions.
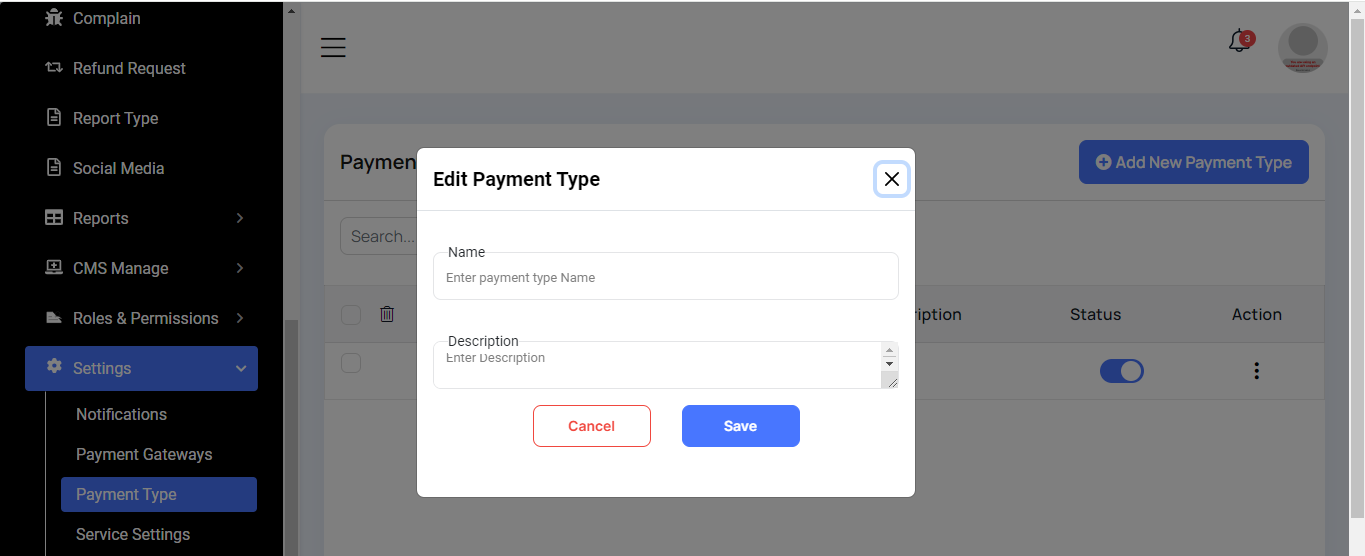
Create Payment Type
Here, you can create a payment type by filling out the required fields.
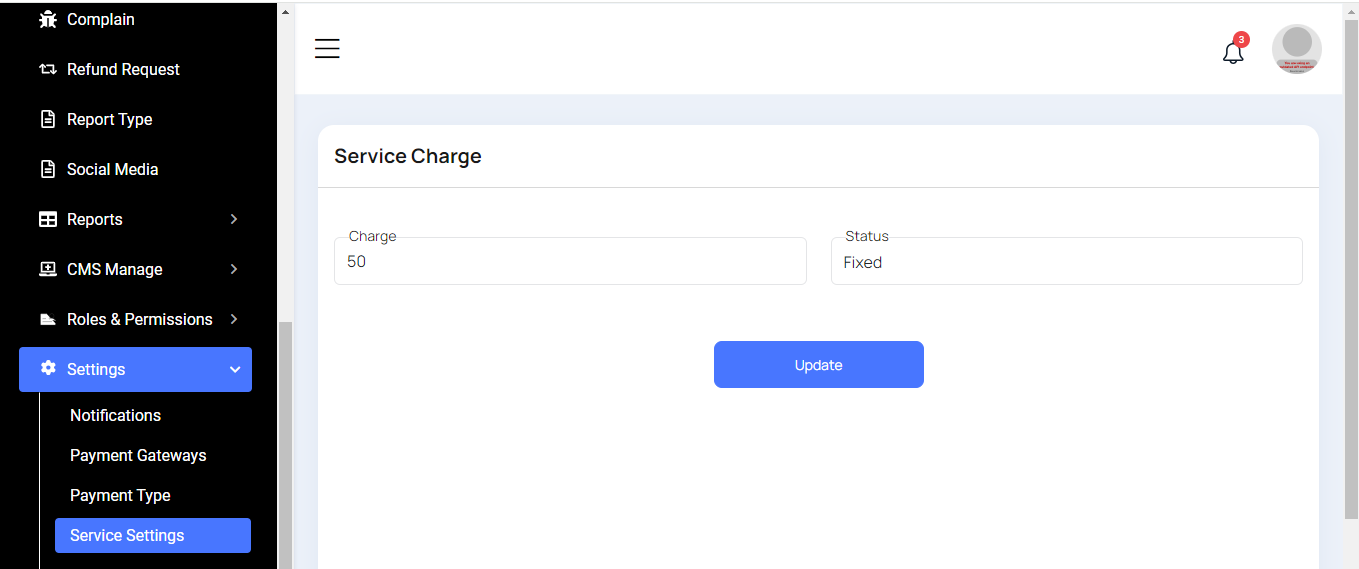
Service Setting
Here you can update service charge & status.
System Settings
In this section, you can configure various backend settings for the project, including application setup, driver configurations, mail settings, storage configurations, and other essential components. It's crucial to handle these configurations with care as they impact the functionality and security of the system.
App

Drivers
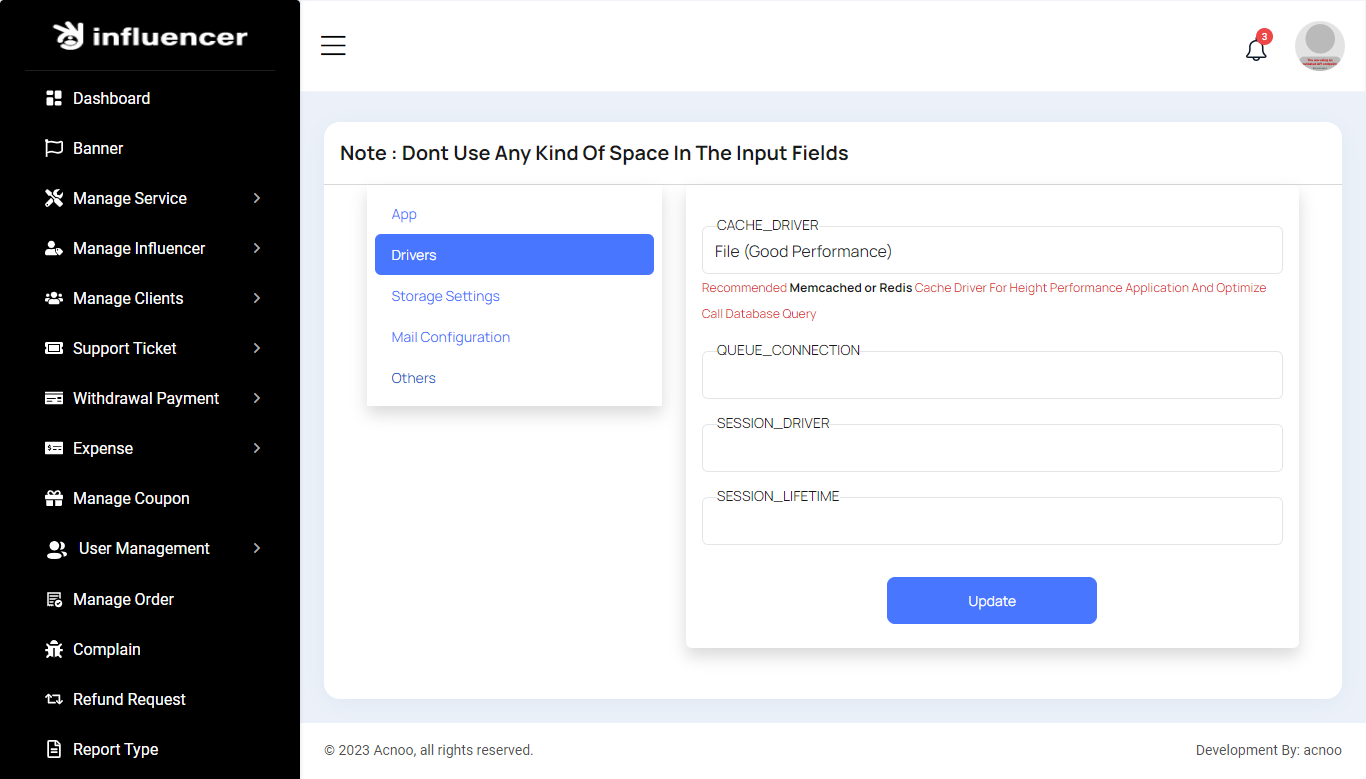
Drivers
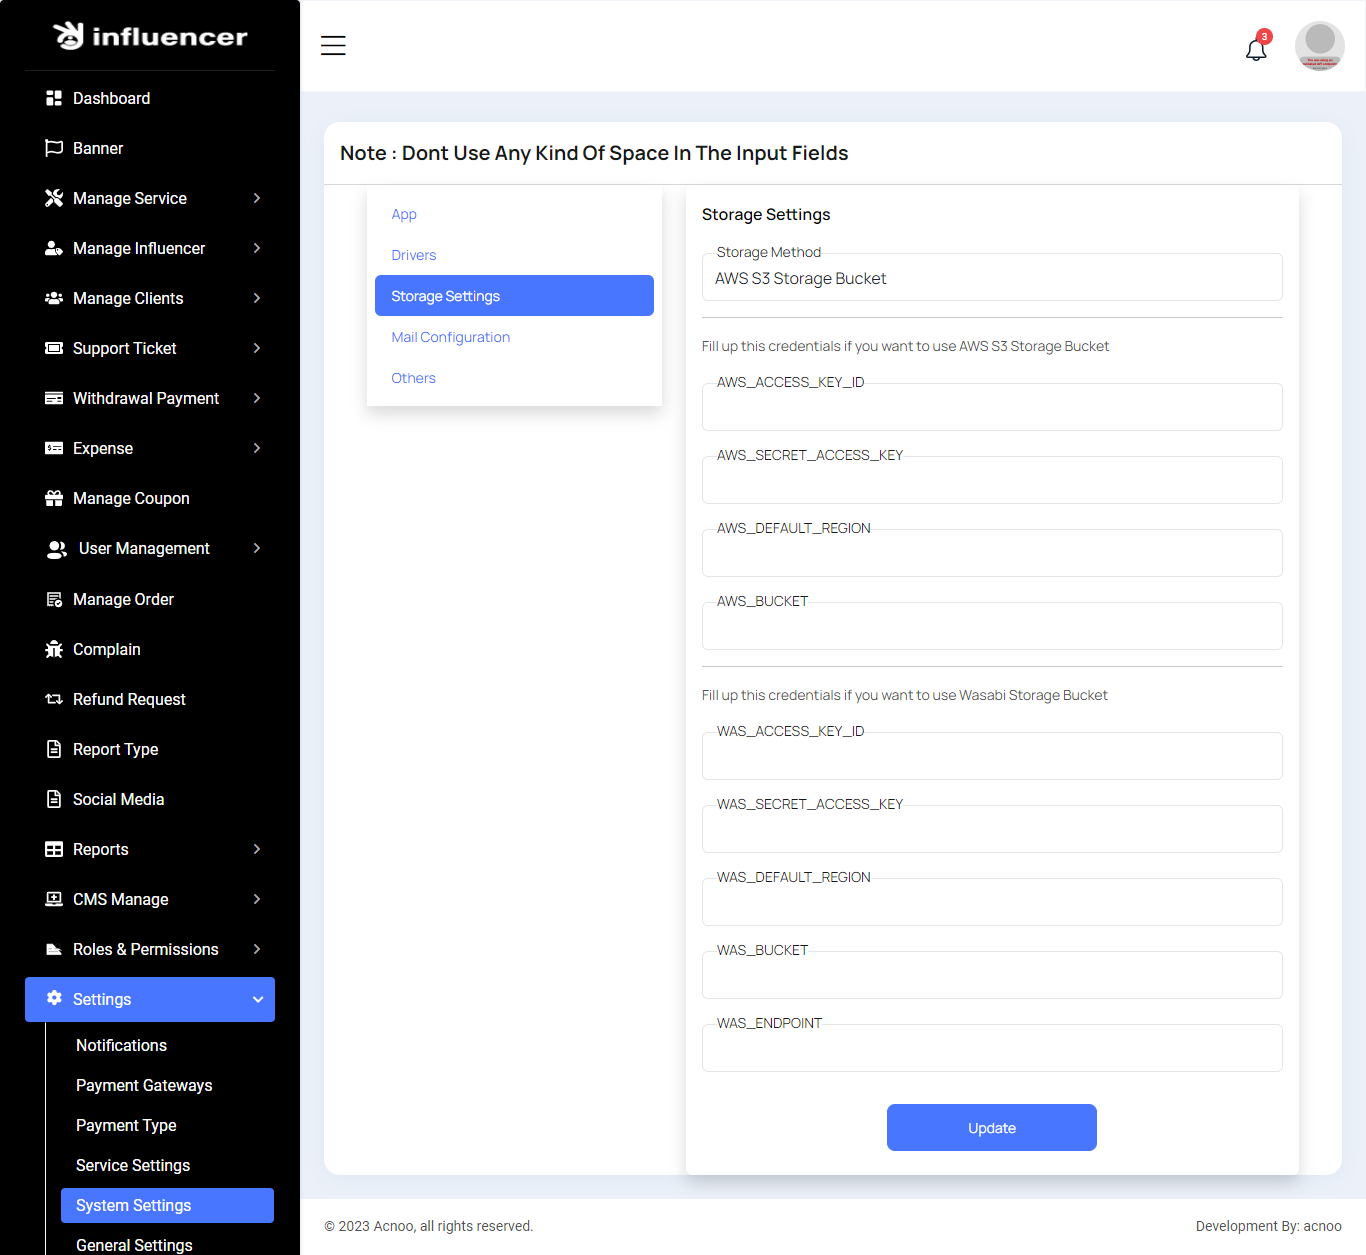
Storage Settings
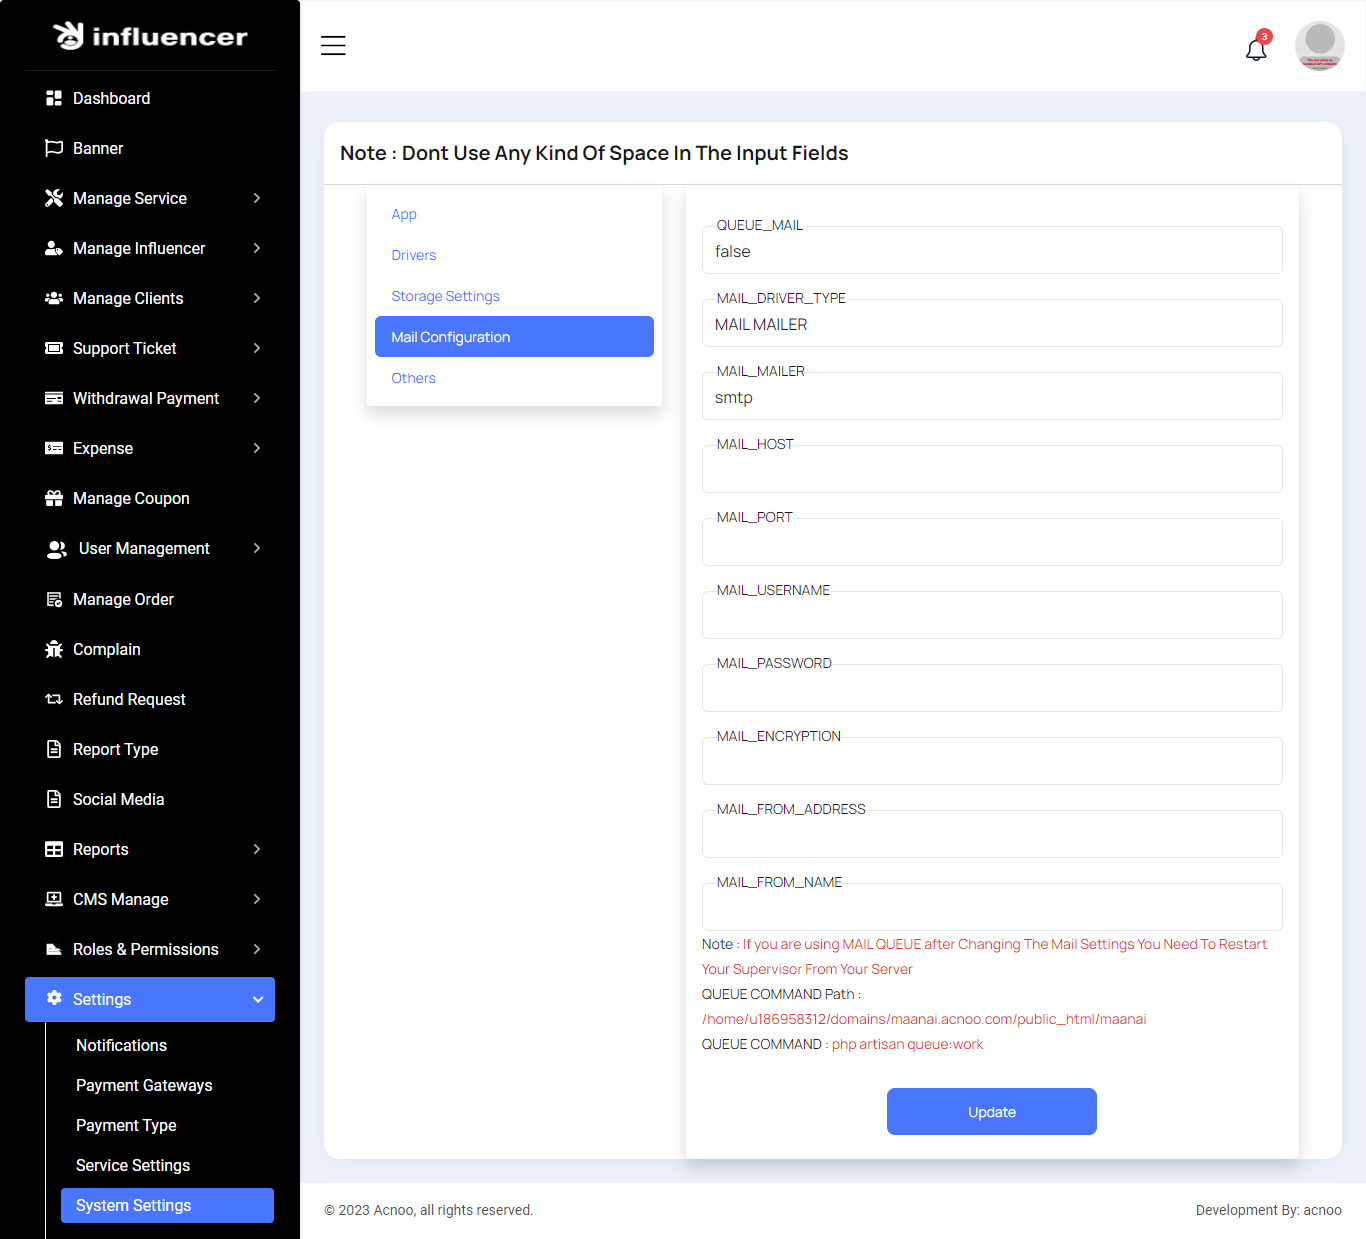
Mail Configuration
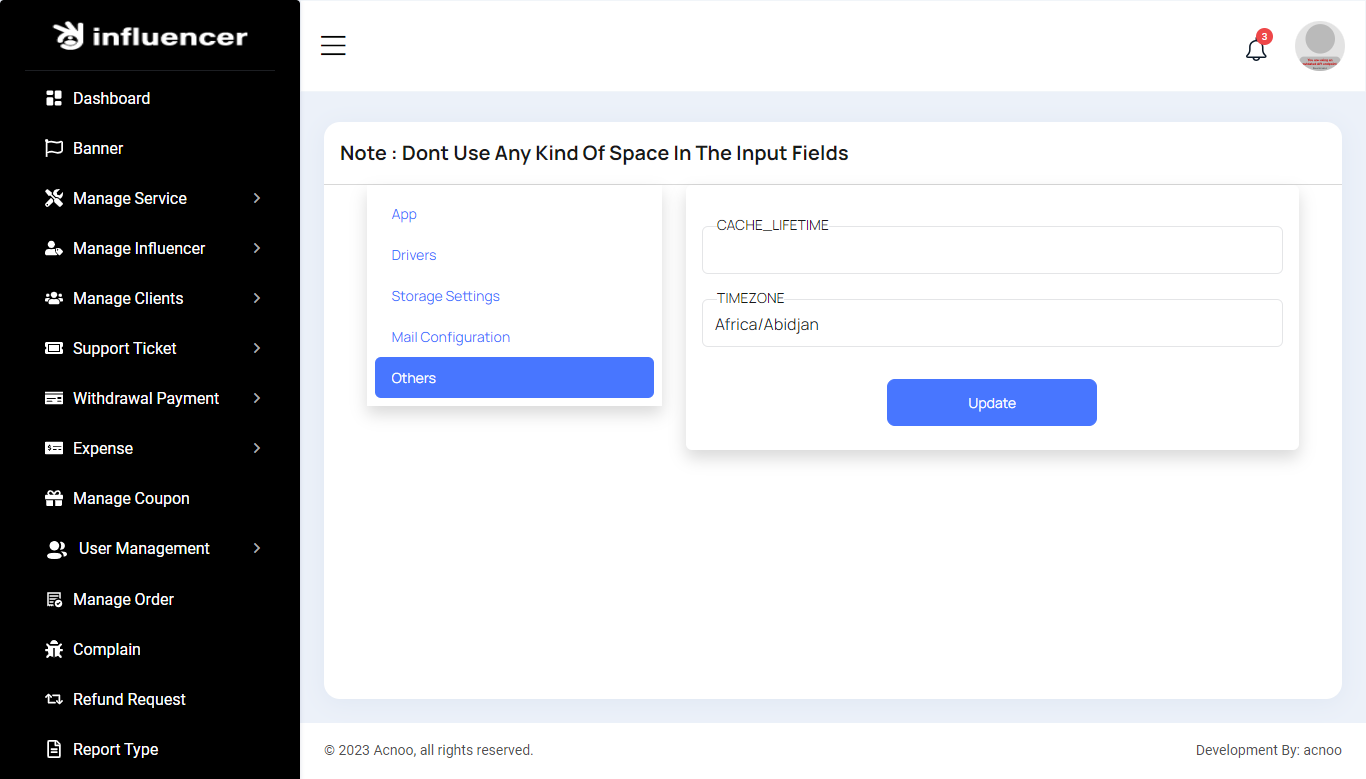
Others
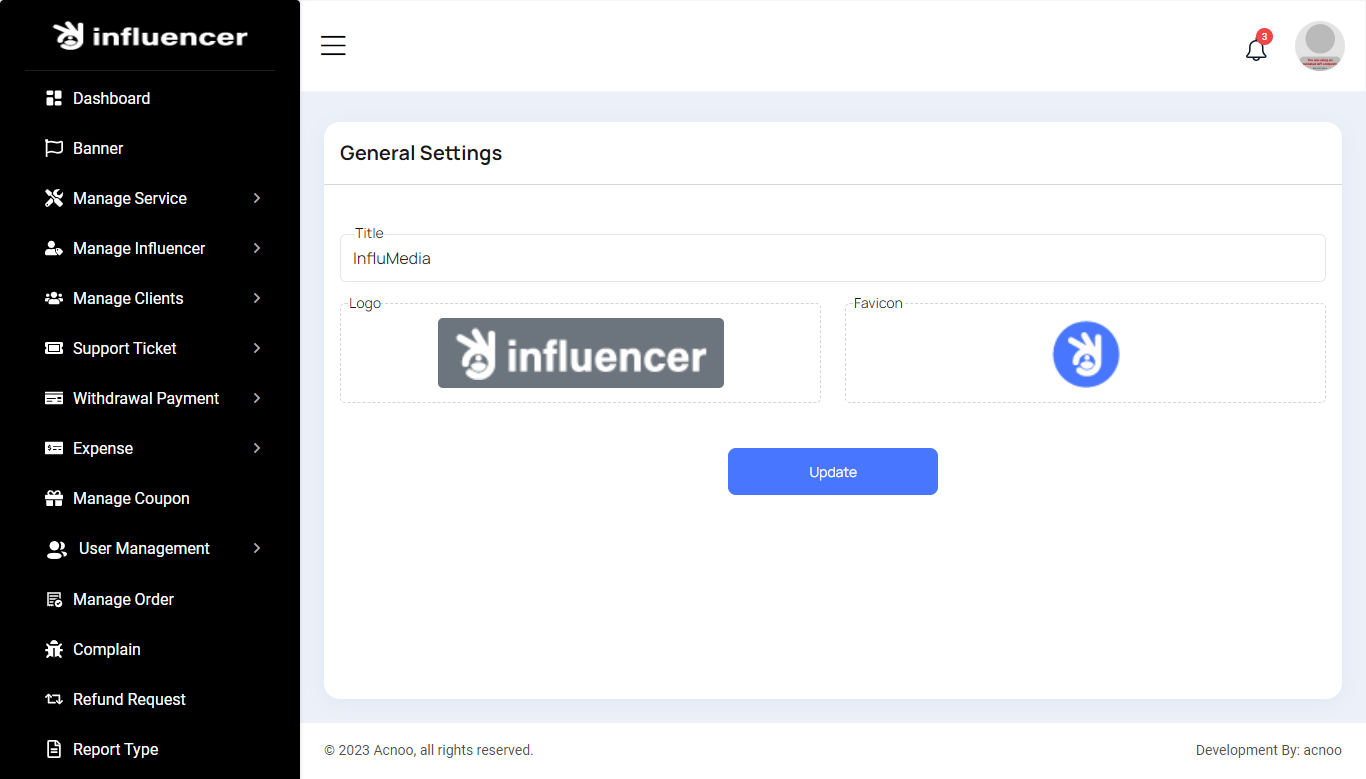
General Settings
You have the capability to modify the general project information.
Flutter App Installation Setup Start
This guide will get you started with the setup of the application on your local machine.Now that you have set up your server, it’s time to set up the mobile application to consume the data from your website. This guide will help you to connect the application with your server.
Tools & Setup
Prerequisite
- Android Studio: 2024.1.1
- Flutter: 3.16.0 upto latest version
- Flutter & Dart SDK
- Anyone IDE Android Studio (Recommended), Visual Studio Code or IntelliJ IDEA
- To edit this project you must have Flutter and Dart installed and configured successfully on your computer.
- Set up your editor - Install the Flutter and Dart plugins.
- If you have got Android SDK installed and configured, to install Flutter you only need
to:
- Download Flutter SDK from official website and extract it.
- Add path to previously extracted SDK to your PATH variable
- Run flutter doctor tool to check if everything is configured correctly.
- All above steps are mentioned here: https://flutter.dev/docs/get-started/install/
Android Studio – Windows
- Download Android Studio - https://developer.android.com/studio/
- Get the Flutter SDK - https://flutter.dev/docs/get-started/install
- Learn more about Android Studio - https://developer.android.com/studio/intro/
Step 1 : Get the Flutter SDK
- Download the following installation bundle to get the latest stable release of the Flutter SDK:
- Extract the zip file and place the contained flutter in the desired installation location for the Flutter SDK (for example, C:\src\flutter; do not install Flutter in a directory like C:\Program Files\ that requires elevated privileges)
Step 2 : Update your path
If you wish to run Flutter commands in the regular Windows console, take these steps to add Flutter to the PATH environment variable: From the Start search bar, enter ‘env’ and select Edit environment variables for your account. Under User variables check if there is an entry called Path:
- If the entry exists, append the full path to flutter\bin using ; as a separator from existing values.
- If the entry doesn’t exist, create a new user variable named Path with the full path to flutter\bin as its value
Important
Note that you have to close and reopen any existing console windows for these changes to take effect. You are now ready to run Flutter commands in the Flutter Console!
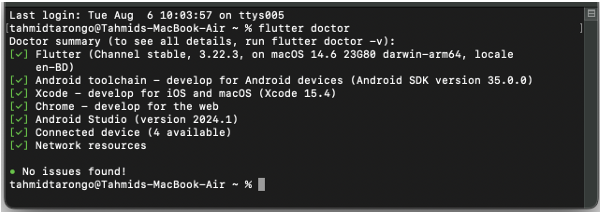
Step 3 : Run flutter doctor
From a console window that has the Flutter directory in the path (see above), run the following command to see if there are any platform dependencies you need to complete the setup:
Android Studio – macOS
- Download Android Studio - https://developer.android.com/studio/
- Download Xcode - https://apps.apple.com/us/app/xcode/id497799835?mt=12
- Get the Flutter SDK - https://flutter.dev/docs/get-started/install
- Learn more about Android Studio - https://developer.android.com/studio/intro/
Step 1 : Get the Flutter SDK
- Download the following installation bundle to get the latest stable release of the Flutter SDK:
- Download SDK and extract downloaded file, just double click on that. and just copy extracted folder and paste it to your desired location (for example, Documents\flutter).
Step 2 : Update your path
Important
Path variable needs to be updated to access “flutter” command from terminal. you can just update path variable for current terminal window only. and if you want to access flutter commands from anywhere in terminal, we need to update SDK path permanently.
To update PATH variable, we need to open terminal.
To update PATH variable for current terminal window only, then enter this command "export PATH="$PATH:`pwd`/flutter/bin"" and hit enter key.
To update PATH variable permanently, then Open or create .bash_profile file. to open
or
create that file, then enter "sudo open -e $HOME/.bash_profile" and hit enter
key.Append
below line to bash_profile file at bottom of all other content. "export PATH="$PATH:
[PATH_TO_FLUTTER_GIT_DIRECTORY]/flutter/bin"" as
[PATH_TO_FLUTTER_GIT_DIRECTORY] is actual path of SDK folder.
Run this command on terminal "source $HOME/.bash_profile" to refresh PATH variables.
Then check whether our SDK is successfully installed or not.
You are now ready to run Flutter commands in the Flutter Console!
Run "flutter doctor" into terminal, If you are getting check list of flutter sdk requirements, it means SDK is successfully installed on your machine. and you can start building flutter apps on your machine.
Android Studio – Linux
- Download Android Studio - https://developer.android.com/studio/
- Get the Flutter SDK - https://flutter.dev/docs/get-started/install/linux
- Learn more about Android Studio - https://developer.android.com/studio/intro/
Step 1 : Get the Flutter SDK
- Download the following installation bundle to get the latest stable release of the Flutter SDK:
- Download SDK and extract downloaded file, just double click on that. and just copy extracted folder and paste it to your desired location (for example, Documents\flutter).
Step 2 : Update your path
Important
Path variable needs to be updated to access “flutter” command from terminal. you can just update path variable for current terminal window only. and if you want to access flutter commands from anywhere in terminal, we need to update SDK path permanently.
You’ll probably want to update this variable permanently, so you can run flutter
commands in any terminal session. To update PATH variable, we need to open terminal.
- Run
source $HOME/.to refresh the current window, or open a new terminal window to automatically source the file. - Verify that the
flutter/bindirectory is now in your PATH by running:
GETTING STARTED (BUILD & RUN)
Important
All below steps are must be followed to build and run application
Download Project
Download and find the your project folder, use your preferred IDE (Android Studio / Visual Studio Code / IntelliJ IDEA) to run the project
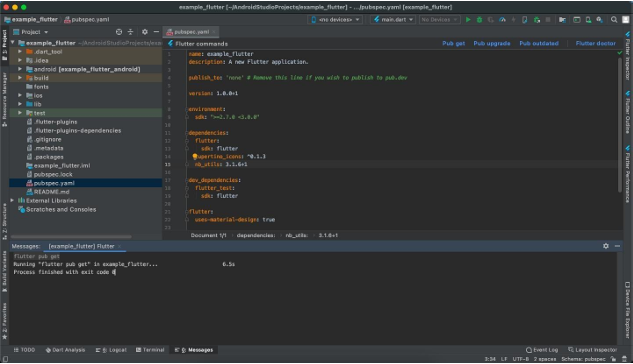
Get Dependencies
After you loaded project successfully, run the following command in the terminal
to install
all the dependencies listed in the pubspec.yaml file in the project's root
directory or just
click on Pub get in pubspec.yaml file if you don't want to use command.
Important
All below steps are must be followed to build and run application
Build and Run App
- Locate the main Android Studio toolbar.
- In the target selector, select an Android device for running the app. If none are listed as available, select Tools > Android > AVD Manager and create one there. For details, see Managing AVDs
- Click the run icon in the toolbar, or invoke the menu item Run > Run.
After the app build completes, you’ll see the app on your device.
If you don’t use Android Studio or IntelliJ you can use the command line to run your application using the following command
Important
Below step requires flutter path to be set in your Environment variables. See https://flutter.dev/docs/get-started/install/windows
You will see below like screen after you have build your app successfully.
Try hot reload
Flutter offers a fast development cycle with Stateful Hot Reload, the ability to reload the code of a live running app without restarting or losing app state. Make a change to app source, tell your IDE or command-line tool that you want to hot reload, and see the change in your simulator, emulator, or device.
Important
Do not stop your app. let your app run.
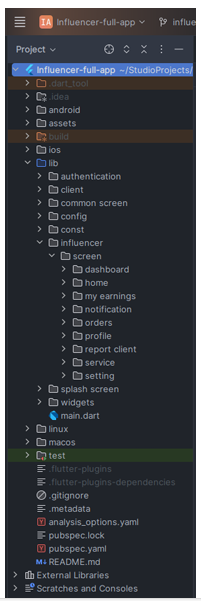
PROJECT STRUCTURE & FEATURES
- images: apps/widgets/snippets images as well as appIcon are stored here.
- lib: Application main file and folder are located here.
- Screens: Full Apps UI Code can be found here.
- Conts: Api configuration can be found here
- Constant: All constant value are located here
- Main: All the routes are been declared here.
- Pubspec.yaml: Application name and other project dependencies can be found here
Application Features
- Clean Code and a well structured project
- Single code base for both Android & iOS
- 60 FPS Support for both Android & iOS
- Fully responsive UI
- Best UI & UX
- Great animation
- Easy to customize
- Free life time updates & stunning customer support
- Easy to integrate in your project
Mobile Application Setup:
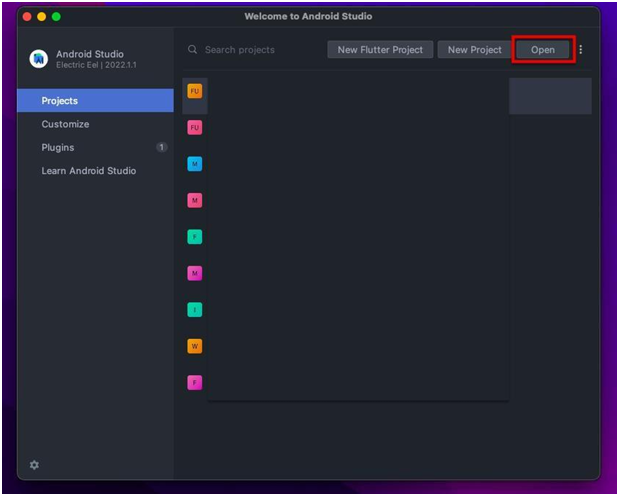
Open app in Android Studio
To modify the required settings for your POS Saas applications, you need to open it in Android Studio. Follow the steps below to open the application in android studio.
1. Open Android Studio on your machine.
2. From the Welcome to Android Studio screen, click on Open
3. Choose the Pos Saas- App / Pos Saas Web/ Pos Saas super admin directory and open it. Note that you have to set the web first. It is located at download or the folder you selected when it was downloaded from the marketplace. This will open the application source code in android studio.
Now you are ready to make the necessary changes in the application in following application files by following the guide below.
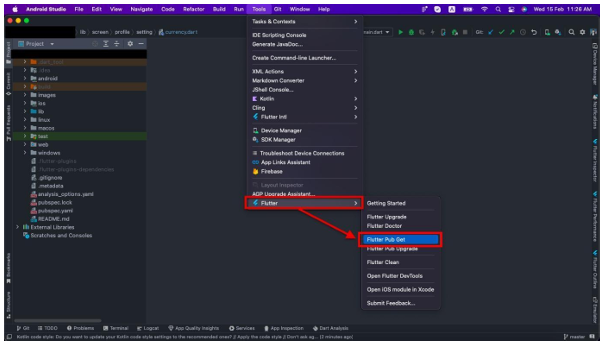
Get Flutter Packages
Now you have to open tool option from the topbar and from the opening menu you have to choose Flutter and then Flutter Pub Get & press or select that. Also if required, you have to give the sdk path, & allow for the configuration
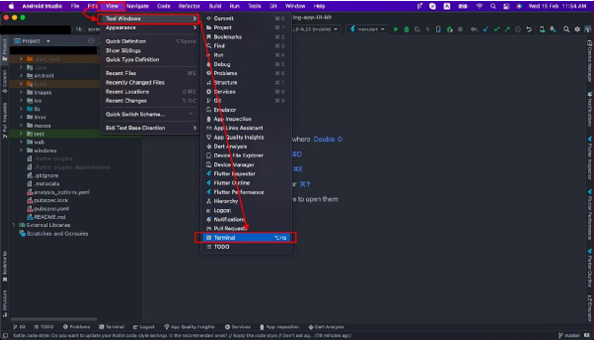
You can do it from your terminal also. For that you have to open the terminal from the topbar.
Select: View → Tool Windows → Terminal as shown in the Next figure.
Now type flutter pub get on terminal and press enter.
This will get the dependencies for the application.
Make sure that you are connected to the internet while performing this task.
Build and Run App
All below steps must be followed to build and run applications.
1. Locate the main Android Studio toolbar.
2. In the target selector (< no device selected >), select an Android device for running the app. Or if you want to run the web app select the available browser from the dropdown menu. If none are listed as available, select Tools > Android > AVD Manager and create one there. For details, see Managing AVDs.
3. Click the run icon in the toolbar, or invoke the menu item Run > Run.

After the app build completes, you’ll see the app on your device.
Update your project version

To update your project version, go to the pubspec.yaml file. And click on the Pub upgrade button at the top. It will automatically update all the packages version.Make sure your pc is connected with the internet. To update your project version and dependencies in a Flutter project, follow these steps:
- 1. Open the pubspec.yaml File:
- Locate the pubspec.yaml file in the root directory of your Flutter project.
- Open it in your preferred text editor or IDE.
- 2. Update the Project Version:
- Find the version field at the top of the pubspec.yaml file.
- Change the version number to your desired version. For example: version: 1.1.0+2
- The version format is major.minor.patch+build.
Run pub upgrade:
- Ensure your computer is connected to the internet..
- In your IDE, locate and click the Pub upgrade button. This button is typically found at the top of the editor or in the pubspec.yaml tab.
- Alternatively, you can run the following command in your terminal from the project directory:
flutter pub upgrade
This command updates all packages to the latest versions allowed by the constraints in pubspec.yaml.
Project Structure:
- assets: Apps/widgets/snippets images as well as appIcon are stored here.
- lib: Applications main files and directories are located here.
- Screen: Full app’s UI codes are stored here.
- Widget: All the reusable widgets are stored here, like(Top bar, Side bar).Also the constant file located in the folder. Where the all the colors are stored which is used to design the app.
App Setup:
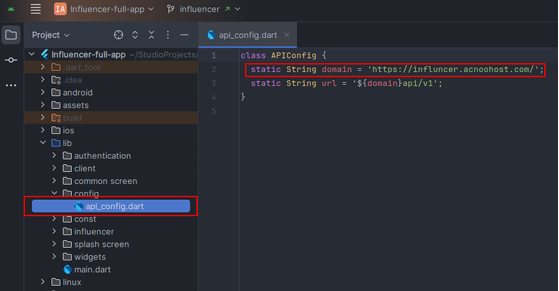
You’ll need to modify the api_config.dart file to replace the existing domain with your new one. Here’s how you can do it:
1. Open the api_config.dart file located in the /Influencer-full-app/lib/config/ directory.
2. Replace 'https://influncer.acnoohost.com/' with your new domain:
3. Make sure the new URL is correctly formatted and includes the proper protocol (https:// or http://).
Now you have to set up the firebase:
Firebase Setup
Step 1
First of all you have to go to https:console.firebase.google.com/
and click on Go to the console which is on the right side of the top bar menu.(if not signed in)

After tapping on the Go to console a new page will be open.
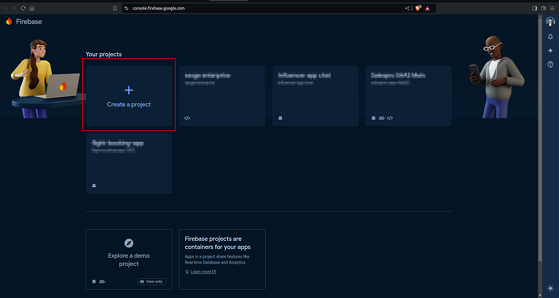
Now you have to create a new project which you want to connect with the app. Click on Create a project button to create a new one.
A screen will open like this.
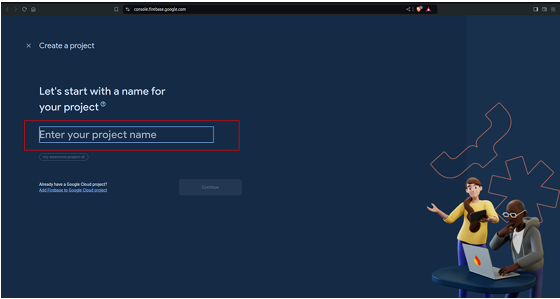
Here you have to enter a name for your project. then press continue to go to the next step.
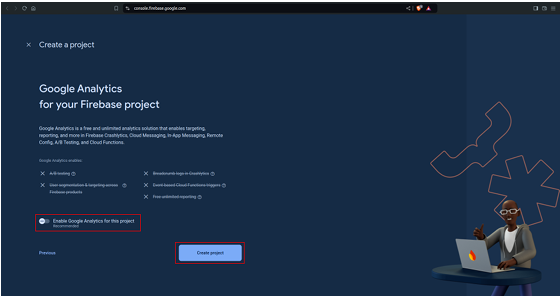
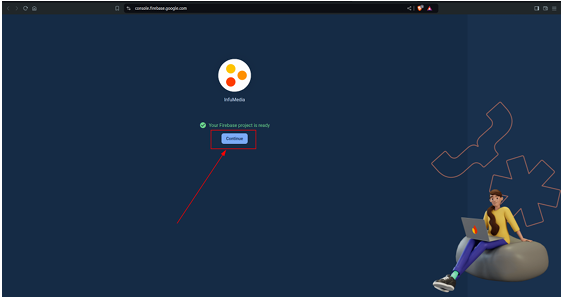
Here if you want you can enable or disable the google analytics for your project. We recommended you to disable it for now and press Create project.Here a new project is created for you. Press continue to view the project.
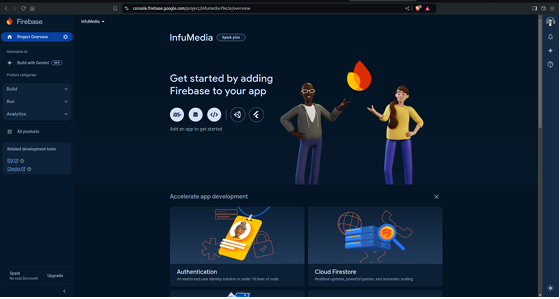
Step 2
Note: that it is required to complete all of the steps one by one before generate the credential for the app.
Now from the sidebar click on the Build section, then select the Firestore Database from the list inside the build section. This will open a screen like this.

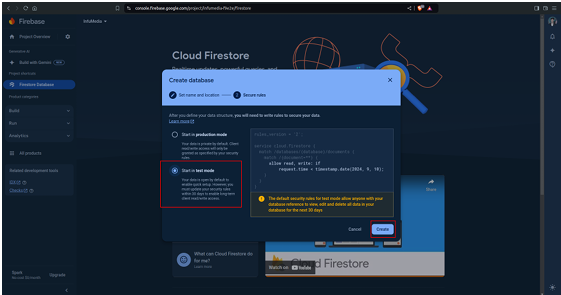
Now press on Create database and select test mode and hit the create button.
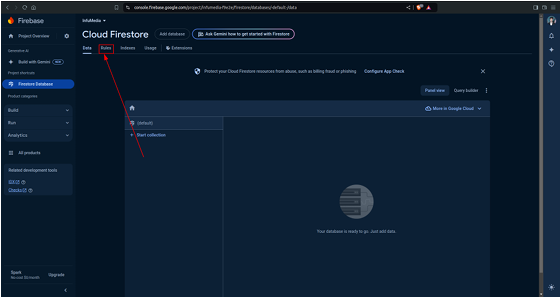
After a certain period it will create a database and open a new screen like this. Here select the Rules tab.
Now increase the timestamp as you want. And press on the Publish button.
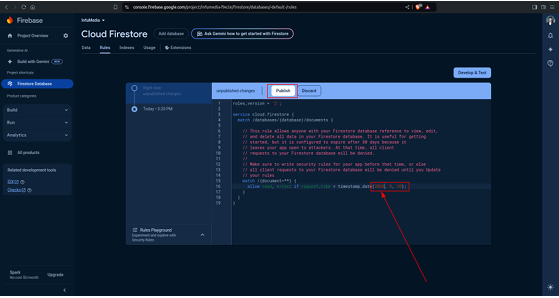
Or just remove the code from the role and paste this
                            rules_version = '2';
                            service cloud.firestore {
                                match /databases/{database}/documents {
                                    match /{document=**} {
                                        allow read, write: if true;
                                    }
                                }
                            }
Step 3
Go back to the Project overview screen and press on the android button to connect the app with firebase.
It will open a new screen like this.
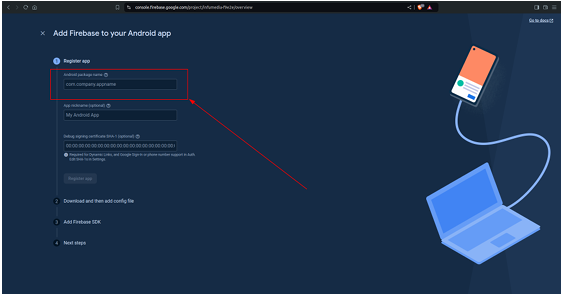
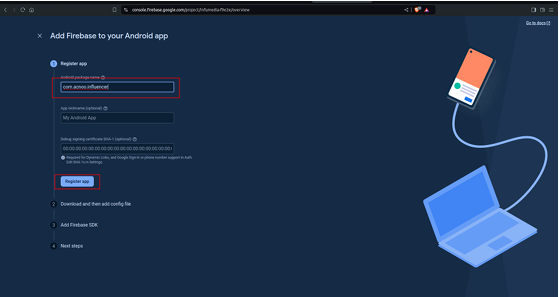
Here you have to enter the Android package name. You can find it in your app source code.
To get the Android package name open the project from your android studio or visual studio. Open the directory build.gradle.
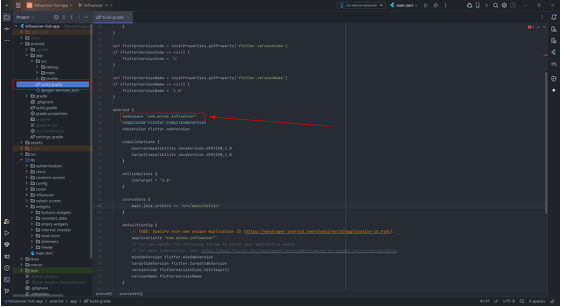
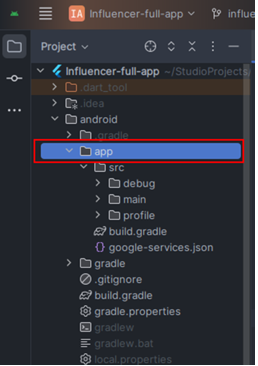
Path :/Influencer-full-app/android/app/build.gradle
Now copy the name which is inside the qotation, for example “com.acnoo.influencer” copy the text and paste it in the android package name field and press on Register app button.
A newscreen will open with a json file, which you have to download.
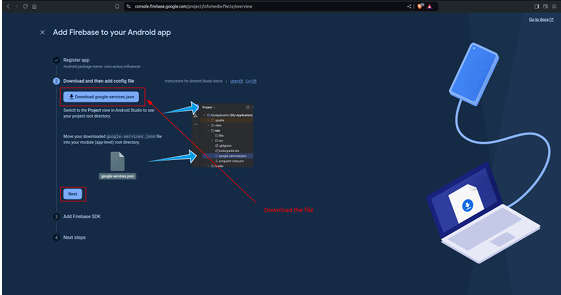
After download press on the Next button.
And again press on the Next button, it will collapse the page and will show the 4th step.
Now press on the Continue the console button.
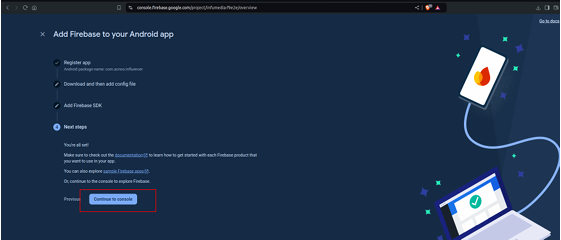
That's all. The firebase will be set up successfully
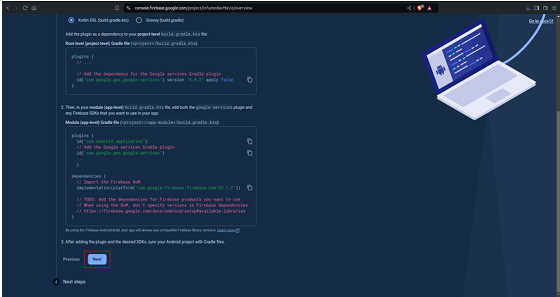
Now you have to put the downloaded google-services.json file into your app. For this copy the google-services.json And paste it to the app folder.
If you get any warning to replace it then replace the file with your new one. And the firebase setup is complete.
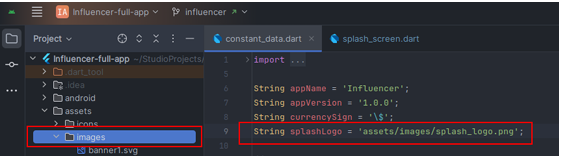
Change Splash Logo & logo inside app
Select Images:
- Choose the image that you want to use for the main logo.
- Ensure the image is appropriate and formatted correctly for the app's display requirements.
Rename Images:
- Rename the selected image with the following filenames:
- Splash logo: splash_logo.png
- Make sure to keep the file extension as .png.
Replace Existing Images:
- Locate the folder where the current logo & avatar images are stored. This is typically named images
- Copy and paste your newly renamed images into this folder.
- If prompted, allow the new images to replace the existing ones.
Restart the App:
- Close the app completely to ensure all changes take effect.
Restart the app and verify that the new onboarding images are displayed correctly. Project version Update:
Change the app name
To change the app name you have to go to the AndroidManifest.xml file.
path: Project/android/app/src/main/AndroidManifest.xml
After opening the file change the android:label =”AppName”And build the app. The App name will be changed.
Name Inside App
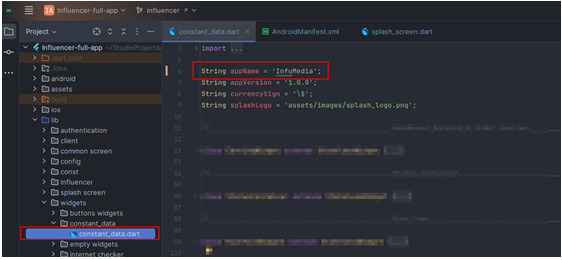
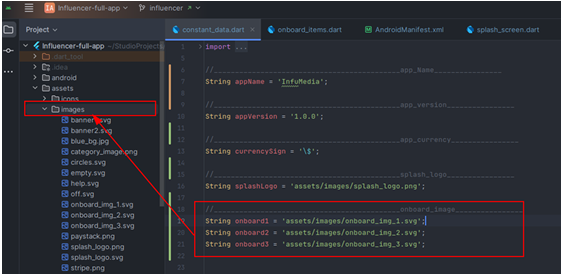
Replace the name “InfluMedia”
Path: /Influencer-full-app/lib/widgets/constant_data/constant_data.dart
Change the app logo
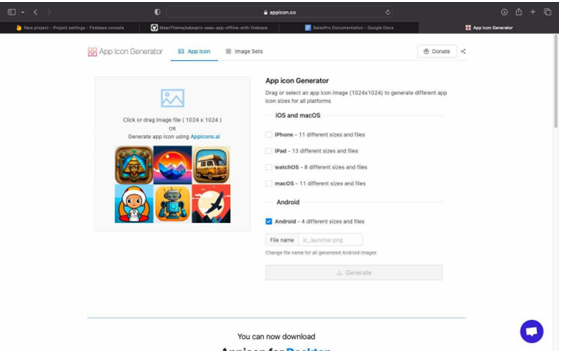
For this first you have to design a logo for your app. Then to create different sizes of logo easily, you have to go to http://appicon.co. Then drag and drop or upload your image file to the site. And select only Android from the list. No need to give any file name. And click on generate. It will generate a zip file for you.
Now Unzip the file and enter the folder.
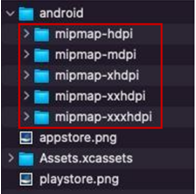
Copy marked these 5 folders. And go to the environment where the project is opened.Now from the project go to the res directory.
path: Project/android/app/src/main/res/
Now select the marked five folder and paste the folder you have copied from the zip and replace it. Now build the APK. It will show the new logo.
Change Onboarding image:

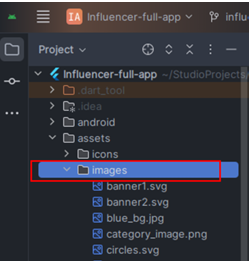
- Open images folder
Select Images:
- Choose three images that you want to use for the onboarding screens.
- Ensure the images are appropriate and formatted correctly for the app's display requirements.
Rename Images:
- Rename the selected image with the following filenames:
- First Image: onboard_img_1.svg
- SecondImage: onboard_img_2.svg
- Third Image: onboard_img_3.svg
- Make sure to keep the file extension as .svg.
Replace Existing Images:
- Locate the folder where the current onboarding images are stored. This is typically named images
- Copy and paste your newly renamed images into this folder.
- If prompted, allow the new images to replace the existing ones.
Restart the App:
- Clos ethe app completely to ensure all changes take effect.
Restart the app and verify that the new onboarding images are displayed correctly. Project version Update:
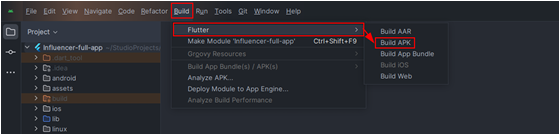
Build release apk
To build an APK, go to the menu section of your environment, then select the Build section and move the cursor on Flutter and then select the Build APK. That's all. After sometimes it will build a release APK file.
After completing the build process, go to the build directory of the main project directory. It will build a new release apk file.
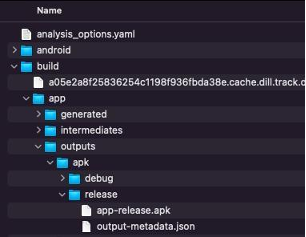
path: build/app/outputs/release
Inside the release directory you can find the release.
To publish your app in google play store you can follow this instruction:
HELP & SUPPORT
Free support policy includes troubleshooting, technical assistance with the product only. It does not include any customization, additional features integration or concerns about third- party plugins compatibility. But, support is applied to plugin(s) we have developed and integrated ourselves. We appreciate your understanding!
If you need assistance and information on purchased product that is not covered in documentation, mail them on our support at
You can expect answer within 24-48 hours, usually as soon as possible in the order they were received.
Additionally, if any email has no response from the item owner for more than 7 days, that support email will be archived by default. However, if you need further assistance, you can mail us again.
Social Media List
You can view the Social Media list with a search feature. You also have the options to edit, delete, or perform multi-deletions.
Create Social Media
Here, you can create a social media entry by simply filling out the necessary fields to complete the process.